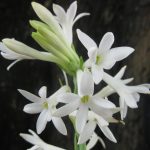

The tuberose is a plant that demands attention and specific environmental conditions to truly thrive in a garden setting. Unlike many hardy perennials, this bulbous beauty hails from warmer climates, meaning it requires a gardener’s careful eye throughout the growing season. Successful cultivation begins with understanding that this plant does not tolerate cold soil or frost at any stage of its life cycle. By committing to a consistent care routine, you ensure that the fragrant white blooms will appear in late summer to reward your efforts.
Environmental requirements and location
Choosing the right location is the absolute foundation of caring for this species, as it craves warmth and shelter above all else. You must select a spot in your garden that receives full sunlight for at least six to eight hours a day to promote vigorous flowering. If the plant is placed in a shady area, it will likely produce lush green foliage but fail to develop its signature scented spikes. Furthermore, the site should be protected from strong winds, which can easily snap the tall, slender flower stalks that emerge later in the season.
The soil temperature plays a critical role in the metabolic activity of the plant, influencing how well it absorbs water and nutrients. You should wait until the ground has thoroughly warmed up in late spring before even thinking about moving your plants outdoors. Cold soil can cause the bulbs to rot or enter a state of dormancy from which they struggle to wake up. Ideally, the ambient temperature should consistently remain above sixty degrees Fahrenheit to maintain steady growth.
Humidity is another factor that, while often overlooked, contributes to the overall health and turgidity of the leaves. While the plant originates from a region with distinct wet and dry seasons, it appreciates moderate humidity levels during its active growth phase. In exceedingly dry climates, the leaf tips may turn brown, signaling a need for slightly more ambient moisture or careful watering. However, you must avoid creating a stagnant, damp environment, as this invites fungal pathogens that can be devastating.
Finally, the spacing between plants directly impacts the airflow around the foliage, which is vital for preventing disease. When you plant them too closely together, the lack of air circulation creates a microclimate that remains wet for too long after rain or watering. You should aim to leave at least six to eight inches between each bulb to allow for unrestricted growth and air movement. This simple step in site planning significantly reduces the need for chemical interventions later in the season.
More articles on this topic
Soil composition and preparation
The ideal soil for this fragrant plant is rich, well-draining, and teeming with organic matter to support its hunger for nutrients. Heavy clay soils are the enemy of this species, as they hold water around the root zone and suffocate the sensitive bulbs. You can improve heavy soil by amending it with generous amounts of coarse sand, perlite, or composted bark to enhance drainage. The goal is to create a medium that remains moist but never soggy, allowing excess water to pass through freely.
pH levels in the soil should generally be slightly acidic to neutral, falling somewhere between 6.5 and 7.5 on the scale. If the soil is too alkaline, the plant may struggle to take up essential micronutrients like iron, leading to yellowing leaves. You should test your garden soil before planting and apply agricultural lime or sulfur if adjustments are necessary. Correcting the pH takes time, so this preparation should ideally happen weeks before the bulbs go into the ground.
Organic matter serves as a slow-release reservoir of energy that helps the plant sustain its blooming period. Incorporating well-rotted manure or finished compost into the planting bed provides a steady supply of nitrogen, phosphorus, and potassium. You should mix these amendments into the top twelve inches of soil to ensure the roots have immediate access to them. This organic base also improves soil structure, making it easier for the delicate roots to penetrate and anchor the plant.
Drainage cannot be stressed enough, as standing water is the quickest way to kill a healthy plant. If you are gardening in an area with a high water table or poor natural drainage, you should consider planting in raised beds or containers. Raised beds allow you to control the soil mixture completely and ensure that gravity helps pull excess moisture away from the roots. Even in containers, you must ensure there are adequate holes at the bottom to prevent the “wet feet” condition that leads to rot.
More articles on this topic
Staking and structural support
As the flower spikes begin to shoot upwards, they can become quite top-heavy, especially when fully laden with blooms. The slender stems are often not strong enough to support the weight of the flowers during heavy rains or gusty winds. You should proactively install stakes or supports early in the season before the root system is too extensive to be disturbed. Waiting until the plant is leaning or falling over often results in damage to the stem or the bulb itself.
Bamboo stakes are a popular and unobtrusive choice that blends well with the green foliage of the garden. You should place a stake carefully about two inches away from the base of the plant to avoid piercing the bulb underground. Use soft plant ties or garden twine to secure the stem to the stake at several intervals as it grows. Do not tie the stem too tightly, as this can strangle the plant and prevent natural movement and growth.
For gardeners with multiple plants growing in a row or a cluster, a grid support system might be more efficient than individual staking. You can stretch a mesh or netting horizontally over the bed at a height of about eighteen inches. The plants will grow through the grid, which provides collective support to the stems without the need for individual tying. This method is particularly useful for cut flower production, as it keeps the stems perfectly straight.
Regular monitoring of the supports is necessary because the plants can grow rapidly during the height of summer. You may need to add additional ties or adjust the height of the stakes as the flower spike extends. If a storm is predicted, it is wise to double-check the security of your plants to prevent heartbreak. A little preventative effort in providing structural support ensures that the visual impact of the display remains pristine.
Monitoring growth and development
Observation is a key part of the gardener’s toolkit, allowing you to catch issues before they become serious problems. You should make a habit of inspecting your plants every few days, looking at both the upper and lower surfaces of the leaves. Healthy foliage should be a vibrant, medium green color without any spots, discoloration, or deformities. Any changes in leaf color or texture can be an early warning sign of nutritional deficiencies or pest infestations.
The rate of growth can tell you a lot about whether the plant is receiving adequate water and sunlight. If the plant seems stunted or is growing significantly slower than expected, you may need to reassess its environmental conditions. Conversely, leggy, weak growth often indicates that the plant is stretching for light and needs to be moved to a brighter spot. Adjusting care routines based on these visual cues is what separates a novice gardener from an expert.
Flowering is the ultimate goal, and monitoring the development of the flower spike is particularly exciting. Once the spike emerges, you should ensure that the plant receives consistent moisture to support the expanding buds. If the soil dries out completely during this phase, the buds may drop off or fail to open properly. Watch for the first opening florets at the bottom of the spike, which signals the beginning of the blooming period.
After the blooming has finished, your observation duties do not end, as the post-bloom phase is critical for the following year. You must continue to monitor the foliage as it naturally begins to yellow and die back with the approach of autumn. This is the period when the bulb is recharging, so premature removal of leaves should be avoided. Only when the leaves have turned completely brown and papery should you consider the season over.
Seasonal timeline and adjustments
Spring care is focused entirely on preparation and patience, waiting for the right moment to plant. You generally start the bulbs indoors in pots if you live in a region with a short growing season to give them a head start. This allows the root system to establish itself before the plant has to cope with the stress of the outdoor environment. Once the danger of frost has passed, you gradually acclimatize the plants to outdoor conditions over a week.
Summer is the season of active maintenance, requiring a routine of watering, feeding, and weeding. You must be diligent about removing weeds that compete with the plant for nutrients and water in the soil. The application of a balanced liquid fertilizer every few weeks helps sustain the rapid growth and flower production. During heatwaves, you may need to increase watering frequency to prevent the plant from wilting under the intense sun.
Autumn signals the transition from active growth to dormancy, and your care routine must shift accordingly. As the temperatures drop, you should reduce watering frequency to encourage the plant to harden off. This is the time to stop fertilizing completely, as new growth produced now would be damaged by the coming cold. You need to prepare your storage area if you plan to lift the bulbs for winter protection.
Winter is the period of rest for the bulbs, which must be kept dry and cool to survive until the next season. If you live in a frost-free zone, you might be able to leave them in the ground with a thick layer of mulch. For most gardeners, however, this means storing the cleaned bulbs in peat moss or vermiculite in a frost-free location. Checking the stored bulbs monthly for rot or desiccation ensures you have viable stock for the next spring.
Troubleshooting common issues
Despite your best efforts, you may encounter yellowing leaves, which is a common complaint among growers. This symptom can be caused by overwatering, which rots the roots and prevents nutrient uptake. Alternatively, it might indicate a nitrogen deficiency, which can be corrected with a quick-release fertilizer. You must carefully analyze your recent care habits to diagnose the root cause correctly.
Failure to bloom is another frustrating issue that can usually be traced back to the previous season’s care or storage. If the bulb was not allowed to store enough energy before going dormant, it simply won’t have the reserves to flower. Similarly, planting the bulb too deeply or in a spot with insufficient light can inhibit flower production. Ensuring the bulb is large enough and healthy at planting time is the best prevention.
Dropping buds before they open is often a sign of environmental stress, such as a sudden cold snap or extreme drought. It can also be caused by thrips, tiny insects that feed on the developing flower tissues. You should inspect the buds closely for signs of insect activity if you notice this phenomenon. Maintaining consistent soil moisture helps buffer the plant against minor temperature fluctuations.
Finally, soft or mushy bulbs are a clear indication of rot, usually fungal or bacterial in nature. This is almost always fatal for the affected bulb and requires immediate removal to protect the surrounding plants. You should improve drainage in that area or plant in a different spot in the future. Prevention through proper soil preparation and watering is the only effective cure for rot.
 Flickr / Szerző: Scamperdale / Licence: CC BY-NC 2.0