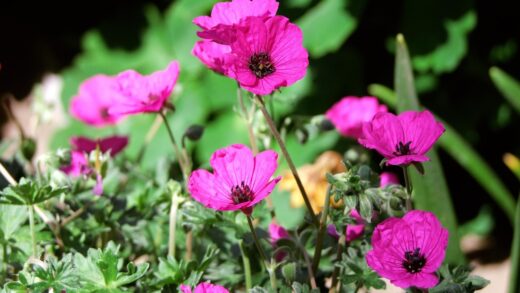
Successfully establishing Geranium x cantabrigiense in the garden begins with proper planting techniques, which are crucial for the long-term health and vigour of this exceptional perennial. The process is straightforward, reflecting the plant’s adaptable and forgiving nature, making it an excellent project for gardeners of all experience levels. Choosing the right time of year to plant is the first critical step; spring and autumn are the ideal seasons. Planting during these cooler, often moister periods allows the geranium to establish its root system without the stress of extreme summer heat or winter cold, giving it a strong foundation for future growth. When you bring your new plants home, whether they are in small pots or bare-root, ensuring they are well-hydrated before they go into the ground will help ease the transition into their new environment. Proper site preparation is equally important for getting your plants off to the best possible start. While this geranium is tolerant of a wide range of soil types, it performs best in soil that is well-drained and moderately fertile. Before planting, take the time to loosen the soil in the planting area to a depth of about 20-30 centimetres and incorporate some organic matter, such as compost or well-rotted manure. This improves the soil structure, enhances drainage in heavy soils, and increases moisture retention in sandy soils, creating an optimal rooting environment. A well-prepared bed will pay dividends in the form of healthier, more robust plants that establish quickly and thrive for years.
The actual process of planting Geranium x cantabrigiense is simple and requires just a few key steps. Dig a hole that is approximately twice as wide as the plant’s root ball but no deeper. The goal is to plant the geranium at the same depth it was growing in its nursery pot, as planting it too deeply can lead to crown rot. Gently remove the plant from its container, and if the roots are tightly coiled, carefully tease them apart to encourage them to grow outwards into the surrounding soil. Place the plant in the centre of the hole, ensuring the top of the root ball is level with the soil surface.
Once the plant is correctly positioned, backfill the hole with the amended soil, gently firming it around the root ball to eliminate any large air pockets. Air pockets can cause the roots to dry out, hindering the establishment of the plant. After backfilling, water the plant thoroughly and deeply. This initial watering is crucial as it helps to settle the soil around the roots and provides the moisture needed for the plant to begin its growth in the new location. A deep watering encourages the roots to grow downward in search of moisture, leading to a more drought-tolerant plant in the long run.
Aftercare for newly planted Cambridge cranesbill is minimal but important. For the first few weeks after planting, and especially during dry spells, monitor the soil moisture regularly and provide supplemental water as needed to keep the soil consistently moist but not waterlogged. Applying a layer of organic mulch, such as shredded bark or compost, around the base of the plant can be very beneficial. Mulching helps to conserve soil moisture, suppress weed growth, and regulate soil temperature, further reducing the stress on the new plant and contributing to its successful establishment in the garden.
Site selection and soil preparation
Choosing the right location is fundamental to the success of your Geranium x cantabrigiense. This versatile plant offers a great deal of flexibility, as it is capable of thriving in conditions ranging from full sun to partial shade. In regions with very hot summers, a location that receives some afternoon shade is ideal, as this will protect the foliage from potential scorching. In cooler climates, a sunnier spot will promote more compact growth and a more profuse flowering display. Consider the plant’s mature spread, which is typically around 45-60 centimetres, and allow adequate space for it to form its characteristic mat-like ground cover without overcrowding its neighbours.
More articles on this topic
The soil is the foundation of a healthy plant, and preparing it properly before planting is a critical step. Geranium x cantabrigiense is not particularly demanding, but it has a strong preference for well-drained soil. If your garden has heavy clay soil that tends to stay wet, it is essential to improve its drainage. You can achieve this by incorporating generous amounts of organic matter, such as compost, leaf mould, or well-rotted manure. These amendments help to break up the dense clay particles, creating better aeration and allowing excess water to drain away more freely, which is vital for preventing root rot.
For gardens with sandy soil, the challenge is often poor water and nutrient retention. Once again, organic matter is the solution. Adding compost or other decomposed organic material to sandy soil will improve its structure, acting like a sponge to hold onto moisture and nutrients for longer periods, making them available to the plant’s roots. Regardless of your soil type, a soil test can provide valuable information about its pH and nutrient levels. Geranium x cantabrigiense prefers a soil pH that is neutral to slightly alkaline, but it is tolerant of a fairly wide range.
Before you begin digging, it is also important to clear the planting area of any weeds, especially persistent perennial weeds. These can compete with your newly planted geranium for water, nutrients, and light, potentially stunting its growth. Removing them thoroughly before planting will save you a great deal of maintenance effort later on. Loosening the soil with a garden fork or tiller to a depth of at least 30 centimetres will create a friable and welcoming environment for the geranium’s roots to spread and establish themselves quickly and effectively.
Spacing and depth considerations
Proper spacing is crucial when planting Geranium x cantabrigiense to ensure it can develop into the lush, dense ground cover it is known for. It is important to consider the mature size of the plant and plan accordingly. A good rule of thumb is to space individual plants approximately 45 to 60 centimetres apart. This might look a bit sparse initially, but this geranium is a relatively fast grower, and this spacing allows each plant enough room to spread and fill in the gaps without becoming overcrowded. The goal is for the plants to knit together to form a solid mat of foliage.
More articles on this topic
Overcrowding plants can lead to several problems that can compromise their health and appearance. When plants are spaced too closely, there is increased competition for essential resources like water, nutrients, and sunlight. This can result in weaker, leggier growth as the plants stretch for light. Furthermore, poor air circulation in densely packed plantings can create a humid environment that is more conducive to the development of fungal diseases, such as powdery mildew or botrytis. Providing adequate space from the outset promotes better air movement and healthier plants.
Planting depth is another critical factor that can significantly impact the success of your geraniums. The crown of the plant, which is the point where the stems meet the roots, should be positioned right at the soil level. Planting too deeply is a common mistake that can be fatal for many perennials, including this one. When the crown is buried, it can easily rot, especially in moist conditions, leading to the decline and eventual death of the plant. It is always better to err on the side of planting slightly too high than too low.
To ensure the correct depth, dig the planting hole only as deep as the root ball of the plant. After placing the plant in the hole, double-check that the top of the root ball is flush with the surrounding soil surface. As you backfill the hole, the soil will settle slightly, so starting at the correct level is important. Gently firm the soil around the plant to provide support, but avoid compacting it too heavily. Proper spacing and depth are simple yet vital details that contribute significantly to the rapid establishment and long-term performance of Geranium x cantabrigiense in your garden.
Propagation by division
Division is the most common and effective method for propagating Geranium x cantabrigiense, and it is a wonderful way to increase your stock of plants or to share them with friends. This process also serves to rejuvenate older, established clumps that may have become woody or less vigorous in the centre. The ideal time to divide this geranium is either in early spring, just as new growth is beginning to emerge, or in early autumn, after the main heat of summer has passed. Dividing in autumn gives the new plants several weeks to establish their roots before the ground freezes.
The process of division is quite simple and requires only a few basic garden tools, such as a sturdy garden fork or spade. Begin by carefully lifting the entire clump of the geranium out of the ground. Try to dig widely around the plant to get as much of the root system as possible. Once the clump is lifted, you can gently shake off some of the excess soil to get a better view of the root structure and the individual crowns. Often, the clump can be gently pulled apart by hand into smaller sections.
For larger, more established clumps that are more densely packed, you may need to use a sharp spade, a garden knife, or two garden forks inserted back-to-back in the centre of the clump to pry it apart. Each new division should have a healthy portion of both roots and top growth (shoots or buds). Aim to create divisions that are at least 10-15 centimetres across for the best results. Discard any old, woody parts from the centre of the original clump, as these are less vigorous and will not perform as well.
Once you have your new divisions, it is important to replant them as soon as possible to prevent the roots from drying out. If you cannot replant them immediately, keep them in a shady spot and cover the roots with moist soil or a damp cloth. Plant the divisions at the same depth they were previously growing, following the same planting guidelines as for a new nursery plant. Water them in thoroughly after planting and keep them consistently moist for the next few weeks until they show signs of new growth, indicating they have successfully established themselves.
Propagation from cuttings
While division is the primary method of propagation, Geranium x cantabrigiense can also be successfully propagated from basal cuttings. This technique is best performed in the spring when the plant is producing lots of fresh, vigorous new shoots from the base. Basal cuttings are taken from the very bottom of the plant and often include a small piece of the underground rhizome, which can encourage faster rooting. This method is particularly useful if you want to produce a number of new plants without having to dig up an entire clump.
To take basal cuttings, select healthy, non-flowering shoots that are about 5-10 centimetres long. Use a sharp, clean knife to cut the shoot away from the parent plant at its base, trying to include a small sliver of the woody rhizome at the bottom of the cutting. This small piece of older tissue is rich in dormant buds and hormones that promote root development. Once you have taken your cuttings, remove the lower leaves from each one, leaving just two or three leaves at the top to reduce moisture loss through transpiration.
For the best chance of success, it is advisable to dip the base of each cutting into a rooting hormone powder or gel. This will help to stimulate the formation of new roots. Prepare a pot or tray filled with a well-draining rooting medium, such as a mix of perlite and compost or a specialized seed and cutting compost. Insert the cuttings into the medium, ensuring that the first set of leaf nodes is just below the surface. Gently firm the medium around the cuttings to hold them in place.
To create a humid environment that encourages rooting, you can cover the pot with a clear plastic bag or place it in a propagator. It is important to ensure there is still some ventilation to prevent fungal growth. Place the cuttings in a warm, bright location, but out of direct sunlight, which could scorch them. Keep the rooting medium consistently moist but not waterlogged. Roots should begin to form within a few weeks. You can check for rooting by giving a gentle tug on a cutting; if you feel resistance, it is a sign that roots have developed.


