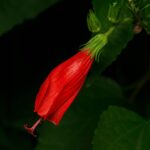
Successfully planting and propagating bouvardia is a rewarding endeavor that allows gardeners to multiply their stock and ensure the continuation of these beautiful flowering plants. The process begins with establishing a new plant, which requires careful attention to its initial placement and soil conditions to foster a strong root system. Whether starting with a nursery-bought specimen or a cutting from an existing plant, the foundational steps taken during planting are critical for its long-term health and vigor. Understanding the plant’s needs from the very beginning sets the stage for a lush, floriferous addition to your garden or home collection. This process is not overly complex, but it demands a gentle hand and an appreciation for the delicate nature of young plants.
When planting a new bouvardia, timing and location are paramount. The ideal time for planting is in the spring, after the last threat of frost has passed and the soil has begun to warm up. This allows the plant the entire growing season to establish its roots before the cooler temperatures of autumn arrive. Choose a location that receives ample bright, indirect sunlight, as direct midday sun can be too intense and may scorch the leaves. For container planting, this means selecting a spot on a patio or near a window where the light is filtered, while for garden planting, a position with morning sun and afternoon shade is often perfect.
The preparation of the planting site is the next crucial step. Bouvardia insists on exceptionally well-draining soil, so amending the planting area is often necessary. If planting in a garden bed, incorporate a generous amount of organic matter such as compost or well-rotted manure, along with perlite or coarse sand to improve the soil structure and drainage. For container planting, use a high-quality potting mix specifically formulated for flowering plants, which typically already contains ingredients to promote good aeration. The goal is to create a growing medium that retains some moisture but allows excess water to drain away freely.
The actual planting process should be handled with care to minimize stress on the plant. Dig a hole that is twice as wide and just as deep as the root ball of the bouvardia. Gently remove the plant from its nursery pot, being careful not to pull on the stem, and inspect the roots, teasing apart any that are tightly coiled. Place the plant in the center of the hole, ensuring that the top of the root ball is level with the surrounding soil surface. Backfill the hole with the prepared soil, firming it gently around the base of the plant to eliminate any large air pockets.
After planting, the final step is to water the new bouvardia thoroughly. This initial watering is crucial as it helps to settle the soil around the roots and reduces transplant shock. Provide enough water so that the entire root zone is saturated. For the first few weeks after planting, monitor the soil moisture carefully, keeping it consistently moist but not waterlogged as the plant begins to establish itself in its new environment. This initial period of attentive care is a vital investment in the future health and blooming capacity of your bouvardia.
More articles on this topic
Propagation from stem cuttings
One of the most effective and popular methods for propagating bouvardia is through stem cuttings. This technique allows you to create genetically identical clones of the parent plant, ensuring that the desirable characteristics, such as flower color and form, are preserved. The best time to take cuttings is in the late spring or early summer when the plant is in a state of active growth, as this is when the stems have the ideal balance of firmness and flexibility for successful rooting. Look for healthy, vigorous stems that are free from any signs of pests or disease.
To take a cutting, use a clean, sharp knife or pair of pruning shears to sever a 10-15 centimeter section from the tip of a non-flowering stem. It is best to make the cut just below a leaf node, which is the point on the stem where a leaf emerges, as this area contains a high concentration of hormones that encourage root development. Once you have your cutting, carefully remove the leaves from the lower half of the stem to prevent them from rotting when planted. You may also want to dip the cut end of the stem in a rooting hormone powder to further increase the chances of successful rooting.
The next step is to plant the prepared cutting in a suitable rooting medium. A light, airy mixture of perlite, vermiculite, and peat moss is ideal as it provides excellent drainage and aeration while retaining enough moisture to support the cutting. Fill a small pot or tray with this mixture, and use a pencil or dibber to make a small hole for the cutting. Insert the cutting into the hole, ensuring that the stripped nodes are below the surface, and gently firm the medium around the stem to hold it in place.
Creating a humid environment is critical for the survival of the cuttings until they develop their own root systems. You can achieve this by placing the pot inside a clear plastic bag or by covering it with a plastic dome, ensuring that the covering does not touch the leaves of the cutting. Place the container in a warm location with bright, indirect light. Check the cuttings periodically, watering the medium lightly if it begins to dry out. Roots should begin to form within four to six weeks, and you can test for this by giving the cutting a very gentle tug; if you feel resistance, roots have formed.
More articles on this topic
Propagation from root cuttings
Another viable, though less common, method for propagating bouvardia is through root cuttings. This technique can be particularly useful for rejuvenating an older plant or for creating new plants when there is a lack of suitable stem material available. Root cuttings are best taken during the plant’s dormant period in late winter or very early spring, just before new growth begins. At this time, the roots are storing a large amount of carbohydrates, which provide the necessary energy for the cutting to develop new shoots and leaves.
To take root cuttings, you must first carefully unpot the parent plant to gain access to its root system. Gently shake off the excess soil to expose the thicker, healthier roots. Using a clean, sharp blade, select a few vigorous roots and cut them into sections that are approximately 5-7 centimeters long. It is important to remember which end of the cutting was closest to the main stem (the proximal end) and which was the tip (the distal end). To avoid confusion, you can make a flat cut on the proximal end and an angled cut on the distal end.
The prepared root cuttings can then be planted in a tray or pot filled with a moist, sterile rooting medium, such as a mix of sand and peat moss. The orientation of the cutting is important for some species, but for bouvardia, horizontal placement is generally effective. Lay the root sections horizontally on the surface of the medium and cover them with a thin layer of the mix, about 1-2 centimeters deep. Alternatively, they can be inserted vertically with the proximal (flat cut) end just level with the surface of the medium.
After planting the root cuttings, water the medium lightly and place the container in a warm, protected location. Maintaining consistent moisture is important, but the medium should not be allowed to become waterlogged. A heated propagation mat can be beneficial as bottom heat often encourages faster development. New shoots should begin to emerge from the cuttings within several weeks to a couple of months. Once the new plantlets have developed a few sets of true leaves and a small root system of their own, they can be carefully separated and potted up individually into small containers.
Starting bouvardia from seed
Growing bouvardia from seed is a fascinating process, though it requires patience and may result in plants that show some variation from the parent, especially if the seeds are from a hybrid variety. Seeds can be purchased from reputable suppliers or collected from your own plants after the flowers have faded and the seed pods have matured and dried. If collecting your own, allow the pods to dry completely on the plant before harvesting them to ensure the seeds are viable. Once collected, the seeds should be sown in the spring.
To begin, prepare a seed tray or small pots with a fine, sterile seed-starting mix. Lightly moisten the mix before sowing the seeds. Bouvardia seeds are quite small and require light to germinate, so they should be sown on the surface of the medium and not buried. Gently press them onto the surface to ensure good contact with the soil. After sowing, you can lightly mist the surface with water, but be careful not to dislodge the delicate seeds.
Germination is most successful when the seeds are provided with consistent warmth and humidity. Cover the seed tray with a clear plastic lid or a plastic bag to create a mini-greenhouse effect, which helps to maintain high humidity levels. Place the tray in a warm location, ideally with a constant temperature between 21 and 24 degrees Celsius. A spot that receives bright, indirect light is also essential. Germination can be erratic, but you should expect to see the first seedlings emerge within two to four weeks.
Once the seedlings have germinated and developed their first set of true leaves (the second pair of leaves to appear), the plastic cover can be gradually removed to acclimate them to lower humidity. When the seedlings are large enough to handle, they can be carefully pricked out and transplanted into individual small pots. Continue to grow them in a bright, warm location, keeping the soil consistently moist. The young plants can then be gradually hardened off and planted in their final location once they are well-established.
Acclimatizing young plants
Whether you have propagated bouvardia from stem cuttings, root cuttings, or seeds, the young plants will need to be gradually acclimatized to their final growing environment, a process known as hardening off. This is especially crucial if the plantlets have been raised in a protected indoor or greenhouse setting and are destined for an outdoor location. This gradual transition prevents the shock that can occur from a sudden change in temperature, light intensity, and humidity, which can stunt growth or even kill the young plant.
The hardening-off process should begin about one to two weeks before you plan to plant the bouvardia in its permanent spot. Start by placing the young plants in a sheltered outdoor location, such as a covered porch or under the shade of a larger tree, for just a few hours on the first day. This initial exposure should be to a location that is protected from strong winds and direct sunlight. Bring the plants back indoors before the evening temperatures drop.
Over the next several days, gradually increase the amount of time the plants spend outdoors each day. Also, begin to expose them to short periods of more direct sunlight, preferably the gentle morning sun. Each day, you can leave them out for a little longer and in slightly more intense light, always monitoring them for any signs of stress, such as wilting or leaf scorching. If you see any negative effects, reduce the exposure for a day or two before proceeding.
By the end of the one to two-week period, the plants should be able to tolerate a full day of outdoor conditions, including several hours of the appropriate level of sunlight. They will also have adjusted to the natural fluctuations in temperature between day and night. At this point, the bouvardia plantlets are fully hardened off and ready to be transplanted into their final garden bed or container, where they will be much better equipped to handle the rigors of the outdoor environment and grow into strong, healthy plants.