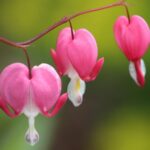
Choosing the right location is the most critical factor for the successful cultivation of the beautiful bleeding heart, a plant that thrives in specific environmental conditions. This perennial is naturally found in woodland settings, so the goal is to replicate this habitat in your garden as closely as possible. The ideal site will offer protection from the harsh afternoon sun, which can scorch its delicate, fern-like foliage and cause the vibrant flowers to fade prematurely. Look for a spot that receives partial to full shade, such as beneath the canopy of tall deciduous trees or on the north or east side of a building.
The quality of the light in the chosen location is a nuanced but important consideration. Dappled sunlight filtering through the leaves of overhead trees is perfect, providing enough light for vigorous growth and abundant flowering without the stress of direct solar radiation. While the plant is shade-tolerant, deep, dark shade should be avoided as it can lead to sparse foliage, elongated and weak stems, and a significant reduction in the number of flowers produced. A balance is necessary; the site should be bright but shaded, offering the best of both worlds for this elegant perennial.
Beyond light, the physical space and its characteristics are also key. The beautiful bleeding heart needs well-drained soil to prevent its rhizomatous roots from rotting, which is a common issue in heavy, waterlogged conditions. Before making a final decision on the location, assess the soil’s drainage by observing how water behaves after a heavy rain or by digging a test hole and filling it with water. If the water stands for an extended period, you will need to amend the soil or choose a different site with better natural drainage.
Finally, consider the plant’s mature size and its companions in the garden. This plant can form a substantial clump over time, so ensure it has enough room to spread without being crowded by other plants, which can lead to poor air circulation and an increased risk of fungal diseases. It pairs beautifully with other shade-loving plants like hostas, ferns, and astilbes, which have similar light and moisture requirements. Planning the composition of your shade garden with these factors in mind will result in a healthier, more cohesive, and visually appealing display.
Preparing the soil for planting
Proper soil preparation is a foundational step that directly impacts the long-term health and vitality of your beautiful bleeding heart. This plant performs best in soil that is rich in organic matter, consistently moist, yet well-draining. The ideal soil texture is a loam or sandy loam, but even less ideal soils, such as heavy clay or overly sandy soil, can be significantly improved with the right amendments. The primary goal is to create a root environment that is fertile, holds adequate moisture, and allows excess water to percolate away freely.
More articles on this topic
To begin the preparation process, it is advisable to clear the chosen area of all weeds and debris. Then, loosen the existing soil to a depth of at least twelve to fifteen inches using a garden fork or tiller. This deep cultivation helps to break up any compacted layers, improving both drainage and aeration, which allows the plant’s roots to grow more easily and deeply. Breaking up the soil is particularly crucial in areas with heavy clay, as it creates channels for water to move through rather than pooling around the roots.
The next, and perhaps most important, step is the incorporation of organic matter. Spread a generous layer, about three to four inches deep, of well-rotted compost, leaf mold, or aged manure over the loosened soil. This is the key to transforming your soil into the rich, humus-like medium that the beautiful bleeding heart loves. Organic matter improves soil structure by binding sandy soil particles together to improve water retention and by separating clay particles to enhance drainage. It also provides a slow, steady supply of essential nutrients as it decomposes.
Once the organic matter is spread, thoroughly mix it into the native soil. This ensures that the amendments are evenly distributed throughout the future root zone of the plant. After amending, it is also a good time to check the soil pH. The beautiful bleeding heart prefers a slightly acidic to neutral pH, typically between 6.0 and 7.0. You can use a simple soil test kit to determine your pH level and, if necessary, add amendments like elemental sulfur to lower the pH or lime to raise it, following the product instructions carefully.
The process of planting
The best time to plant a beautiful bleeding heart, whether it is a bare-root specimen or a container-grown plant, is in the spring or early autumn. Planting during these cooler, often moister seasons allows the plant to establish a strong root system without the stress of extreme heat. Spring planting gives the plant a full growing season to settle in, while autumn planting in warmer climates allows the roots to grow before the ground freezes, giving it a head start for the following spring’s growth. Avoid planting during the heat of mid-summer, as this can be very stressful for a new transplant.
More articles on this topic
When you are ready to plant, dig a hole that is approximately twice as wide as the plant’s root ball and just as deep. The extra width is important as it provides loosened soil for the new roots to spread into easily. Create a small mound of soil in the center of the hole. If you are planting a bare-root specimen, carefully spread the fragile roots out over this mound. For a container-grown plant, gently remove it from its pot, being careful not to damage the root ball, and lightly tease apart any circling roots at the bottom.
Position the plant in the hole so that the crown—the point where the stems emerge from the roots—is at or just slightly below the level of the surrounding soil. Planting too deeply can lead to crown rot, a serious issue for this plant, while planting too high can cause the roots to dry out. Once the plant is correctly positioned, begin backfilling the hole with the amended soil you prepared earlier. Gently firm the soil around the roots as you go to eliminate any large air pockets, which can dry out the roots.
After the hole is completely backfilled, the final and most crucial step is to water the plant thoroughly. Provide a deep, slow soaking to help settle the soil around the roots and to provide the moisture the plant needs to begin establishing itself. This initial watering is critical for ensuring good contact between the roots and the soil. Following planting, applying a two-inch layer of organic mulch around the base of the plant, being careful not to cover the crown, will help to conserve soil moisture and suppress weed growth.
Propagation through division
Propagating the beautiful bleeding heart is most effectively done through division, a process that not only creates new plants but also helps to rejuvenate older, overcrowded clumps. The ideal time to divide this perennial is in the early spring, just as the new growth is beginning to emerge but before it has fully leafed out. Alternatively, division can also be done in the early autumn after the foliage has died back, giving the new divisions time to establish roots before winter. Dividing during these times minimizes stress on the plant.
To begin the process, you will need to carefully excavate the entire plant clump from the ground. Use a sharp spade or garden fork to dig around the perimeter of the plant, making sure to go deep enough to get under the entire root system. Once you have loosened the soil all the way around, gently lift the entire clump out of the ground. Be as gentle as possible during this process to minimize damage to the fleshy, brittle roots, which are the plant’s energy storage organs.
Once the clump is lifted, gently shake or wash off the excess soil so you can clearly see the root structure and the “eyes” or growth points on the crown. The goal is to separate the clump into smaller sections, each with at least one or two prominent growth points and a healthy portion of the root system attached. You may be able to pull some sections apart by hand. For tougher, more established clumps, you will need to use a sharp, sterilized knife or a spade to make clean cuts through the crown.
Immediately after dividing, it is important to replant the new sections to prevent the delicate roots from drying out. Plant them at the same depth as they were previously growing, in a well-prepared site with amended soil, following the same planting procedures as for a new plant. Water the newly planted divisions thoroughly to settle the soil and provide necessary moisture. The new plants may take a season to become fully established, but with proper care, they will soon grow into healthy, mature specimens, rewarding you with their unique and charming flowers.
Propagation from seeds
Growing the beautiful bleeding heart from seed is a rewarding but more challenging and time-consuming process compared to division. The seeds of this plant have a complex dormancy mechanism that requires a specific sequence of conditions to be met before germination will occur. This process, known as double dormancy, requires both a warm, moist period followed by a cold, moist period to break down the seed coat and trigger the embryo’s growth. This mimics the natural conditions the seeds would experience when they fall to the forest floor.
To start the process, you should sow the seeds as soon as they are ripe, which is typically in early summer when the seed pods have turned brown and begun to split open. You can sow them directly in a prepared seedbed in a shady part of the garden or in pots. If using pots, fill them with a sterile, well-draining seed starting mix. Sow the seeds on the surface of the mix and lightly cover them with a thin layer of soil or fine grit. Water gently to ensure the medium is moist but not waterlogged.
The key to success is providing the necessary stratification periods. The sown seeds should be kept in a warm place, around 68-75 degrees Fahrenheit (20-24 degrees Celsius), for about six to eight weeks. During this time, it is crucial to keep the soil consistently moist. After this warm period, the seeds need to undergo a cold stratification period. If you have sown the seeds outdoors, this will happen naturally over the winter. If you are growing them in pots, you can move the pots to a cold frame, an unheated garage, or even place them in a plastic bag in the refrigerator for another six to eight weeks.
After the cold period, as temperatures begin to warm up in the spring, germination should occur. This can be an erratic process, with some seeds sprouting while others may take another full year to germinate, so patience is essential. Once the seedlings have developed their first set of true leaves and are large enough to handle, they can be carefully transplanted into individual pots or into a sheltered spot in the garden to grow on. It is important to remember that plants grown from seed may take several years to reach flowering size.


