Successfully establishing spiraea in the garden landscape begins with a solid understanding of proper planting techniques and the various methods of propagation. While these shrubs are known for their forgiving nature, providing them with the right start is paramount to ensuring their long-term health, vigor, and abundant flowering. The process is more than simply digging a hole; it involves careful site selection, meticulous soil preparation, and precise placement of the plant to encourage a strong root system. By mastering these fundamental steps, a gardener can lay the groundwork for a beautiful and resilient shrub that will thrive for years. This initial investment of time and effort pays significant dividends in the form of a low-maintenance and highly rewarding garden feature.
Beyond initial planting, the ability to propagate spiraea opens up a world of possibilities for expanding a garden collection or sharing plants with others. Propagation is a cost-effective and deeply satisfying way to create new plants from an existing favorite specimen. Whether through the simple division of a mature clump or the more technical process of taking cuttings, creating new life from an established plant connects the gardener to the natural cycles of growth and renewal. Understanding the principles behind these methods empowers the gardener to not only maintain their landscape but to actively shape and multiply its beauty.
The journey from a bare-root shrub or a small cutting to a fully established, flowering plant is a testament to horticultural practice. Each step, from the timing of the planting to the preparation of the rooting medium, plays a critical role in the outcome. This article will delve into the essential details of both planting new spiraea and propagating them, providing the practical knowledge needed for success. It will cover everything from the ideal seasons for these activities to the step-by-step procedures that encourage rapid establishment and healthy new growth, ensuring a seamless transition for the plant into its new environment.
Ultimately, the goal of both planting and propagation is to create a healthy, self-sufficient plant. A spiraea that is planted correctly will quickly develop a robust root system capable of sourcing its own water and nutrients from the surrounding soil. Similarly, a successfully propagated cutting will transition from a dependent state to an independent, rooted plant. This process of fostering independence is at the heart of good gardening, setting the stage for a plant that not only survives but truly flourishes in its intended space.
Optimal site selection and preparation
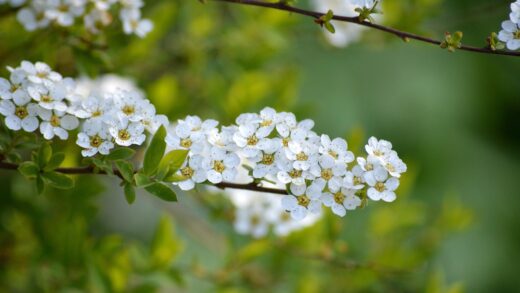
The first and most critical step in successfully planting a spiraea shrub is choosing the right location. Spiraea are sun-loving plants and will produce the most abundant flowers and display the best foliage color when planted in a location that receives at least six hours of direct sunlight per day. While they can tolerate partial shade, their flowering may be reduced, and the overall form can become more open and leggy as the plant stretches towards the light. Therefore, for a dense, floriferous shrub, full sun exposure is the ideal condition to aim for in the garden.
More articles on this topic
Equally important as sunlight is the quality of the soil, with good drainage being a non-negotiable requirement. Spiraea despise ‘wet feet’ and will quickly succumb to root rot if left in waterlogged, compacted soil. To assess the drainage of a potential planting site, you can perform a simple percolation test. Dig a hole about a foot deep and fill it with water; if the water has not drained away within a few hours, it indicates poor drainage that must be addressed. In such cases, it is necessary to amend the soil heavily with organic matter or consider planting in a raised bed to improve the conditions.
Once an appropriate site has been selected, thorough preparation of the planting area is essential. This involves clearing the area of all weeds, grass, and large rocks that could compete with the new shrub for water and nutrients. The planting hole itself should be dug to be at least twice as wide as the plant’s root ball but no deeper. The adage “dig a fifty-dollar hole for a five-dollar plant” holds true here; the extra width allows the new roots to easily penetrate the surrounding soil and establish themselves more quickly. Loosening the soil on the sides of the hole further encourages this outward root growth.
Before placing the plant in the hole, it is beneficial to incorporate a generous amount of organic matter, such as compost or well-rotted manure, into the backfill soil. This enriches the soil, improves its structure, and provides a gentle source of nutrients for the establishing plant. Avoid adding high-nitrogen synthetic fertilizers directly into the planting hole, as this can burn the delicate new roots. Proper site selection and meticulous soil preparation are foundational efforts that will significantly influence the spiraea’s ability to thrive from day one.
The process of planting
The timing of planting spiraea can have a significant impact on its successful establishment. The ideal times to plant are in the spring, after the last frost has passed, or in the early autumn. Planting in the spring allows the shrub the entire growing season to develop a strong root system before winter arrives. Autumn planting also works well, as the warm soil encourages root growth while the cooler air temperatures reduce stress on the foliage. Avoid planting during the peak heat of summer, which can cause significant transplant shock and require intensive watering to keep the plant alive.
More articles on this topic
When you are ready to plant, carefully remove the spiraea from its nursery container. If the plant is pot-bound, meaning the roots are densely wrapped in a tight circle, it is crucial to gently tease them apart or score the root ball in several places with a sharp knife. This encourages the roots to grow outwards into the new soil rather than continuing to circle, which can ultimately girdle and kill the plant. For bare-root specimens, soak the roots in a bucket of water for a few hours before planting to ensure they are well-hydrated.
Place the shrub in the center of the prepared hole, making sure that the top of the root ball is level with or slightly above the surrounding ground level. Planting too deeply is a common mistake that can lead to crown rot and other health issues. Once you are satisfied with the depth, begin backfilling the hole with the amended soil, gently firming it down around the root ball to eliminate any large air pockets. These air pockets can cause roots to dry out, so ensuring good soil-to-root contact is essential for the plant’s survival.
After the hole is completely backfilled, create a shallow basin or ‘berm’ of soil around the perimeter of the planting area. This basin will act as a reservoir, helping to direct water to the root zone and prevent runoff during irrigation. Water the newly planted spiraea thoroughly and deeply, allowing the water to soak in and settle the soil around the roots. This initial watering is critical for hydrating the plant and eliminating any remaining air pockets. The plant’s successful transition into the landscape depends heavily on this careful and methodical planting process.
Propagation through cuttings
One of the most reliable and popular methods for propagating spiraea is through softwood cuttings. This technique is best performed in late spring or early summer when the plant’s new growth is still flexible but mature enough to hold its shape when bent. Using a clean, sharp pair of pruning shears or a knife, select healthy, vigorous stems from the current season’s growth. The ideal cutting should be about four to six inches long and taken from the tip of a branch that has not yet flowered.
Once the cuttings have been taken, they must be prepared for rooting. Remove the leaves from the lower half of the cutting, as any leaves left below the soil line would rot. It is also a good practice to make a fresh, angled cut at the base of the stem, just below a leaf node, as this is where roots naturally tend to form. To increase the chances of successful rooting, you may dip the bottom inch of the cutting into a powdered or liquid rooting hormone. This hormone encourages faster and more robust root development.
The prepared cuttings should be inserted into a sterile, well-draining rooting medium. A mixture of equal parts peat moss and perlite or sand works very well for this purpose. Fill small pots or a tray with the medium, moisten it thoroughly, and then use a pencil or dibber to create planting holes. Insert each cutting about one to two inches deep into the medium, ensuring that the remaining leaves are above the surface. Gently firm the medium around the base of each cutting to provide support.
To create the humid environment that softwood cuttings need to root, cover the pot or tray with a clear plastic bag or a propagation dome, making sure the plastic does not touch the leaves. Place the cuttings in a warm location with bright, indirect light, avoiding direct sun which can scorch the delicate leaves. Check the cuttings periodically, misting them with water to maintain humidity and ensuring the medium stays consistently moist but not soggy. Roots should begin to form within four to six weeks, at which point the new plants can be gradually acclimated to normal growing conditions.
Propagation by division and layering
For spiraea varieties that form clumps or spread via suckers, division is an excellent and straightforward method of propagation. This process is best carried out in the early spring before new growth begins or in the autumn after the leaves have dropped. Division not only creates new plants but also serves to rejuvenate an older, overgrown clump, improving its vigor and flowering performance. The process involves carefully digging up the entire plant, taking care to preserve as much of the root ball as possible.
Once the shrub is out of the ground, use a sharp spade, garden fork, or pruning saw to divide the root ball into several smaller sections. Each section must have a healthy portion of both roots and top growth (canes or buds) to be viable. The size of the divisions can vary, but generally, splitting a large clump into two or three smaller plants is a good practice. Replant these new divisions immediately at the same depth they were previously growing, and water them in thoroughly to help them settle into their new location.
Layering is another simple yet highly effective propagation technique that can be used for spiraea with flexible, low-growing branches. In the spring, select a long, healthy stem that can be easily bent down to touch the ground. At a point about six to twelve inches from the tip of the branch, wound the stem slightly by scraping off a small section of the outer bark. This wounding encourages the formation of roots at that spot.
Bend the wounded section of the stem down to the ground and secure it in place with a piece of bent wire or a rock. Cover the wounded portion with soil, leaving the tip of the branch exposed to the air. Keep the soil around the layered section consistently moist throughout the growing season. By autumn, or certainly by the following spring, roots should have formed from the buried section of the stem. At this point, the new plant can be severed from the parent plant and transplanted to a new location in the garden.