Successfully establishing a Scots pine in the landscape begins long before the tree is placed in the ground. It requires careful planning, from selecting a healthy specimen and an appropriate site to preparing the soil to meet its specific needs. Proper planting techniques are fundamental to the tree’s long-term survival and vigor, as mistakes made at this early stage can lead to a lifetime of poor growth and health problems. Similarly, understanding the methods of propagation, whether from seed or through vegetative means, opens up possibilities for cultivating this versatile conifer for reforestation, landscaping, or as a rewarding horticultural project. By mastering these foundational skills, you provide the best possible start for a tree that can become a landmark for generations.
The journey to a magnificent Scots pine starts with choosing the right tree from the nursery. Look for a specimen with a strong, straight central leader and well-spaced branches that form a balanced structure. The needles should be a healthy blue-green color, without any signs of yellowing, browning, or spotting, which could indicate disease or stress. It is also important to inspect the root system; for container-grown trees, avoid those that are severely root-bound, where a dense mat of roots circles the inside of the pot. A healthy root system is key to the tree’s ability to establish itself quickly in its new environment.
The principles of planting are centered on creating an environment that allows the root system to expand and access water and nutrients efficiently. This means digging a wide but not overly deep planting hole and carefully managing the transition from the nursery container to the native soil. The single most common and fatal planting error is setting the tree too deep in the ground. The point where the roots begin to flare out from the trunk must be positioned at or slightly above the surrounding soil level. Planting too deeply suffocates the roots and can lead to collar rot at the base of the trunk.
Propagation offers a deeper connection to the life cycle of the Scots pine. Growing a tree from a seed collected from a local, well-adapted parent tree can be a particularly gratifying experience, resulting in a plant that is perfectly suited to the regional climate. While seed propagation requires patience, it is the most common method for this species. Vegetative methods like grafting are more specialized, typically used to clone specific cultivars with desirable characteristics, such as a unique growth habit or needle color, ensuring that the new plant is genetically identical to the parent. Each method has its own set of techniques and challenges to master.
Preparing the ideal planting location
The selection and preparation of the planting site are critical first steps that will dictate the future success of the Scots pine. As a sun-loving species, the chosen location must receive a minimum of six to eight hours of direct sunlight per day. An open area with good air circulation is also paramount to prevent the development of fungal diseases on the needles. You should consider the tree’s mature size, which can be substantial, ensuring it is planted well away from buildings, overhead power lines, and other trees to avoid future conflicts. A location with an open northern or eastern exposure is often ideal.
More articles on this topic
Once a sunny, open site has been identified, the next step is to evaluate and prepare the soil. The Scots pine demands well-drained, acidic soil and will not tolerate “wet feet” or heavy, compacted clay. To assess drainage, dig a test hole about 30 centimeters deep and wide, fill it with water, and time how long it takes to drain away. If the water is still standing after four or five hours, the drainage is inadequate. In such cases, you will need to either choose a different site or take significant steps to improve the soil structure over a large area, not just in the planting hole.
To improve poorly draining soil, you should amend a wide area, at least two to three times the diameter of the future root ball. Incorporate materials that improve porosity and structure, such as coarse sand, composted pine bark, or small gravel. This process, known as creating a raised bed or berm, effectively lifts the root zone above the surrounding waterlogged soil. It is crucial to avoid the temptation of simply adding sand or gravel to the bottom of the planting hole, as this can create a “bathtub effect,” where water collects and saturates the root ball, leading to root rot.
The final step in site preparation is to clear the area of any competing vegetation, such as grass or weeds. These plants compete with the young pine for water, nutrients, and sunlight, which can significantly slow its establishment. Clear a circle at least one meter in diameter around the planting spot. After planting, this cleared area should be covered with a layer of organic mulch. This will not only suppress weed growth but also help to retain soil moisture and moderate soil temperature, creating an optimal environment for the new roots to grow and establish themselves.
Step-by-step guide to planting container-grown and bare-root saplings
Planting a container-grown Scots pine requires careful handling to ensure a smooth transition from the pot to the ground. The first step is to dig a planting hole that is two to three times wider than the container but no deeper than the depth of the root ball. The width of the hole is important because it loosens the surrounding soil, making it easier for the roots to penetrate and expand. Before placing the tree in the hole, gently remove it from the container and inspect the root system. If the roots are densely packed or circling the bottom of the pot, it is essential to tease them apart or make several vertical cuts through the root mass to encourage outward growth.
More articles on this topic
Once the root ball is prepared, place the tree in the center of the hole, ensuring that the top of the root ball is level with or slightly above the surrounding ground level. Use a straight edge, like a shovel handle, placed across the hole to accurately check the depth. Backfill the hole with the native soil that was removed, breaking up any large clumps. It is generally not recommended to add rich compost or fertilizer directly into the planting hole, as this can discourage the roots from growing out into the less fertile native soil. Gently firm the soil around the root ball as you backfill to eliminate any large air pockets.
After backfilling, create a shallow basin or “berm” of soil around the edge of the planting hole. This will help to contain water and direct it down to the root ball during the initial establishment period. Water the newly planted tree thoroughly, applying the water slowly to allow it to soak in deeply and settle the soil around the roots. For the first few weeks, and throughout the first growing season, it is crucial to monitor soil moisture and water the tree deeply whenever the top few centimeters of soil become dry.
Planting bare-root saplings, which are typically available in the spring while dormant, follows a slightly different process. Upon arrival, the roots must be kept moist and cool until planting. For planting, create a mound of soil in the center of the wide planting hole. Spread the roots out evenly over the mound, ensuring they are not bent or J-hooked. The planting depth is again critical; look for the color change on the trunk that indicates the original soil line and ensure it is level with the ground. Backfill carefully, working the soil in around the roots to remove air pockets, and water thoroughly as you would for a container-grown tree.
Seed propagation: from collection to germination
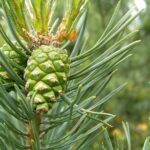
Propagating Scots pine from seed is a rewarding process that begins with the collection of mature cones. The cones take two years to mature and are ready for collection in the autumn or winter of their second year, once they have turned a grayish-brown color but before they have opened to release their seeds. Collect cones from healthy, vigorous trees that display desirable characteristics. Once collected, the cones need to be dried in a warm, well-ventilated location to encourage them to open. Placing them in a paper bag on a sunny windowsill or near a gentle heat source will usually cause the scales to separate, allowing the winged seeds to be shaken out.
After extraction, the seeds need to undergo a period of cold, moist stratification to break their natural dormancy. This process mimics the winter conditions they would experience in nature. To stratify the seeds, mix them with a slightly damp medium like sand, peat moss, or vermiculite, and place the mixture in a sealed plastic bag or container in the refrigerator. This cold period should last for at least 30 to 60 days. It is important that the medium is only slightly damp, not wet, to prevent the seeds from rotting during this time.
Following stratification, the seeds are ready for sowing. Prepare a seed tray or small pots with a well-draining, sterile seed-starting mix. A mix of peat moss, perlite, and sand is an excellent choice. Sow the seeds on the surface of the medium and cover them lightly with a thin layer of the mix or fine grit, no deeper than the thickness of the seed itself. Gently water the tray and place it in a location that receives bright, indirect light and maintains a consistent temperature. Covering the tray with a clear plastic dome can help to maintain the high humidity needed for germination.
Germination should occur within a few weeks to a month. During this time, it is crucial to keep the growing medium consistently moist but not waterlogged. As the seedlings emerge, provide good air circulation by removing the plastic dome for part of the day to prevent damping-off disease. Once the seedlings have developed their first set of true needles and are large enough to handle, they can be carefully transplanted into individual pots to continue growing. They should be grown in these pots for at least one to two years before they are large enough and strong enough to be planted out in their final landscape position.
Vegetative propagation: grafting and cuttings
While seed propagation is common for the species, vegetative propagation methods like grafting are essential for reproducing specific cultivars of Scots pine. Cultivars are selected for unique traits such as a weeping habit, dwarf size, or unusual needle coloration, and these traits are not reliably passed on through seeds. Grafting involves joining a piece of the desired cultivar, known as the scion, onto the root system of a common Scots pine seedling, known as the rootstock. This process creates a new plant that has the hardy, well-adapted root system of the seedling but the desirable above-ground characteristics of the cultivar.
The success of grafting depends heavily on timing, technique, and compatibility between the scion and rootstock. The most common time to graft pines is in the late winter or very early spring when both the scion and rootstock are dormant. The scion wood, which is a cutting from the previous season’s growth, should be collected from the upper part of a healthy parent tree. The rootstock should be a healthy, well-established seedling, typically two to three years old. The most frequently used technique for pines is the side-veneer graft, where a sliver of bark and wood is removed from both the rootstock and the scion to expose the cambium layers, which are then aligned and bound tightly together.
After the graft is made, the newly joined plant requires a specific environment to heal and form a successful graft union. The grafted plants are typically placed in a greenhouse or a cold frame where high humidity can be maintained. This prevents the scion from drying out before the vascular tissues of the two parts have fused together. The healing process can take several weeks to a few months. Once the scion shows signs of new growth, it is an indication that the graft has taken. At this point, the top of the rootstock above the graft union is gradually cut back to direct all the plant’s energy into the growth of the scion.
Propagating Scots pine from cuttings is significantly more difficult than grafting and is not a commercially viable method for this species. While some success can be achieved under highly controlled laboratory or nursery conditions with the application of strong rooting hormones and mist systems, the success rate is generally very low. The cuttings have a natural reluctance to form roots. Therefore, for the home gardener or professional looking to reproduce a specific cultivar, grafting remains the standard and most reliable method of vegetative propagation for the Scots pine.
Essential aftercare for newly established pines
The care provided in the first few years after planting is critical for the long-term health and successful establishment of a Scots pine. The most important task during this period is to ensure the tree receives adequate water. The soil around the root ball should be kept consistently moist, but not saturated, throughout the first and second growing seasons. This typically means providing a deep, slow watering once or twice a week during periods without significant rainfall. This consistent moisture is vital for encouraging the roots to grow out of the original root ball and into the surrounding native soil, which is the key to establishment.
Maintaining a proper mulch layer around the base of the young pine is another essential aftercare step. A 5 to 10 centimeter layer of organic mulch, such as pine bark or wood chips, should be spread in a wide circle around the tree, extending out to the drip line. This mulch layer serves multiple purposes: it helps to conserve soil moisture by reducing evaporation, it suppresses the growth of competing weeds and grass, and it insulates the soil, protecting the new roots from extreme temperature fluctuations. Critically, the mulch should be pulled back a few centimeters from the trunk itself to prevent moisture from accumulating against the bark, which could lead to rot.
Protecting the young tree from physical damage is also paramount. The thin bark of a young Scots pine is easily damaged by lawnmowers, string trimmers, and animal browsing. Creating a wide mulch ring eliminates the need to operate machinery close to the trunk. If deer or other browsing animals are a problem in your area, installing a protective tree guard or a fence around the sapling may be necessary for the first several years until the tree’s main leader has grown beyond their reach. Any wounds to the trunk can create entry points for diseases and insects and can severely impact the tree’s health.
Finally, you should monitor the young tree for any signs of stress, such as yellowing needles, stunted growth, or pest infestations. Staking is generally not necessary or recommended for Scots pines unless the site is extremely windy or the root ball is unstable. If staking is required, it should be done with flexible materials that allow the trunk to sway, and the stakes should be removed after the first year to allow the tree to develop its own supportive trunk taper. Avoid any significant pruning during the first few years, other than removing any broken or clearly dead branches, to allow the tree to maximize its energy production through its foliage.
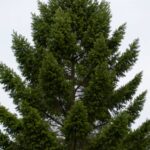
📷 Arnstein Rønning, CC BY 3.0, via Wikimedia Commons