The successful establishment of a Golden Rain Tree begins with a meticulous planting process and a clear understanding of its propagation methods. This tree, celebrated for its adaptability and ornamental qualities, can be introduced to the landscape either as a nursery-grown specimen or propagated from seed or cuttings. The foundation for a healthy, long-lived tree is laid at the moment of planting, where careful attention to site selection, soil preparation, and planting technique is paramount. Following the correct procedures ensures the root system establishes quickly, minimizing transplant shock and setting the stage for vigorous growth. Similarly, understanding the principles of propagation allows gardeners to multiply this exceptional tree, whether for expanding a personal collection or sharing with others.
Proper preparation before planting is as crucial as the planting act itself. The first step involves selecting a high-quality, healthy tree from a reputable nursery. Inspect the young tree for any signs of disease, pests, or physical damage. It should have a well-developed central leader and a balanced branch structure. If the tree is container-grown, check the root system to ensure it is not pot-bound, where roots are densely circling the inside of the container; if it is, these roots will need to be gently loosened or scored before planting. For balled-and-burlapped trees, ensure the root ball is firm and has been kept moist.
The timing of planting significantly influences the tree’s ability to establish successfully. The ideal times to plant a Golden Rain Tree are in the early spring, after the last frost has passed, or in the early autumn. Spring planting allows the tree an entire growing season to develop a strong root system before the onset of winter cold. Autumn planting, on the other hand, allows the roots to establish in the cool, moist soil before the ground freezes, giving the tree a head start for the following spring. Avoid planting in the heat of mid-summer, as this can cause significant stress and water loss for the newly installed tree.
Before digging the planting hole, it is essential to have a clear plan for the tree’s location, taking into account its mature size and environmental needs. The Golden Rain Tree requires a location with full sun and well-drained soil. It is also important to be aware of any underground utilities; contacting your local utility locating service before digging can prevent dangerous and costly mistakes. Proper spacing is key—ensure the tree is planted far enough away from buildings, driveways, and other trees to allow its canopy to reach its full 9 to 12-meter spread without interference.
Selecting the ideal planting site
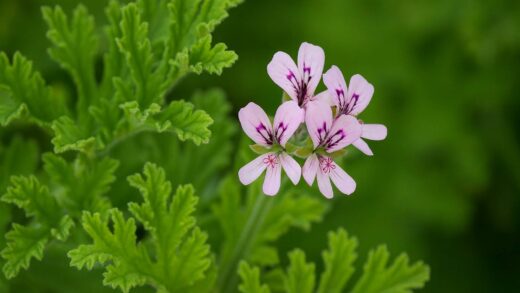
The selection of an appropriate planting site is the single most important factor determining the long-term health and success of a Golden Rain Tree. The primary consideration is light exposure. This species thrives and flowers most prolifically in full, direct sunlight, meaning it needs a minimum of six hours of unobstructed sun each day. A location that is shaded by other trees or buildings will result in sparse foliage, a leggy and weak growth habit, and a significant reduction in the spectacular summer flower display for which the tree is known. Therefore, an open area with southern or western exposure is typically the best choice.
More articles on this topic
A thorough analysis of the soil at the proposed site is the next critical step. The Golden Rain Tree is adaptable to various soil textures, but it absolutely requires good drainage. To test the drainage, dig a hole about 30 centimeters deep and fill it with water. If the water has not drained away within 12 hours, the site may have a drainage problem that needs to be addressed. In such cases, you may need to choose a different location or take steps to improve the soil structure by incorporating organic matter or creating a raised bed to elevate the root zone above the saturated soil level.
Beyond light and drainage, you must consider the spatial requirements of the mature tree. A Golden Rain Tree will grow to be a medium-sized tree with a broad, rounded crown. It is crucial to plant it where it will have room to grow to its full potential without causing future conflicts. This means keeping it a safe distance—at least 6 to 8 meters—from houses, sheds, and utility lines. Also, consider its proximity to patios, sidewalks, and driveways. While its roots are not typically problematic, the tree does drop flowers and seed pods, which can create a temporary mess on hard surfaces.
Finally, evaluate the microclimate of the potential planting site. Even within a single property, conditions can vary. A location sheltered from harsh, prevailing winter winds can be beneficial, especially for young trees or in colder climates at the edge of its hardiness range (USDA Zone 5). Conversely, ensuring good air circulation around the tree can help to reduce the incidence of fungal diseases. Taking the time to observe and analyze these site-specific factors before planting will pay dividends in the form of a healthier, more resilient, and lower-maintenance tree for years to come.
The proper planting process
Once the ideal site has been chosen and prepared, the next phase is the physical act of planting the tree correctly. The guiding principle is to create a welcoming environment for the roots to expand into the surrounding soil. Begin by digging a planting hole that is two to three times wider than the diameter of the tree’s root ball, but no deeper than the root ball itself. The wide, shallow hole encourages the roots to grow outwards into the native soil. It is a common and detrimental mistake to dig the hole too deep, as this can cause the tree to settle over time, leading to the root flare being buried, which can promote disease and girdling roots.
More articles on this topic
Carefully remove the tree from its container or burlap wrapping. If it is in a plastic pot, gently tap the sides to loosen the soil and slide the tree out, supporting the base of the trunk. If the roots are tightly coiled, use your fingers or a small tool to gently tease them apart and score the sides of the root ball in a few places with a sharp knife to encourage outward growth. For balled-and-burlapped trees, place the entire ball into the hole and then cut away and remove all the twine, wire basket, and as much of the burlap as possible. Any burlap left in place can inhibit root growth.
Place the tree in the center of the hole, ensuring that the top of the root ball—the point where the trunk begins to flare out into the roots—is level with or slightly above the surrounding ground level. Use a straight edge, like a shovel handle, placed across the hole to verify the correct depth. Once the tree is positioned correctly, begin backfilling the hole with the original soil that was removed. It is generally not recommended to amend the backfill soil with large amounts of compost or other rich materials, as this can create a “container effect,” discouraging the roots from growing beyond the enriched hole into the less fertile native soil.
After backfilling the hole about halfway, gently tamp the soil to remove any large air pockets and water thoroughly to help the soil settle around the roots. Finish backfilling the hole, and then create a shallow saucer or berm of soil around the outer edge of the planting hole to help retain water over the root zone. Water the newly planted tree again, deeply and slowly, to ensure the entire root ball is saturated. This initial watering is critical for settling the soil and providing the tree with the moisture it needs to begin recovering from the stress of transplanting.
Propagation from seed
Propagating the Golden Rain Tree from seed is a patient but rewarding process that allows for the creation of numerous new plants. The process begins with the collection of viable seeds, which are found inside the distinctive, lantern-like papery capsules that form after the summer flowering period. The capsules should be harvested in the autumn once they have dried to a tan or brownish color and the small, black, pea-like seeds inside are hard and mature. The seeds can be easily extracted by breaking open the brittle pods.
The seeds of Koelreuteria paniculata have a hard seed coat and exhibit a type of dormancy known as double dormancy, requiring both scarification and stratification to germinate successfully. Scarification involves breaking, scratching, or softening the seed coat to allow water to penetrate. A common method is to use hot water: bring water to a boil, remove it from the heat, and drop the seeds in to soak for 24 hours. Alternatively, you can carefully nick the seed coat with a file or sandpaper, being cautious not to damage the embryo inside.
After scarification, the seeds must undergo a period of cold, moist stratification to break their internal dormancy. This process mimics the natural winter conditions that the seeds would experience outdoors. To achieve this, mix the scarified seeds with a moist medium like sand, peat moss, or vermiculite. Place the mixture in a labeled, sealed plastic bag or container and store it in a refrigerator at a temperature of around 1-5°C for a period of 60 to 90 days. It is important to check the mixture periodically to ensure it remains moist but not waterlogged.
Once the stratification period is complete, the seeds are ready for sowing. Plant the seeds about one centimeter deep in pots or trays filled with a well-draining seed-starting mix. Place the containers in a warm, bright location, such as a greenhouse or under grow lights, and keep the soil consistently moist. Germination can be slow and sometimes erratic, but you should begin to see seedlings emerge within a few weeks to a couple of months. The young seedlings can then be grown on in their pots until they are large enough to be transplanted into the garden.
Post-planting and initial care of young trees
The care provided in the first few years after planting is crucial for the long-term health and successful establishment of a Golden Rain Tree. The most important task during this period is to ensure consistent and adequate watering. The root system is still developing, making the young tree more vulnerable to drought stress than a mature specimen. For the first two growing seasons, provide a deep watering once or twice a week during dry periods, allowing the soil to dry slightly between waterings. This encourages the roots to grow deeper in search of moisture, building a more resilient root system.
Applying a layer of organic mulch around the base of the newly planted tree is highly beneficial. A 5- to 10-centimeter layer of shredded bark or wood chips will help conserve soil moisture, regulate soil temperature, and prevent weed competition. Create a doughnut-shaped ring of mulch around the tree, extending it out to the edge of the original planting hole. It is critically important to keep the mulch from piling up directly against the trunk, as this can trap moisture and lead to bark decay and fungal diseases.
In some situations, staking may be necessary to provide temporary support for a young tree, especially in windy locations or if the tree has a large canopy relative to its root ball. If staking is required, use two or three stakes placed outside the root ball and attach the tree to them using wide, flexible materials like canvas straps or rubber tubing to avoid damaging the bark. The goal is to allow the trunk some movement, which helps it develop strength. The stakes should be removed as soon as the tree is stable enough to support itself, typically after one growing season.
Finally, protect the young tree from potential threats. The thin bark of a young Golden Rain Tree is susceptible to damage from lawnmowers and string trimmers, so maintaining a mulch ring creates a helpful protective barrier. In areas with deer or rabbit populations, a trunk guard or temporary fencing may be needed to prevent them from browsing on the foliage or rubbing their antlers against the trunk. Minimal pruning is needed in the first year, but you can remove any branches that were broken during the planting process. Focus on providing these basic needs to help your young tree thrive.
📷 Flickr / Szerző: Plant Image Library / Licence: CC BY-SA 2.0