Successfully establishing lantana in your garden begins with proper planting techniques that cater to its fundamental needs for sun and drainage. This vibrant plant, celebrated for its clusters of colorful flowers, is remarkably easy to grow once you provide it with the right start in life. The initial planting process is a critical moment that sets the stage for a season of vigorous growth and prolific blooming. By paying close attention to soil preparation, spacing, and the planting depth, you can ensure your new lantana develops a robust root system quickly, which is the key to its future resilience and drought tolerance. This foundational step is arguably the most important interaction you will have with the plant all year.
Propagation offers an exciting and cost-effective way to multiply your lantana collection, allowing you to fill garden beds or share this wonderful plant with fellow enthusiasts. Whether you choose to propagate from cuttings or seeds, the process is straightforward and yields gratifying results with a little patience. Propagating from cuttings is the most common and reliable method, as it creates a genetic clone of the parent plant, ensuring the new plants will have the exact same flower color and growth habit. This technique is particularly useful for preserving the traits of specific hybrid cultivars that may not grow true from seed.
Understanding the timing for both planting and propagation is crucial for success. The best time to plant new lantana outdoors is in the spring, after all danger of frost has passed and the soil has had a chance to warm up. This gives the plant the entire growing season to become well-established before the cooler temperatures of autumn arrive. Similarly, the optimal time for taking cuttings is during the active growing season, from late spring to late summer, when the stems are vigorous and have a higher chance of rooting successfully.
Ultimately, both planting and propagation are about creating new life and expanding the beauty of your garden. The minimal effort required to plant a new lantana or to root a few cuttings is rewarded tenfold by the season-long display of color and the constant activity of butterflies and other pollinators it attracts. These simple horticultural practices connect you more deeply with the lifecycle of your plants and provide a tangible sense of accomplishment as you watch them take root and flourish under your care.
Selecting the ideal planting site
The success of your lantana hinges on choosing the perfect location from the very beginning. Sunlight is the most critical factor, as this plant is a true heliophile, meaning it thrives in and requires intense light. You should select a spot in your garden that receives at least six to eight hours of direct, unfiltered sun each day. A sun-drenched location will fuel the plant’s energy production, leading to strong stems, dense foliage, and, most importantly, a profusion of vibrant flower clusters. A lack of sufficient sunlight will result in a leggy, sparse plant with few, if any, blooms.
More articles on this topic
Beyond sunlight, soil drainage is the next most important consideration. Lantana has a strong aversion to “wet feet” and is highly susceptible to root rot in waterlogged conditions. Therefore, you must choose a site with soil that drains well. If you have heavy clay soil that tends to retain water, you will need to amend it by incorporating organic matter such as compost, aged pine bark, or coarse sand to improve its structure and porosity. Raised beds can also be an excellent solution in areas with chronically poor drainage.
While it is adaptable to a range of soil types, lantana performs best in soil that is not overly rich or fertile. In fact, excessively fertile soil can stimulate the plant to produce an abundance of lush green leaves at the expense of flowers. This makes it an ideal candidate for those less-than-perfect spots in the garden where other, more demanding plants might fail to thrive. It tolerates sandy and rocky soils with ease, so long as the drainage is adequate.
Finally, consider the mature size of the specific lantana variety you are planting. Some are compact, mounding types perfect for the front of a border or containers, while others can grow into large, sprawling shrubs. Read the plant tag carefully and provide enough space for it to reach its full potential without overcrowding its neighbors. Good spacing not only allows the plant to develop a natural, attractive shape but also promotes good air circulation, which is key to preventing fungal diseases.
The step-by-step planting process
Once you have selected and prepared the perfect site, the actual process of planting your lantana is simple and straightforward. Begin by digging a hole that is approximately twice as wide as the nursery pot the plant came in and just as deep. The extra width is important as it loosens the surrounding soil, making it easier for the new roots to penetrate and expand outward. It is generally not necessary to add fertilizer to the planting hole, as this can sometimes burn the delicate new roots.
More articles on this topic
Carefully remove the lantana from its container by gently squeezing the sides of the pot and turning it upside down while supporting the base of the plant with your other hand. If the plant is root-bound, meaning the roots are densely wrapped in a tight circle, it is crucial to tease them apart gently with your fingers or make a few vertical cuts through the root ball with a sharp knife. This encourages the roots to grow out into the new soil rather than continuing to circle in on themselves, which would inhibit the plant’s ability to establish.
Place the plant in the center of the hole, ensuring that the top of its root ball is level with the surrounding ground. Planting too deep can lead to stem rot, while planting too high can cause the root ball to dry out too quickly. Once you are satisfied with the depth, begin backfilling the hole with the native soil you removed. Firm the soil gently around the root ball with your hands to eliminate any large air pockets, which can dry out roots and hinder their growth.
The final and most critical step is to water the newly planted lantana thoroughly. Provide a deep, slow soaking that completely saturates the root ball and the surrounding soil. This initial watering helps to settle the soil around the roots, eliminating any remaining air pockets and providing the moisture needed to reduce transplant shock. For the first few weeks, continue to water regularly to keep the soil consistently moist but not waterlogged, until the plant begins to show signs of new growth.
Propagation from stem cuttings
Propagating lantana from stem cuttings is an incredibly reliable and popular method for creating new plants that are identical to the parent. The best time to take cuttings is from late spring to mid-summer when the plant is in a state of active growth. You will need a sharp, sterile pair of pruning shears or a knife, a small pot with drainage holes, and a well-draining rooting medium such as a mix of perlite and peat moss or coarse sand. Sterilizing your cutting tool is important to prevent the transfer of diseases to the parent plant and the new cutting.
Select a healthy, vigorous stem from the parent plant that has no flowers or buds. The ideal cutting should be a softwood or semi-hardwood section from the tip of a branch. Make a clean cut to remove a piece of stem about 10-15 centimeters long, cutting just below a leaf node (the point where a leaf emerges from the stem). Carefully strip off the leaves from the lower half of the cutting, as this is the portion that will be inserted into the rooting medium, and leaving leaves below the soil line can lead to rot.
To increase the chances of successful rooting, you may dip the cut end of the stem into a rooting hormone powder or gel. While this step is not strictly necessary for an easy-to-root plant like lantana, it can significantly speed up the process and lead to a more robust root system. Tap off any excess powder before planting. Gently insert the bottom half of the cutting into the prepared pot of rooting medium, ensuring the leaf nodes you stripped are buried.
Place the potted cutting in a warm location with bright, indirect light, and water the medium thoroughly. To create a humid environment that encourages rooting, you can cover the pot with a clear plastic bag or the top half of a plastic bottle, making sure the cover does not touch the leaves of the cutting. Keep the medium consistently moist but not soggy. Roots should begin to form within three to four weeks, which you can test for by giving a very gentle tug on the cutting; if you feel resistance, roots have formed.
Growing lantana from seed
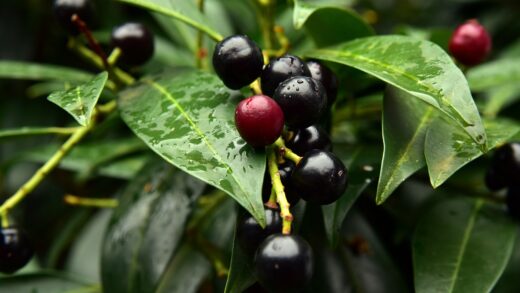
While propagation from cuttings is more common for preserving specific cultivars, growing lantana from seed can be a rewarding experience, especially if you are not concerned with obtaining an exact replica of the parent plant. You can purchase seeds from a supplier or collect them from your own plants, but be aware that seeds from hybrid varieties may not produce plants that are true to type. The seeds are found within the small, dark berries that form after the flowers fade; they must be fully ripe (dark purple or black) before harvesting.
Before sowing, it is crucial to prepare the seeds properly. The fleshy pulp of the berry contains germination inhibitors and should be removed completely. You can do this by mashing the ripe berries and washing them in a sieve under running water until only the clean seeds remain. After cleaning, it is often beneficial to scarify the hard seed coat to improve germination rates. Gently rub the seeds with a piece of fine-grit sandpaper or nick them with a knife to allow water to penetrate more easily.
Sow the seeds indoors about six to eight weeks before your last expected frost date. Fill seed trays or small pots with a sterile, well-draining seed-starting mix. Plant the seeds about 3-5 millimeters deep, cover them lightly with the mix, and water gently to moisten the soil. To aid germination, you can place the seed tray on a heat mat to keep the soil temperature consistently warm, around 21-24°C.
Germination can be slow and somewhat erratic, sometimes taking anywhere from two weeks to over a month. Keep the soil consistently moist throughout this period, and provide plenty of bright, indirect light once the seedlings emerge. After the seedlings have developed their second set of true leaves, they can be transplanted into individual pots to grow larger. Harden them off by gradually exposing them to outdoor conditions for a week or two before planting them in the garden after the danger of frost has passed.
📷 Flickr / Szerző: Mauricio Mercadante / Licence: CC BY-NC-SA 2.0