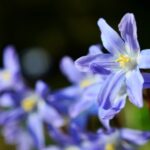
Brimeura amethystina, commonly known as the amethyst hyacinth, is a delicate and charming bulbous perennial that can bring a touch of understated elegance to any garden setting. Originating from the mountainous regions of the Pyrenees and the Balkans, this plant is admired for its loose racemes of bell-shaped flowers, which typically appear in late spring. Despite its refined appearance, it is a surprisingly resilient and low-maintenance plant, making it an excellent choice for both novice and experienced gardeners. Understanding its natural habitat and growth cycle is the fundamental first step towards providing the optimal conditions for it to thrive and naturalize over time, rewarding the gardener with an increasing display of its beautiful blue or white blossoms year after year.
The amethyst hyacinth belongs to the Asparagaceae family, a lineage it shares with more common garden plants like hyacinths and scillas, though it possesses its own unique character. Its slender, grass-like leaves emerge in early spring, forming a subtle clump from which the delicate flower stalks rise. Each stalk is topped with a cluster of up to fifteen nodding, bell-shaped flowers, creating a visual effect that is more airy and graceful than that of its denser hyacinth relatives. This subtle beauty makes it a perfect candidate for rock gardens, woodland edges, or for interplanting with other spring-blooming perennials where it can provide a soft splash of color without overwhelming the composition.
Understanding the plant’s annual growth cycle is paramount for its successful long-term care. The bulbs begin to stir from dormancy in the cool, moist conditions of early spring, sending up foliage to begin the process of photosynthesis. Flowering occurs in late spring to early summer, after which the plant’s energy is directed towards replenishing the bulb for the following season. As summer progresses and temperatures rise, the foliage will naturally begin to yellow and wither, signaling the onset of its dormant period. It is absolutely crucial to allow this process to complete naturally, as cutting the leaves back prematurely will deprive the bulb of the energy it needs to survive and produce flowers the next year.
To truly succeed with the amethyst hyacinth, one must aim to replicate the conditions of its native alpine meadows. This means providing a location that is sunny but not scorchingly hot, and soil that is gritty and exceptionally well-drained. These plants are accustomed to a period of cool, moist weather during their growth phase, followed by a warmer, drier summer dormancy. By keeping these environmental cues in mind, a gardener can create a micro-environment where the amethyst hyacinth not only survives but flourishes, establishing strong colonies that will persist for many years. Proper care is less about intensive intervention and more about providing the right foundational setting from the start.
Essential environmental factors
The foundation of successful amethyst hyacinth cultivation lies in the soil composition, which must prioritize drainage above all else. These bulbs are highly susceptible to rot if they are left in soil that remains waterlogged, especially during their summer dormancy. An ideal soil mix would be a sandy or gritty loam that allows water to pass through freely while still retaining enough moisture to support the plant during its active growth in spring. Gardeners with heavy clay soils will need to amend their planting areas significantly to create a suitable environment. This preparation is a one-time investment that will pay dividends in the health and longevity of the plants for years to come.
More articles on this topic
Improving soil structure for the amethyst hyacinth often involves the incorporation of various amendments. Adding coarse horticultural sand, fine grit, or perlite can dramatically improve the porosity of heavy soils, creating the air pockets and drainage channels that the bulbs require. Organic matter is also beneficial, but it should be well-decomposed, such as leaf mould or mature compost. This helps to create a friable, nutrient-rich medium without making the soil overly heavy or moisture-retentive. The goal is to achieve a balanced substrate that feels light and crumbles easily in your hand, signaling that it will not compact and suffocate the delicate root system.
The interplay of sunlight and shade is another critical factor to consider when siting these plants. Brimeura amethystina thrives in a position that receives full sun for at least the morning and early afternoon, especially in cooler climates. This exposure to sunlight is vital for photosynthesis, which powers the development of strong bulbs and prolific flowering. However, in regions with very hot summers, a location with some light afternoon shade can be beneficial, as it helps to protect the plant from excessive heat stress as it begins to enter its dormant phase. An ideal spot might be on a sunny, sloped rockery or at the edge of a deciduous woodland, where it receives ample spring sun before the tree canopy leafs out.
Finally, do not underestimate the importance of good air circulation around the plants. Densely packed plantings in stagnant, humid air can create a microclimate that is conducive to the development of fungal diseases such as botrytis. Ensuring there is adequate spacing between clumps of amethyst hyacinths and neighboring plants allows foliage to dry quickly after rain or irrigation, significantly reducing the risk of pathogens taking hold. This is particularly important in damp spring weather when the foliage is lush and most vulnerable. Proper airflow is an invisible but essential component of preventative care for these charming bulbs.
Watering practices throughout the year
The guiding principle for watering amethyst hyacinths is to maintain consistent moisture during their active growth period and then to allow for a distinct dry period during their summer dormancy. When the first signs of green shoots appear in the spring, the soil should be kept lightly and evenly moist, similar to a wrung-out sponge. This ensures the developing leaves and flower stalks have the water they need to expand and grow vigorously. Avoid letting the soil dry out completely for extended periods at this stage, as it can stunt growth and lead to smaller, less impressive floral displays. Regular monitoring of the soil moisture is key to success.
More articles on this topic
The frequency of irrigation will depend heavily on your specific climate, soil type, and whether the bulbs are planted in the ground or in containers. In a garden bed with well-draining soil, natural rainfall might be sufficient in many temperate climates, with supplemental watering needed only during prolonged dry spells in spring. For bulbs grown in containers, which dry out much more quickly, you will need to check the soil moisture every few days. A simple test is to insert your finger into the top inch of the soil; if it feels dry, it is time to water thoroughly, allowing the excess to drain away completely.
A crucial shift in watering strategy must occur once the flowering period has finished and the foliage begins to naturally turn yellow. This is the signal that the plant is preparing for dormancy, and it is at this point that you should significantly reduce and eventually cease supplemental watering. Continuing to irrigate heavily during this transition can interfere with the bulb’s natural curing process and dramatically increases the risk of bulb rot. The goal is to mimic the dry summer conditions of its native habitat, allowing the bulb to rest and ripen in warm, relatively dry soil.
The consequences of improper watering, particularly overwatering, are severe and often irreversible for Brimeura amethystina. Excess moisture, especially in poorly drained soil, displaces oxygen from the root zone, creating an anaerobic environment where fungal and bacterial pathogens thrive. This leads to bulb rot, which manifests as a soft, mushy, and often foul-smelling bulb. Once rot has set in, the bulb is typically lost. It is therefore always better to err on the side of caution and water less frequently, especially if you are unsure, as the bulbs are far more tolerant of a brief period of dryness than they are of persistent wetness.
Nutritional support for vibrant blooms
Unlike many other garden perennials, the amethyst hyacinth has relatively modest nutritional requirements and is not a heavy feeder. In fact, excessive fertilization can be more detrimental than providing no supplemental nutrients at all, as it can encourage lush, soft foliage at the expense of flowers and may even lead to bulb rot. If the bulbs are planted in soil that has been well-prepared with a moderate amount of organic matter like leaf mould or mature compost, they may not require any additional feeding for several years. The primary focus should be on creating healthy soil biology rather than applying concentrated chemical feeds.
When you do decide to provide a nutritional boost, it is critical to select the right type of fertilizer. The ideal choice is a balanced or low-nitrogen formula, often one specifically designed for bulbs. A fertilizer high in nitrogen will stimulate weak, leafy growth that is more susceptible to pests and diseases, and it can inhibit the proper development of the flower buds. Instead, look for a product with a higher proportion of phosphorus (P) and potassium (K), which support strong root development, disease resistance, and the formation of robust, healthy bulbs that will produce abundant flowers in the following season.
The timing of fertilizer application is just as important as the type of fertilizer used. The best time to feed amethyst hyacinths is in the early spring, just as the new growth is emerging from the soil. This provides a readily available source of nutrients that the plant can utilize during its most active phase of growth and flowering. Applying a slow-release granular bulb food at this time is an excellent strategy, as it will release nutrients gradually over several weeks. A light top-dressing of bone meal worked into the soil surface in autumn can also be beneficial, providing a slow source of phosphorus for root development over the winter.
For those who prefer an organic approach, there are several excellent alternatives to synthetic fertilizers. A light application of well-rotted compost or leaf mould around the base of the plants in early spring provides a gentle source of nutrients and also helps to improve soil structure. Bone meal is a classic organic amendment for bulbs, offering a slow-release source of phosphorus. Another option is a liquid feed made from comfrey or seaweed, diluted to half-strength and applied once or twice during the early spring growth phase. These organic methods support the overall health of the soil ecosystem, which in turn benefits the plants in a sustainable way.
Post-bloom and dormancy care
One of the most critical aspects of caring for amethyst hyacinths, and indeed for most spring-flowering bulbs, occurs after the flowers have faded. It is absolutely essential to resist the temptation to tidy up the plant by cutting back the foliage while it is still green. These leaves are the plant’s engine for photosynthesis, and they spend the weeks after flowering capturing solar energy and converting it into starches and sugars. This energy is then transferred down into the bulb, where it is stored to fuel the next year’s growth and flowering cycle. Removing the leaves prematurely is akin to taking away the bulb’s food source.
The process of foliage dieback, known as senescence, should be allowed to proceed at its own pace. The leaves will gradually turn from green to yellow, and then to a dry, papery brown as the plant systematically reabsorbs all the mobile nutrients from them. Only once the leaves are completely withered and have detached easily from the base with a gentle tug should they be removed. During this period, the plant may look somewhat untidy, so it is a good horticultural practice to plant Brimeura amongst later-emerging perennials whose own foliage can help to mask the declining leaves of the bulbs.
While allowing the foliage to die back is non-negotiable, the question of whether to deadhead the spent flower stalks is more nuanced. Removing the flower stalks once the blooms have faded prevents the plant from expending energy on seed production. This redirects all of the plant’s resources into bulb development, which can result in larger, more robust bulbs and a more impressive floral display the following year. To deadhead, simply snip the flower stalk off at its base, being careful not to damage any of the remaining green leaves.
Managing the dormant period correctly is the final piece of the post-bloom care puzzle. Once the foliage has died back, the bulb enters a state of rest throughout the summer. During this time, the primary requirement is for the soil to remain on the drier side. This is why excellent drainage is so critical; the bulb needs to be in warm, well-aerated soil, not cool, damp soil. Avoid irrigating the area where the bulbs are planted unless there is an extreme and prolonged drought. For most temperate climates, natural conditions will be sufficient to see the bulb safely through its dormancy until it begins to stir again with the arrival of autumn rains and cooler temperatures.
Long-term management and rejuvenation
Over several years, a single planting of amethyst hyacinths will multiply and develop into a dense clump. While this initial expansion is a welcome sign of a healthy and happy plant, eventually the clump can become overcrowded. This increased competition for resources such as water, nutrients, and light can lead to a noticeable decline in the number and size of the flowers produced. When you observe that your once-prolific patch of Brimeura is producing more leaves than flowers, it is a clear indication that the time has come to lift and divide the bulbs to restore their vigor.
The ideal time to undertake the task of dividing the bulbs is during their summer dormancy period, after the foliage has completely died back. This typically falls between late summer and early autumn. Performing the division while the bulbs are dormant minimizes the stress on the plant and gives the newly separated bulbs ample time to establish their root systems before the onset of winter. Attempting to divide them while they are in active growth can damage the foliage and roots, setting them back significantly and likely sacrificing the following year’s flowering.
The process of division is straightforward. Use a garden fork or a hand trowel to carefully lift the entire clump from the ground, taking care to dig wide and deep enough to avoid spearing the bulbs themselves. Once the clump is out of the soil, gently crumble the earth away and you will see how the original bulbs have produced numerous smaller offset bulbs, known as bulbils. These can be carefully separated from the parent bulbs by hand; they should break apart quite easily. As you separate them, take the opportunity to inspect all the bulbs, discarding any that feel soft, mushy, or show signs of disease.
Once separated, the healthy bulbs are ready for immediate replanting. You can either replant the larger, parent bulbs back in the original location after amending the soil with some fresh compost, or you can use the division as an opportunity to start new colonies in other parts of the garden. Plant the bulbs at a depth of approximately two to three times their own height and space them several inches apart to allow for future growth. The smaller offset bulbs may not be large enough to flower in their first year, but with proper care, they will mature and begin blooming within a couple of seasons, effectively and economically increasing your stock of these delightful plants.