The terms “pruning” and “cutting back” as they apply to love-in-a-mist are used in a fundamentally different context than for shrubs, trees, or perennial plants. As a delicate, single-stemmed annual that completes its life cycle in one season, it does not require pruning for size, shape, or structural health. Instead, any cutting that is performed on this plant serves one of three specific purposes: to prolong the flowering period through deadheading, to harvest the beautiful flowers for fresh arrangements, or to gather the unique and decorative seed pods for dried floral crafts. Understanding these distinct objectives is key to interacting with the plant in a way that enhances its beauty and utility, both in the garden and in the home, without interfering with its natural and graceful life cycle.
It is crucial to recognize that love-in-a-mist has a finite lifespan and a natural growth habit that does not benefit from traditional pruning techniques. Cutting back the main stem in an attempt to make it bushier, for instance, is not effective and will likely just sacrifice the primary and most significant flower. The plant’s charm lies in its airy, informal structure, and it is best to embrace this rather than try to force it into a more controlled shape. All cutting should be done with a light touch and a clear purpose, using a pair of sharp scissors or floral snips to ensure clean cuts that minimize damage to the delicate stems.
The timing of any cutting is also of paramount importance and depends entirely on your goal. If you wish to encourage a longer season of blooms, you will need to be diligent about removing spent flowers throughout the peak of the season. If your primary interest is in harvesting fresh flowers for bouquets, you will be cutting stems just as the flowers are beginning to open. And if you desire the sculptural seed pods for drying, you must exercise patience and wait until the floral display is over and the pods have had time to develop and mature on the plant.
Ultimately, the decision of whether and how much to cut is a personal one that depends on how you wish to enjoy the plant. You can choose to simply let it grow entirely naturally, enjoying its progression from flower to seed pod without any intervention at all. This hands-off approach is perfect for a low-maintenance or naturalistic garden style and ensures the plant will self-sow prolifically. Alternatively, by strategically cutting, you can actively manage the plant to maximize either its floral display or its harvestable materials, tailoring its performance to your specific gardening and creative goals.
The purpose of cutting love-in-a-mist
One of the primary reasons to make any cuts to a love-in-a-mist plant is a practice known as deadheading. This involves the removal of flowers that have faded and are past their prime. The biological purpose behind this action is to interrupt the plant’s life cycle. An annual plant’s fundamental goal is to produce seeds to ensure the next generation. Once a flower is pollinated and begins to develop a seed pod, the plant receives a hormonal signal that its mission is nearing completion, and it will begin to divert its energy away from producing new flowers and towards ripening the existing seeds.
More articles on this topic
By snipping off the spent flower before the seed pod has a chance to form, you effectively trick the plant into thinking it has not yet succeeded in its reproductive goal. This sends a signal back to the plant to continue its efforts, prompting it to redirect its energy into producing a new flush of flower buds. Consistent deadheading can therefore significantly extend the blooming period, keeping the plant looking colorful and vibrant for several additional weeks compared to a plant that is left to its own devices. It is a simple technique that yields a very rewarding result for those who want to maximize the floral show.
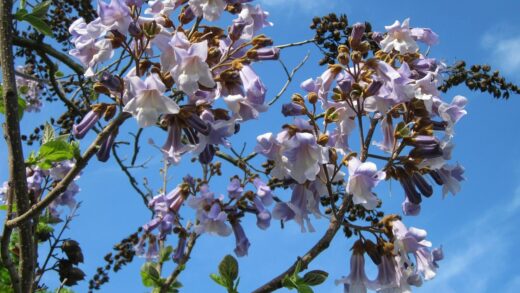
A second major purpose for cutting is to harvest the stems for use in fresh floral arrangements. Love-in-a-mist is a classic “cut-and-come-again” annual, meaning that the more you cut from it, the more it is encouraged to produce new flowering stems. The delicate, jewel-like flowers, nestled in their lacy bracts and held on slender stems with feathery foliage, make an exquisite addition to bouquets, adding texture, color, and a touch of wild, cottage-garden charm. Harvesting regularly not only provides you with beautiful material for indoor arrangements but also functions in a similar way to deadheading, stimulating the plant to remain productive.
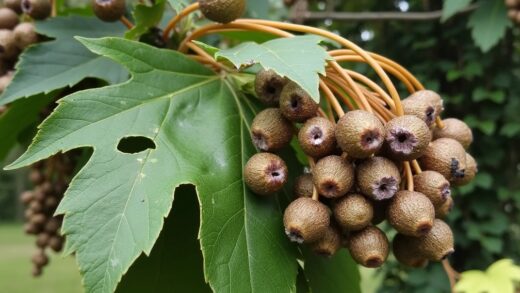
The third distinct reason for cutting is to harvest the mature seed pods. These inflated, often purple-streaked capsules are highly ornamental in their own right and are prized by flower arrangers and crafters for use in dried bouquets, wreaths, and other decorations. This type of cutting takes place at the end of the plant’s life cycle, after the flowering period is over. It allows you to preserve a part of the plant’s beauty long after the fresh flowers have faded, providing decorative interest throughout the autumn and winter months.
Deadheading to prolong flowering
The technique of deadheading is simple but requires a degree of diligence to be effective. The goal is to remove the flower as soon as it begins to look faded, before the central ovary starts to swell and form a seed pod. Using small, sharp scissors or your fingertips, you can snip or pinch off the individual spent flower head. For a cleaner look and to better encourage new growth, it is best to make the cut further down the stem, just above a leaf node or a side shoot from which a new flower bud might emerge.
More articles on this topic
The ideal time to deadhead is during your regular walks through the garden. By making it a frequent, casual task—perhaps every two or three days during the peak blooming season—you can easily keep up with the fading flowers. This regular attention prevents the plant from ever getting the signal to switch over to full-scale seed production. If you let a large number of seed pods begin to form, the plant’s hormonal shift will be more established, and it will be less responsive to subsequent deadheading efforts.
It is important to have a strategic endpoint for your deadheading activities if you also want the plant to produce its decorative seed pods or to self-sow for the following year. About two-thirds of the way through the expected blooming season, you should cease deadheading and allow the final flush of flowers to be pollinated and develop naturally into seed pods. This allows you to enjoy the best of both worlds: an extended period of beautiful flowers followed by the unique structural beauty of the maturing seed capsules.
This practice of deadheading is most impactful on modern cultivars that have been bred for a long blooming season. While it is still effective on heirloom varieties, their natural tendency may be to have a more concentrated, single flush of bloom. Nonetheless, for any variety of love-in-a-mist, removing the spent flowers will always help to tidy the plant’s appearance and will, to some degree, encourage it to invest its energy in any latent buds, thereby maximizing the length and quality of its floral display.
Harvesting flowers for arrangements
Harvesting love-in-a-mist for fresh-cut flowers is a delightful way to bring the beauty of the garden indoors. The key to a long vase life is to cut the stems at the correct stage of development. The ideal time to harvest is in the morning, after the dew has dried but before the heat of the day has set in. At this time, the stems are fully hydrated and firm. Look for flowers that are just beginning to open or are about halfway open. If you wait until the flower is fully open, its vase life will be significantly shorter.
When cutting the stems, use a clean, sharp pair of floral snips or scissors. Make a diagonal cut on the stem at your desired length. It is generally best to cut long stems, as this provides more flexibility when arranging them, and you can always trim them shorter later. Try to make your cut just above a set of leaves or a side shoot; this will encourage the plant to branch out and produce new flowering stems from the point of the cut, ensuring a continuous supply of blooms throughout the season.
Immediately after cutting, it is crucial to condition the flowers properly. Plunge the stems directly into a bucket of cool, clean water. Remove any of the lower foliage that would sit below the waterline in a vase, as this will quickly rot and introduce bacteria into the water, shortening the life of the entire arrangement. Allow the stems to rest and drink up water in a cool, dark place for at least a few hours, or even overnight, before you begin to arrange them. This conditioning step allows the stems to become fully turgid and significantly extends their freshness in the vase.
Once arranged in a vase with fresh water and a floral preservative, love-in-a-mist flowers can be expected to last for up to a week. To maximize their vase life, change the water every other day and re-cut the stems slightly to ensure they can continue to absorb water effectively. Keep the arrangement out of direct sunlight and away from drafts or sources of heat. Their airy texture and intricate forms combine beautifully with a wide range of other garden flowers, from roses and peonies to zinnias and cosmos.
Cutting and drying seed pods
The process of harvesting love-in-a-mist seed pods for drying begins where deadheading leaves off. You must allow the flowers to fade naturally and the subsequent seed pods to develop fully on the plant. The pods are ready to be harvested when they have become firm and have developed their characteristic inflated shape. They can be cut at a green stage, when they often have beautiful burgundy or purple streaks, or you can wait until they have fully matured and turned a light, papery tan or brown. Both stages are attractive, and pods harvested green will eventually dry to a tan color.
As with harvesting fresh flowers, it is best to cut the stems in the morning on a dry day. Cut long stems to give you more versatility for later use. Once harvested, the pods need to be dried in a way that preserves their shape and prevents them from developing mold or mildew. The easiest method is to hang them upside down in small bunches. Gather a few stems together and secure them with a rubber band or a piece of twine.
Find a location for drying that is dark, warm, and has excellent air circulation. An attic, a dry garage, or a spare closet are all good options. Hanging the bunches upside down ensures that the stems dry straight and the pods retain their upright orientation. The drying process typically takes two to three weeks. You will know they are fully dry when the stems are stiff and snap easily, and the pods feel light and papery to the touch.
Once completely dried, the seed pods are remarkably durable and can be used in a multitude of ways. They can be incorporated into dried wreaths, added to everlasting bouquets, or simply displayed on their own in a vase for a simple, sculptural accent. They add wonderful texture and a touch of botanical curiosity to any arrangement. If you wish to save the seeds inside for planting next year, simply shake the dried pods over a bowl to release the small black seeds before you use the pods in your crafts.