The successful cultivation of pineapple sage begins with proper planting, a crucial step that lays the groundwork for a season of vigorous growth and fragrant foliage. This process is more than simply digging a hole; it involves careful consideration of timing, location, and soil preparation to create an environment where the plant can thrive from the very beginning. Choosing the right moment to introduce the plant to the garden is paramount. Pineapple sage is a tender perennial that is extremely sensitive to cold, so it should only be planted outdoors after all danger of frost has definitively passed and the soil has had a chance to warm up. Planting too early in the season can subject the young plant to cold stress, stunting its growth or even killing it outright. A strong, well-timed start is the best guarantee for a healthy, productive plant.
Before the plant even goes into the ground, a thorough preparation of the planting site is essential. This involves more than just turning over the soil; it requires creating the ideal texture and nutritional profile for pineapple sage. The first step is to loosen the soil to a depth of at least 30 centimeters, which allows the roots to penetrate easily and establish themselves quickly. This is also the perfect opportunity to amend the soil. Incorporating a generous amount of organic matter, such as well-rotted compost, leaf mold, or aged manure, will significantly improve the soil’s structure, fertility, and, most importantly, its drainage capacity, which is a non-negotiable requirement for this species.
When it comes to the actual act of planting, spacing is a key consideration that is often overlooked. Pineapple sage can grow into a surprisingly large, bushy plant, often reaching over a meter in both height and spread in a single growing season. To accommodate this vigorous growth, individual plants should be spaced at least 60 to 90 centimeters apart. This spacing ensures that each plant has ample room to develop without competing with its neighbors for sunlight, water, and nutrients. Furthermore, adequate spacing promotes good air circulation around the plants, which is vital for reducing the incidence of fungal diseases like powdery mildew.
After placing the plant in the prepared hole, ensuring the top of the root ball is level with the surrounding soil, the final steps are just as important. Backfill the hole gently but firmly, eliminating any large air pockets that could dry out the roots. Once the plant is securely in place, it should be watered thoroughly and deeply. This initial watering is critical as it helps to settle the soil around the root ball, establishing good contact between the roots and their new environment. It also provides the immediate moisture the plant needs to recover from the stress of transplanting and begin the process of new root growth.
Selecting the ideal planting site
Choosing the correct location for your pineapple sage is arguably the most critical decision you will make in its cultivation journey. The plant’s performance throughout the season is directly tied to the site’s environmental conditions. The primary requirement is sunlight. Pineapple sage is a sun-worshipper and needs a minimum of six hours of direct, unfiltered sunlight each day to thrive. This exposure fuels the photosynthesis necessary for lush growth and is the trigger for the development of the essential oils responsible for its signature pineapple scent. A location on the south or west side of your property is often ideal for providing this intense, day-long light.
More articles on this topic
While full sun is the general rule, a slight nuance applies in extremely hot climates. In regions where summer temperatures consistently soar, the intense afternoon sun can sometimes be too harsh, leading to leaf scorch and heat stress. In these specific environments, a site that offers bright morning sun and some light, dappled shade during the hottest part of the afternoon can be beneficial. This provides the plant with the energy it needs without subjecting it to punishing heat. However, it is a fine balance, as too much shade will inevitably lead to a leggy plant with poor flowering, so direct sun should still be the dominant condition.
Beyond sunlight, the physical characteristics of the soil at the chosen site are paramount. Pineapple sage has an absolute intolerance for waterlogged soil, making excellent drainage a non-negotiable feature. Before committing to a spot, observe how it handles water after a heavy rain or perform a percolation test. The ideal soil is a sandy loam that allows excess water to drain away quickly while still retaining enough moisture to support the plant. If your garden consists of heavy clay, you will need to either heavily amend the site with organic matter and grit or consider alternative planting methods like raised beds or containers.
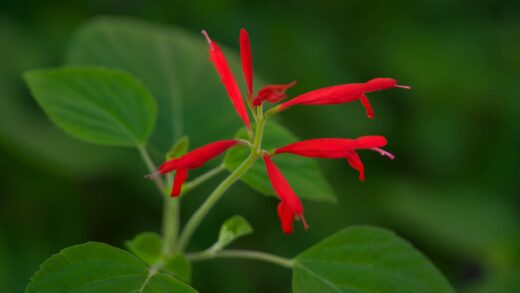
Finally, consider the plant’s physical security and its place within the broader garden design. The stems of pineapple sage, while relatively sturdy, can be brittle and are susceptible to damage from strong winds. Planting it in a location that offers some protection, such as near a fence, wall, or amongst other sturdy plants, can help prevent breakage. Also, remember its eventual size and its late-season flowering habit. Position it where it will have room to grow and where its vibrant red flowers will create a stunning visual impact in the autumn garden, attracting hummingbirds and providing a final burst of color before winter.
The process of planting
The physical act of planting pineapple sage is a straightforward process, but attention to detail can make a significant difference in how quickly the plant establishes itself. Once you have prepared the soil by loosening it and adding amendments, dig a hole that is approximately twice as wide as the nursery pot the plant came in and just as deep. The extra width is important as it provides a zone of loosened soil around the root ball, making it easier for new roots to expand outwards into their new home. Avoid digging the hole significantly deeper than the root ball, as this can cause the plant to settle too low over time, which can lead to stem rot.
More articles on this topic
Before removing the plant from its pot, water it well. This helps to hydrate the root ball and makes it easier to slide out of the container without damaging the delicate roots. Carefully tip the pot on its side and gently squeeze or tap the sides to loosen the plant. If the plant is root-bound, meaning the roots are densely circling the bottom of the pot, it is crucial to address this before planting. Gently tease the roots apart with your fingers or make a few shallow vertical cuts with a clean knife. This encourages the roots to grow outward into the surrounding soil rather than continuing to circle, which can inhibit the plant’s growth.
Place the prepared plant into the center of the hole, making sure that the top of its root ball is sitting perfectly level with the surface of the surrounding garden bed. Planting too deep can cause the crown of the plant to rot, while planting too high can expose the roots to the air, causing them to dry out. Once you are satisfied with the depth, begin to backfill the hole with the amended soil you removed earlier. Gently firm the soil around the root ball as you go to eliminate any large air pockets, which can prevent roots from accessing water and nutrients.
The final step after backfilling is to provide a thorough and immediate watering. This initial drenching serves several purposes: it provides essential moisture to the stressed roots, helps to settle the soil and eliminate any remaining air pockets, and ensures good contact between the roots and the soil. Creating a small, circular berm or trough of soil around the base of the plant can help to hold water and direct it down to the root zone where it is needed most. For the first few weeks after planting, monitor the soil moisture carefully and water regularly to help the plant overcome transplant shock and establish a robust root system.
Propagation through stem cuttings
Propagation by stem cuttings is by far the most common, reliable, and efficient method for creating new pineapple sage plants. This technique allows you to produce genetically identical clones of the parent plant, ensuring that the desirable traits, such as fragrance and flower color, are perfectly preserved. Furthermore, it is an excellent way to create new plants for the following season, especially in colder climates where the parent plant may not survive the winter. The process is simple enough for even novice gardeners to master and provides a rewarding sense of accomplishment.
The timing for taking cuttings is crucial for ensuring a high success rate. While cuttings can be taken at almost any point during the active growing season, the ideal times are late spring or early summer, when the plant is full of vigorous, healthy growth. At this stage, the stems are semi-ripe, meaning they are firm enough to hold their structure but not yet old and woody, making them perfect for rooting. Another excellent time to take cuttings is in the late autumn, just before the first frost is expected. These cuttings can then be rooted and grown indoors over the winter, providing you with healthy young plants ready for the garden the following spring.
When selecting which stems to use for cuttings, it is important to choose wisely. Look for healthy, disease-free stems that are actively growing but have not yet developed flower buds. The presence of flower buds can divert the cutting’s energy towards blooming rather than root production. The ideal cutting should be about 10 to 15 centimeters long and should be taken from the tip of a stem. Use a clean, sharp knife or pair of secateurs to make a clean cut just below a leaf node, which is the point on the stem where a leaf or branch emerges, as this is where rooting hormones are most concentrated.
Once you have taken the cutting, preparation is the next key step. Carefully strip off the leaves from the lower half to two-thirds of the stem. This is important because any leaves left below the soil or water level would rot, potentially introducing disease and killing the cutting. It also reduces the amount of moisture the cutting loses through transpiration, allowing it to focus its energy on developing new roots. Leaving two to four leaves at the very top of the cutting is sufficient to allow for photosynthesis, which will provide the energy needed for the rooting process.
Step-by-step guide to rooting cuttings
Once your pineapple sage cuttings are prepared, the next phase is to encourage them to develop a new root system. You have two primary options for the rooting medium: water or a solid substrate like potting mix. Rooting in water is a simple and visually rewarding method, as you can watch the roots emerge. Simply place the prepared cuttings in a jar or glass of clean water, ensuring that the stripped portion of the stem is submerged but the remaining leaves are well above the water line. Place the jar in a location with bright, indirect light, as direct sunlight can be too intense and may scorch the leaves or encourage algae growth in the water.
To ensure success when rooting in water, it is important to maintain good hygiene. Change the water every two to three days to keep it fresh and oxygenated, and to prevent the growth of bacteria that could cause the stems to rot. Within a week or two, you should begin to see small, white roots emerging from the submerged nodes on the stem. Once these roots have grown to be at least a few centimeters long and have started to branch, the cutting is ready to be transplanted into a pot filled with a high-quality potting mix. Be very gentle during this process, as water-grown roots can be more fragile than those grown in soil.
Alternatively, you can root the cuttings directly in a solid medium, which often results in a more robust root system that transitions to a larger pot more easily. For this method, you can dip the bottom end of the prepared cutting into a rooting hormone powder. While not strictly necessary for an easy-to-root plant like pineapple sage, it can speed up the process and increase the success rate. Fill small pots or a tray with a light, well-draining rooting medium, such as a mix of perlite, vermiculite, and peat moss. Use a pencil or a dibber to make a hole in the medium, then insert the cutting and gently firm the medium around it.
After planting the cuttings in the solid medium, water them thoroughly. To create a humid environment that encourages rooting and prevents the cuttings from drying out, you can cover the pots with a clear plastic bag or place them in a propagator. Ensure the plastic does not touch the leaves. Place the cuttings in a warm spot with bright, indirect light. Keep the medium consistently moist but not waterlogged. You can check for rooting after a few weeks by giving the cutting a very gentle tug; if you feel resistance, it means roots have formed, and the new plant is well on its way.


