The topic of pruning and cutting back the Anatolian colchicum is a simple one, yet it is of paramount importance for the plant’s health and is a subject where gardeners can easily make critical mistakes. In short, this plant requires absolutely no pruning in the conventional sense of shaping or size reduction. The only cutting back that is required is the removal of the foliage after it has completed its life cycle, and the timing of this single action is the most crucial lesson to learn. The ironclad rule of colchicum care is to never, under any circumstances, cut back the green, photosynthesizing foliage in the spring.
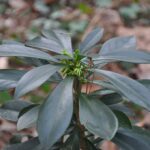
The broad, strap-like leaves that emerge in the spring are the plant’s sole means of producing energy for the entire year. Each leaf acts as a vital solar panel, capturing sunlight and converting it into the sugars that are then transported down and stored in the underground corm. This stored energy is what fuels the corm’s survival through summer dormancy, powers the emergence of the beautiful autumn flowers, and initiates the growth of new leaves the following spring. Cutting these leaves off while they are still green is akin to removing a battery from its charger before it is full; it starves the plant and severely compromises its ability to perform in the future.
Many gardeners, particularly those who prize neatness, may find the large and sometimes floppy foliage of colchicum to be untidy as it matures. There can be a strong temptation to trim it, tie it up, or remove it to improve the appearance of a border. This temptation must be resisted at all costs. Any action that damages the leaves or reduces their surface area will directly reduce the amount of energy the corm can store, leading to a significant decline in the plant’s vigor and a drastically diminished floral display in the autumn.
Therefore, the fundamental principle of “pruning” colchicum is one of patience. The gardener’s role is not to intervene, but to allow the plant to complete its natural cycle without interference. The leaves must be allowed to grow, mature, yellow, and wither away completely on their own schedule. Only when the foliage is entirely brown, dry, and detached from the corm can it be safely removed from the garden.
Managing the foliage in spring
The spring foliage of Anatolian colchicum emerges with vigor and can grow quite large, often reaching 20 to 30 centimeters in length. While essential for the plant, this lush growth can present a visual challenge in a meticulously manicured garden border. An effective strategy to manage its appearance is to use clever companion planting. By siting the colchicum among perennials that emerge a little later in the spring, such as hostas, hardy geraniums, or daylilies, their new growth will rise up and help to screen the colchicum leaves as they begin their natural decline.
As spring progresses into early summer, the colchicum leaves will naturally begin the process of senescence. This is a programmed and active process where the plant systematically breaks down the chlorophyll and other valuable compounds in the leaves and retracts the nutrients back into the corm for storage. This is why the leaves turn yellow and then brown. It is a sign that the plant is efficiently recycling its resources, and it is vital that this process is allowed to complete without interruption.
During this period, the leaves can look quite untidy, often flopping over onto neighboring plants. Again, the urge to tidy them must be resisted. Bending or braiding the leaves, a practice sometimes seen with daffodils, is not recommended as it can crease and damage the leaf tissue, inhibiting the free flow of nutrients back to the corm. The best approach is a hands-off one; simply let nature take its course and plan your garden design to accommodate this temporary phase of untidiness.
If the appearance of the declining foliage is truly unacceptable in a prominent location, it may be a sign that the colchicum has been planted in the wrong spot. Rather than damaging the plant by cutting it back, the better long-term solution is to mark its location and plan to move the corms during their summer dormancy. Relocating them to a less conspicuous spot, such as the middle of a border behind other plants or in a more naturalized area, will allow them to complete their life cycle without detracting from the overall aesthetic of the garden.
The correct time for removal
There is only one correct time to remove the foliage of the Anatolian colchicum, and that is when it has completely and utterly died back. The leaves must have transitioned from green, to yellow, and finally to a dry, brown, papery state. At this stage, they will have fulfilled their purpose entirely, having transported all possible nutrients back down into the corm. This process is usually complete by mid-summer, typically in late June or July, depending on the climate and specific growing conditions.
You can test if the foliage is ready for removal with a gentle tug. If the leaves come away from the ground with little to no resistance, it means they have naturally detached from the corm and can be safely cleared away. If they still feel firmly attached, it is best to wait another week or two and test them again. Pulling them off prematurely can damage the top of the corm, creating a potential entry point for disease.
Once the dead foliage has been removed, you are left with a clear patch of ground. This is the beginning of the corm’s summer dormancy period. It is helpful at this point to ensure that the location of the dormant corms is marked with a label or a small stake. This serves as a crucial reminder of their presence, preventing you from accidentally digging into them and causing damage while planting annuals or performing other garden tasks during the summer.
This annual cycle of allowing the foliage to die back completely is not a suggestion; it is a mandatory requirement for the long-term health and survival of the plant. Gardeners who adhere to this simple rule will be rewarded with increasingly robust clumps that produce a spectacular and reliable show of flowers each and every autumn. It is a classic case where patience and a little benign neglect yield the best results.
Managing the spent flowers
In contrast to the strict rules regarding the foliage, the management of the spent autumn flowers is much more flexible and is largely a matter of personal aesthetic preference. After the colchicum flowers have been pollinated, they will begin to fade, wither, and collapse onto the ground. These spent blooms can be left in place to decompose naturally, or they can be removed to maintain a tidier appearance in the garden. Removing them or leaving them has no significant impact on the health of the corm.
If you choose to remove the faded flowers, a process known as deadheading, you can simply pinch or snip them off at the base where they emerge from the soil. This can help to keep the planting area looking clean and may prevent the decaying petals from becoming a host for fungal diseases like gray mould, particularly during wet autumn weather. This is the only form of “pruning” that is acceptable at this time of year.
However, there is a compelling reason to consider leaving at least some of the spent flowers in place, and that relates to propagation. If the flowers have been successfully pollinated, they will begin to develop seed pods. Unusually, the seed pod develops at the base of the flower tube, underground, and remains there throughout the winter. It is only the following spring that the seed pod will be pushed up to the soil surface, nestled amongst the emerging leaves, to ripen its seeds in the sun.
Therefore, if you are interested in trying to propagate your colchicum from seed or wish to allow them to self-sow and naturalize in your garden, you should not deadhead the flowers. By leaving the spent blooms to their own devices, you allow this fascinating reproductive cycle to complete. The choice to deadhead or not is therefore a decision between maintaining a perfectly tidy garden and allowing the plants to complete their natural life cycle for potential propagation.
Pruning for division and relocation
The only other context in which one might “prune” or cut parts of a colchicum is during the process of dividing or relocating the corms, and even then, it is a minimal and specific action. This task, as previously detailed, should only ever be undertaken during the peak of summer dormancy when the plant is completely inactive, and both the flowers and leaves are absent. The primary focus of this activity is on the corms themselves, not on any above-ground growth.
When you lift a mature clump of corms from the ground, you may find old, shriveled roots and remnants of the previous season’s foliage attached to them. It is perfectly acceptable and good practice to clean up the corms before replanting them. You can trim off any dead, wiry roots and remove any flaky, loose layers of the corm’s outer tunic. This minor tidying helps to remove potential sources of decay and ensures the corm is clean before it goes back into the soil.
If you are dividing the clump a little late in the season, perhaps in late August, you might find that the new flower buds are already beginning to emerge from the top of the corms. In this situation, you must exercise extreme care when handling and replanting them to avoid breaking off these delicate and promising shoots. Any pruning or cleaning of the corms should be done with great caution, keeping well away from the new growing points.
It is important to reiterate that these actions are not part of a regular maintenance routine but are only performed once every several years when a clump becomes overcrowded and requires division. For the vast majority of its life, the Anatolian colchicum is a plant that thrives without the intervention of shears or pruners. Its beauty is best cultivated through patience and an appreciation for its natural, untamed life cycle.