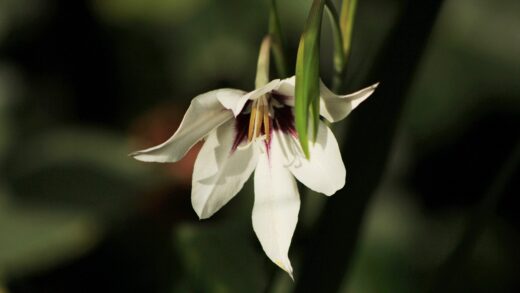
The successful establishment of Daphne laureola begins long before the plant is placed in the ground; it starts with careful planning and thoughtful preparation of the planting site. This evergreen shrub is known for its sensitivity to root disturbance and its resentment of being transplanted, making the initial planting process a critical one-time event. Therefore, selecting the perfect, permanent location from the outset is paramount to its long-term survival and prosperity in the garden. This involves a thorough assessment of light conditions, soil type, and spatial considerations to ensure the chosen spot meets all the plant’s specific requirements, mimicking its preferred woodland habitat as closely as possible.
Before you begin to dig, take time to analyse the garden environment. Spurge laurel thrives in partial to full shade, making it an excellent choice for north or east-facing borders, or for planting under the canopy of larger deciduous trees. The soil must be well-draining yet moisture-retentive, with a neutral to alkaline pH. Avoid planting in areas with heavy, waterlogged clay or in frost pockets where cold air settles, as these conditions can be fatal to the plant. By honouring these fundamental needs during the site selection phase, you significantly increase the chances of the shrub establishing quickly and without stress.
The timing of planting is another important consideration. The ideal times to plant Daphne laureola are in the autumn or early spring. Autumn planting allows the root system to establish itself in the warm soil before winter dormancy, giving it a head start for the following spring. Spring planting is also effective, as long as it is done early enough to allow the plant to settle in before the heat of summer arrives. Avoid planting in the height of summer, when heat and potential drought can place immense stress on a newly transplanted shrub, or in the middle of winter when the ground may be frozen.
Propagating spurge laurel can be a rewarding, albeit patient, endeavour for the dedicated gardener. While it can be grown from seed, this method requires specific treatments and can take a considerable amount of time. A more common and often more successful method is propagation through semi-ripe cuttings taken in the summer. Both methods require precision and a good understanding of the plant’s growth cycle. Successfully creating new plants is a testament to a gardener’s skill and allows for the expansion of this wonderful shrub’s presence in the garden or for sharing with others.
Selecting the perfect location
Choosing the right spot for your spurge laurel is the most crucial decision you will make for its future health. This plant demands a location with dappled or partial shade, as its foliage can easily scorch in direct, intense sunlight, especially during the afternoon. Think about areas in your garden that are shaded by buildings, walls, or the canopies of larger trees. An east-facing site, which receives gentle morning sun but is shaded in the afternoon, is often ideal. Observing the pattern of sunlight throughout the day in your chosen location is a worthwhile exercise before committing to planting.
More articles on this topic
Beyond light, consider the soil conditions in the potential location. Daphne laureola has a strong preference for well-drained soil that does not become waterlogged, as its roots are highly susceptible to rot. To test the drainage in a specific area, you can dig a hole about a foot deep and fill it with water. If the water drains away within a few hours, the drainage is likely adequate. If the water stands for many hours or overnight, the site has poor drainage and will need significant amendment, or another location should be chosen.
The plant also has a distinct preference for soil with a neutral to alkaline pH. It generally does not thrive in acidic soils. If your garden is predominantly acidic, which is common in areas with high rainfall or where ericaceous plants like rhododendrons and azaleas flourish, you will need to amend the soil with garden lime to raise the pH. Investing in a simple soil pH testing kit is a small but wise step to ensure the chemistry of your chosen location is suitable for this particular shrub.
Finally, think about the plant’s mature size and its placement in relation to other plants and garden features. Daphne laureola is a slow-growing shrub that will eventually reach a height and spread of around one to one and a half metres. Ensure it has enough space to grow to its full size without being crowded by more aggressive neighbouring plants. Also, remember that all parts of the plant are toxic, so it is prudent to select a location away from paths or play areas where children or pets might come into frequent contact with it.
Preparing the soil for planting
Once you have selected the ideal location, the next critical step is to prepare the soil thoroughly. The goal is to create a welcoming environment for the plant’s root system, encouraging it to expand and establish itself quickly. Begin by clearing the area of all weeds and grass, ensuring there is no competition for water and nutrients. Then, dig a planting hole that is approximately twice as wide as the plant’s container or root ball, but no deeper. Making the hole wider rather than deeper encourages the roots to grow outwards into the surrounding topsoil, which is typically more fertile and better aerated than the subsoil.
More articles on this topic
Improving the soil’s structure and fertility is essential. Spurge laurel thrives in soil rich in organic matter, which helps with both drainage and moisture retention. In the soil that you have excavated from the planting hole, incorporate a generous amount of well-rotted organic material. Excellent choices include leaf mould, garden compost, or a soil conditioner based on composted bark. For a standard planting hole, mixing in one or two bucketfuls of this organic matter is a good rule of thumb. This will create a friable, nutrient-rich medium that the plant’s roots can easily penetrate.
If your soil is heavy clay, improving drainage is a top priority. In addition to the organic matter, you can mix in a few handfuls of horticultural grit or small gravel into the backfill soil. This will help to create more air pockets and prevent the soil from compacting and retaining too much water around the roots. It can also be beneficial to gently fork the sides and bottom of the planting hole to break up any compacted soil, further assisting with drainage and root penetration. Avoid creating a ‘sump’ effect where the amended hole acts as a basin collecting water in surrounding unimproved clay.
Before placing the plant in the hole, it is good practice to create a slight mound of the improved soil in the center of the hole. This allows you to position the root ball on top and ensures that the plant will be at the correct depth. The top of the root ball should be level with, or even very slightly proud of, the surrounding ground level. Planting too deeply is a common mistake that can lead to the stem rotting at the base. Careful attention to these soil preparation details will pay dividends in the form of a healthy, thriving plant.
The step-by-step planting process
With the site selected and the soil prepared, you are ready for the planting process itself. The key to this stage is to handle the plant with care to minimize stress and root disturbance. Start by watering the plant thoroughly in its container about an hour before you plan to plant it. This ensures the root ball is well-hydrated and helps it to slide out of the pot more easily, reducing the risk of root damage during the process. A well-watered plant will also be better equipped to handle the initial shock of transplanting.
Gently remove the plant from its container. It is best to turn the pot on its side and gently tap it to loosen the root ball, rather than pulling the plant out by its stem. Once removed, inspect the root system. If the roots are tightly coiled and circling the bottom of the pot (a condition known as being pot-bound), it is important to gently tease them out or score the sides of the root ball in a few places with a clean knife. This encourages the roots to grow outwards into the new soil instead of continuing to circle in their original shape.
Place the plant into the prepared hole, resting the root ball on the slight mound you created at the bottom. Adjust the depth so that the top of the root ball is exactly level with the surrounding soil surface. Use a straight edge like a bamboo cane or the handle of your shovel laid across the hole to check the level accurately. Once you are satisfied with the positioning, begin to backfill the hole with the amended soil you prepared earlier, gently firming it down around the root ball with your hands to eliminate any large air pockets.
After the hole is completely backfilled, create a shallow basin or ‘watering well’ with the remaining soil around the perimeter of the planting area. This will help to direct water to the root zone and prevent it from running off. Water the newly planted shrub thoroughly and deeply, allowing the water to soak in and settle the soil around the roots. Finally, apply a two to three-inch layer of organic mulch, such as shredded bark or leaf mould, around the base of the plant, being careful to keep the mulch from directly touching the main stem, which could encourage rot.
Propagation from seed
Propagating Daphne laureola from seed is a fascinating process that requires patience, as it closely mimics the natural cycles the seeds would experience in the wild. The first step is to collect the seeds from the ripe, black berries in late summer or early autumn. It is crucial to wear gloves when handling the berries, as they are toxic. Each berry contains a single seed, which should be cleaned of all surrounding pulp, as the pulp contains germination inhibitors. Washing the seeds gently in water and removing any fleshy residue is an essential part of this process.
Daphne seeds require a period of cold, moist stratification to break their natural dormancy. This process simulates the winter conditions they would naturally endure. For best results, sow the fresh, cleaned seeds immediately in the autumn. Use pots or seed trays filled with a well-draining, sterile seed-starting mix. Sow the seeds about a centimetre deep, cover them lightly with the mix, and water them gently. The containers should then be placed outdoors in a sheltered, shady location, such as a cold frame or against a north-facing wall, where they will be exposed to the natural winter cold.
Germination can be erratic and may not occur until the following spring, or in some cases, the spring after that. It is a slow process, so patience is absolutely key. Throughout the winter, ensure the seed-starting mix remains lightly moist but not waterlogged. Protect the containers from heavy rain, which could wash out the seeds, and from pests like mice or squirrels that might dig them up. When seedlings do emerge in the spring, they will be small and delicate, so they must be handled with care.
Once the seedlings have developed their first true leaves and are large enough to handle, they can be carefully pricked out and transplanted into individual small pots. Use a well-draining, loam-based potting mix for this stage. Continue to grow the young plants on in a sheltered, shady spot for at least a year or two until they have developed a robust root system and are strong enough to be planted out into their final position in the garden. This slow, deliberate process ensures the young plants are well-established before facing the rigours of the open garden.
Propagation from cuttings
Propagating Daphne laureola from cuttings is often a more reliable and faster method than growing from seed. The best time to take cuttings is during the summer, from mid-July to early September, when the current season’s growth is semi-ripe. This means the base of the shoot is firm and woody, while the tip is still soft and actively growing. This stage of growth provides the ideal balance of maturity to prevent rotting and youthfulness to encourage rooting. Select healthy, vigorous, non-flowering shoots for the best chance of success.
Using a clean, sharp knife or secateurs, take cuttings that are approximately ten to fifteen centimetres long. Make a clean cut just below a leaf node (the point where a leaf joins the stem). Carefully remove the leaves from the lower half to two-thirds of the cutting to reduce water loss through transpiration and to create a clear stem for insertion into the rooting medium. It is also common practice to make a small ‘wound’ at the base of the cutting by slicing off a thin sliver of bark, as this can sometimes encourage root formation.
To further increase the chances of success, dip the prepared base of each cutting into a hormone rooting powder. This powder contains auxins, which are plant hormones that stimulate root development. Tap off any excess powder, as too much can be detrimental. Insert the cuttings into a pot or tray filled with a high-quality, well-draining rooting medium. A mixture of equal parts peat-free compost and perlite or coarse sand provides the ideal balance of moisture retention and aeration needed for roots to form.
Place the prepared cuttings in a warm, humid environment away from direct sunlight. A propagator with bottom heat is ideal, but you can create a suitable microclimate by covering the pot with a clear plastic bag, secured with an elastic band. Ensure the bag does not touch the leaves. Keep the rooting medium consistently moist but not wet. Roots can take several weeks or even a few months to develop. You can check for rooting by giving a cutting a very gentle tug; if you feel resistance, roots have likely formed. Once well-rooted, the young plants can be potted on individually and grown on until they are ready for the garden.
📷: Josep Gesti, CC BY-SA 4.0, via Wikimedia Commons