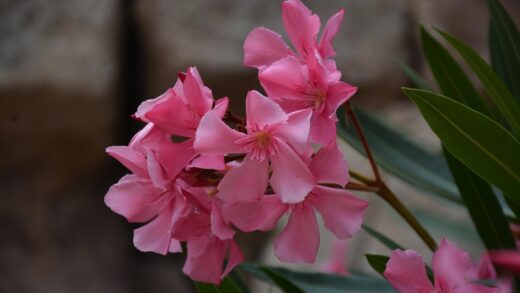
Understanding the fundamental needs of the cape daisy, or Osteospermum, is the first step toward cultivating a stunning display of vibrant, daisy-like flowers that can brighten any garden space. These popular ornamentals, native to South Africa, thrive with attentive care that mimics their natural environment, rewarding the gardener with a profusion of blooms from spring until the first frost. Proper care involves a balanced approach to sunlight, water, soil, and nutrition, each playing a critical role in the plant’s overall health and flowering capacity. Neglecting any of these core components can lead to a lackluster performance, with fewer flowers and less vigorous growth, so a holistic understanding is truly essential for success. This guide will provide a comprehensive overview of the essential practices required to ensure your cape daisies not only survive but flourish, becoming a standout feature in your containers or garden beds.
The foundation of successful cape daisy cultivation begins with selecting an appropriate location, as these plants are true sun-worshippers and require ample direct sunlight to produce their iconic flowers. A spot that receives at least six to eight hours of direct sun each day is considered ideal for promoting the most prolific blooming. Without sufficient light, the plants tend to become leggy, stretching in search of the sun, which results in weaker stems and a significant reduction in flower production. Furthermore, you may notice that the flowers close up at night or on particularly overcast days, a natural behavior that underscores their strong relationship with sunlight. Therefore, choosing a south-facing or west-facing position in the garden will provide the intensity and duration of light these plants crave.
Proper soil composition is another non-negotiable aspect of cape daisy care, as these plants are particularly susceptible to root rot in heavy, waterlogged conditions. They demand well-draining soil that allows excess water to escape freely, preventing the roots from becoming saturated. An ideal growing medium can be created by amending standard garden soil with organic matter like compost, which improves soil structure, and materials like perlite or coarse sand to enhance drainage. For container gardening, using a high-quality, peat-based potting mix specifically formulated for flowering plants is an excellent choice. The soil’s pH should ideally be slightly acidic to neutral, falling within a range of 5.5 to 6.5, as this allows for optimal nutrient uptake by the plant’s root system.
Beyond sunlight and soil, a consistent watering and feeding regimen is paramount for maintaining the health and vigor of your cape daisies throughout the growing season. While they exhibit a degree of drought tolerance once established, they perform best with regular moisture, especially during periods of active growth and intense heat. The key is to allow the top inch or two of soil to dry out completely between waterings to avoid the risk of overwatering. A balanced, water-soluble fertilizer applied every two to four weeks provides the necessary nutrients to fuel continuous blooming. This consistent supply of energy ensures that the plants have the resources they need to produce a spectacular and long-lasting floral display.
Finally, regular maintenance in the form of deadheading and occasional pruning plays a vital role in the overall care of cape daisies. Deadheading, which is the practice of removing spent or faded flowers, is crucial because it prevents the plant from expending energy on seed production. By redirecting this energy, the plant is encouraged to produce new buds and more flowers, thereby extending the blooming period significantly. Light pruning can also be beneficial to maintain a compact, bushy shape and prevent the plant from becoming too straggly. These simple yet effective practices are essential for keeping the plant looking tidy and maximizing its ornamental value in the garden.
Sunlight and temperature considerations
The quantity and quality of light directly influence the flowering mechanism of the cape daisy, making it one of the most critical environmental factors for this plant. These plants are heliophilic, meaning they actively seek and thrive in sunlight, which powers the process of photosynthesis necessary for energy production and bloom development. Inadequate light levels will invariably lead to disappointment, as the plants will produce lush foliage at the expense of flowers. The intricate, colorful blooms for which Osteospermum is prized will fail to form, or if they do, they will be sparse and small. Ensuring they are not shaded by larger plants, trees, or structures is a fundamental step in their care.
The duration of daily sunlight exposure is just as important as its intensity for stimulating and sustaining a robust flowering cycle. Cape daisies should receive a minimum of six hours of direct, unfiltered sunlight each day to perform optimally. An ideal scenario involves exposure to the gentle morning sun and the more intense afternoon light, which together provide the full spectrum of light wavelengths the plant utilizes. In regions with exceptionally hot summers, some light afternoon shade can be beneficial to protect the plants from scorching, but this should not come at the expense of the minimum required duration of direct sun. A lack of sufficient sunlight duration is often the primary reason these plants fail to rebloom after their initial flush.
Temperature also plays a significant role in the life cycle and blooming habits of the cape daisy. These plants prefer moderate temperatures and tend to perform best when daytime temperatures are mild to warm and nighttime temperatures are cool. They often enter a period of dormancy or reduced flowering during the peak heat of midsummer, especially in hotter climates. This is a natural survival mechanism to conserve energy and water. As temperatures begin to cool down in late summer and early autumn, you will often be rewarded with a second, vibrant flush of blooms that can last until the first hard frost.
Understanding the plant’s temperature sensitivities is also crucial for its long-term survival, particularly in climates with cold winters. Cape daisies are typically grown as annuals in regions where temperatures drop significantly below freezing, as they are not frost-hardy. While some varieties can tolerate a light, brief frost, a sustained freeze will damage the plant tissue and ultimately kill the plant. Gardeners in colder zones who wish to preserve their plants must bring them indoors for the winter. This requires a gradual acclimatization process both in the autumn and again in the spring to avoid shocking the plant with sudden temperature changes.
Soil and potting requirements
The structural and chemical properties of the soil are foundational to the health of cape daisies, directly impacting root development and nutrient absorption. These plants absolutely require soil that drains exceptionally well, as their root systems are highly vulnerable to fungal diseases in soggy conditions. Heavy clay soils, which retain water for extended periods, are unsuitable unless they are heavily amended. The ideal soil texture is a sandy loam or a mix that feels light and crumbles easily. This type of structure contains enough air pockets to allow roots to breathe and prevents the compaction that can suffocate them and lead to decline.
When planting cape daisies in garden beds, thorough soil preparation is a worthwhile investment of time and effort. You should begin by digging the planting area to a depth of at least twelve inches to loosen any compacted soil. Following this, incorporate a generous amount of organic material, such as well-rotted compost, leaf mold, or aged manure. This amendment serves a dual purpose: it improves the soil’s structure for better drainage while also enriching it with a slow-release source of essential nutrients. For particularly heavy soils, adding coarse sand or fine grit can further enhance porosity, ensuring that water drains away from the root zone effectively after rain or irrigation.
For those growing cape daisies in containers, pots, or hanging baskets, the choice of potting medium is of utmost importance. A standard, all-purpose potting mix is often a good starting point, but it can be significantly improved for the needs of Osteospermum. To create an ideal mix, you can combine the all-purpose mix with equal parts perlite or pumice. This addition drastically increases the drainage capacity of the mix, preventing the soil from becoming waterlogged, which is a common issue in container gardening. Ensure that any container you choose has ample drainage holes at the bottom to allow excess water to escape freely.
The pH level of the soil, which measures its acidity or alkalinity, also influences the plant’s ability to access available nutrients. Cape daisies thrive in soil that is slightly acidic to neutral, with a preferred pH range between 5.5 and 6.5. Most commercially available potting mixes fall within this range, but it is wise to test garden soil if you are unsure of its pH. If your soil is too alkaline, you can amend it with elemental sulfur or peat moss to lower the pH. Conversely, if it is overly acidic, adding lime will help raise the pH into the optimal range for healthy growth and vibrant flowering.
Watering and feeding regimen
A consistent and thoughtful approach to watering is essential for keeping cape daisies vibrant and full of flowers. While these plants possess a notable degree of drought resistance once their root systems are well-established, they should not be subjected to prolonged periods of dryness. The best practice is to water the plants deeply whenever the top one to two inches of soil feel dry to the touch. This method ensures that the entire root ball is hydrated without leaving the soil in a constant state of saturation. Deep, infrequent watering encourages the roots to grow deeper into the soil in search of moisture, which in turn builds a more resilient and robust plant.
The method of water application can also impact the health of the plant. It is always preferable to water the soil at the base of the plant rather than watering from overhead. Applying water directly to the soil minimizes moisture on the leaves and flowers, which helps to reduce the risk of common fungal diseases like powdery mildew. Using a soaker hose, drip irrigation system, or a watering can with a long spout allows you to target the root zone effectively. During the hottest parts of the summer, watering in the early morning is ideal, as it allows the plant to hydrate before the peak heat of the day and reduces water loss through evaporation.
Proper nutrition is the fuel that powers the cape daisy’s impressive and continuous blooming performance. A regular feeding schedule is necessary to replenish the nutrients in the soil, especially for plants grown in containers where nutrients are leached out more quickly with each watering. A balanced, water-soluble fertilizer with an N-P-K ratio such as 10-10-10 or 20-20-20 is an excellent choice for promoting overall health, strong foliage, and abundant flowers. This type of fertilizer provides an equal proportion of nitrogen, phosphorus, and potassium, which are the primary macronutrients required for plant growth.
The frequency of fertilization should be adjusted based on the plant’s growing environment and stage of development. During the peak growing season in spring and early summer, fertilizing every two to three weeks is generally recommended. As the plant’s growth naturally slows down during the intense heat of midsummer or as autumn approaches, you can reduce the frequency to once a month. It is important to always follow the manufacturer’s instructions on the fertilizer packaging to avoid over-fertilizing, which can lead to fertilizer burn and damage the plant’s delicate roots. Diluting the fertilizer to half-strength is a safe practice if you are uncertain about the plant’s needs.
Pruning and maintenance tasks
Regular deadheading is arguably the most important maintenance task for ensuring a long and prolific blooming season for your cape daisies. This simple process involves the removal of flowers that have faded and started to wilt. When a flower is left on the plant, it begins the process of producing seeds, which consumes a significant amount of the plant’s energy reserves. By promptly snipping off these spent blooms, you prevent seed formation and signal the plant to redirect its energy back into producing new buds and flowers. This practice not only extends the flowering period but also keeps the plant looking neat and tidy.
To deadhead a cape daisy correctly, you should follow the stem of the faded flower down to the first set of healthy leaves and make a clean cut just above this junction. Using clean, sharp scissors or pruning snips will prevent tearing the stem and reduce the risk of introducing diseases. Making this task a regular habit, perhaps checking your plants every few days, will ensure you catch the spent flowers before they have a chance to start developing seeds. This small but consistent effort will pay significant dividends in the form of a continuous and vibrant floral display throughout the season.
In addition to deadheading, light pruning or “pinching back” can be highly beneficial, especially early in the growing season. When the plants are young and have developed several sets of leaves, you can pinch off the very tip of the main stems. This action encourages the plant to branch out from the nodes below the pinch point, resulting in a much bushier, more compact, and fuller plant. A denser plant structure not only looks more attractive but also produces more lateral stems, which means more potential sites for flower development. This technique is particularly useful for preventing the leggy, sparse growth that can sometimes occur.
A more significant pruning session may be necessary if the plants become overly leggy or overgrown by midsummer. During this time, you can cut back the entire plant by about one-third to one-half of its height. While this may seem drastic and will temporarily reduce the number of flowers, it rejuvenates the plant, stimulating a fresh flush of new, healthy growth and a subsequent round of profuse blooming as the weather cools in late summer and autumn. This “hard prune” is an effective way to reset the plant and improve its overall shape and vigor for the remainder of the season.
Managing common challenges
One of the most frequent challenges gardeners face with cape daisies is a sudden cessation of blooming, particularly during the hottest part of the summer. This is often not a sign of disease or poor care but rather the plant’s natural response to heat stress. Osteospermum varieties are native to regions with mild climates and they can struggle when temperatures consistently soar. During these heat waves, the plant conserves energy by halting flower production. The best course of action is to continue with proper watering, ensure the soil does not completely dry out, and wait for cooler temperatures to return, at which point the plant will typically resume its flowering cycle with renewed vigor.
Another common issue is the development of yellowing leaves, which can be caused by a variety of factors. The most common culprit is improper watering, specifically overwatering. When the soil is constantly saturated, the roots are deprived of oxygen, leading to root rot and an inability to absorb nutrients, which manifests as yellow foliage. Conversely, severe underwatering can also cause leaves to yellow and drop as the plant sheds foliage to conserve moisture. It is crucial to assess your watering practices and the soil’s moisture level before making adjustments. Nutrient deficiencies, particularly a lack of nitrogen or iron, can also lead to yellowing leaves and may require a targeted application of an appropriate fertilizer.
Pest infestations can also pose a significant challenge to the health of cape daisies. Aphids are one of the most common pests to affect these plants, clustering on new growth and flower buds where they feed on the plant’s sap. This can lead to distorted growth and a sticky residue known as honeydew, which can in turn attract sooty mold. Other potential pests include thrips and whiteflies. Regularly inspecting your plants, especially the undersides of leaves, can help you catch infestations early. Minor infestations can often be managed by spraying the pests off with a strong jet of water or by applying insecticidal soap or neem oil.
Finally, fungal diseases can become a problem, especially in humid conditions or when plants are overcrowded and have poor air circulation. Powdery mildew, which appears as a white, dusty coating on the leaves, is a frequent issue. Downy mildew and various forms of root rot can also occur, particularly in poorly drained soils. To prevent these diseases, it is important to provide adequate spacing between plants to promote good airflow, water the soil directly to keep foliage dry, and ensure the planting site or container has excellent drainage. If a fungal disease does take hold, removing affected leaves and applying an appropriate fungicide can help control its spread.