Successfully establishing the Japanese plum yew in your garden begins with a proper understanding of its planting requirements and propagation methods, which, while straightforward, demand attention to detail. This robust and shade-loving evergreen is a long-term investment in the structure of your landscape, and its slow growth rate means that getting the initial planting right is paramount to its future health and beauty. Whether you are introducing a new nursery-grown specimen to your garden or aiming to create new plants from an existing one, the foundational principles of site selection, soil preparation, and technique are critical. The primary methods for increasing your stock are through semi-hardwood cuttings, a reliable vegetative technique, or by sowing seeds, a process that requires significant patience but can be deeply rewarding.
Selecting the perfect planting site
The most crucial factor in siting a Japanese plum yew is light exposure. This plant unequivocally performs best in partial to full shade, a characteristic that makes it invaluable for challenging, low-light areas of the garden. An ideal location would be under the high canopy of mature trees, on the north or east side of a building, or in any area that is shielded from the harsh, direct sun of the afternoon. While it can tolerate some morning sun, excessive direct sunlight will lead to scorched, yellowed foliage and overall plant stress. Choosing a shady spot not only ensures the plant will thrive but also allows its deep green, lustrous needles to be displayed to their best advantage.
Equally important to light is the soil condition, specifically its ability to drain effectively. The Japanese plum yew is highly susceptible to root rot if its roots are left in standing water or consistently saturated soil. Before you even consider digging a hole, you must assess the drainage of the potential site. A simple percolation test, where you dig a hole and fill it with water to see how quickly it disappears, is a vital step. If the water remains for several hours, the site has poor drainage and will need significant amendment with organic matter to improve its structure, or a different location must be chosen altogether. Never plant this shrub in a low-lying area where water naturally collects.
Consider the plant’s mature size and growth habit when choosing its long-term home. Different cultivars of Cephalotaxus harringtonia have varying forms, from low, spreading groundcovers to taller, more upright, vase-shaped shrubs. Research the specific variety you have chosen to understand its ultimate height and spread. Placing the shrub where it will have ample room to grow to its natural size without crowding buildings, walkways, or other plants will prevent the need for constant pruning later, allowing its graceful form to develop unimpeded. Giving it the right amount of space from the beginning is a key component of a low-maintenance landscape design.
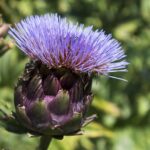
Finally, think about the plant’s placement in relation to environmental stressors. A site that offers protection from strong, sweeping winter winds will help prevent the foliage from drying out and developing winter burn. Planting on the leeward side of a structure or in a cluster with other evergreens can provide an effective windbreak. Additionally, consider the ecosystem of the site; this plant’s notable deer resistance makes it an excellent choice for areas with high deer populations where other evergreens like arborvitae or true yews (Taxus) would be quickly devoured. Selecting a site with these practical considerations in mind will contribute significantly to the plant’s success.
More articles on this topic
The step-by-step planting process
The best time to plant a Japanese plum yew is during the cooler, more forgiving seasons of spring or autumn. Planting at these times allows the shrub to establish its root system without the dual stresses of extreme heat and potential drought that are common in summer. A spring planting gives it the entire growing season to settle in before winter, while an autumn planting in a mild climate allows the roots to grow even as the top of the plant goes dormant. Avoid planting in the heat of summer or when the ground is frozen, as this puts unnecessary strain on the plant and significantly reduces its chances of successful establishment.
Begin by digging a planting hole that is two to three times as wide as the plant’s root ball, but no deeper than the root ball itself. The width of the hole is important because it loosens the surrounding soil, making it easier for the new roots to penetrate and expand outwards. It is a common and critical mistake to dig the hole too deep, as this can cause the plant to settle over time, effectively burying the crown (where the stem meets the roots), which can lead to decay and disease. The top of the root ball should be perfectly level with, or even slightly above, the surrounding soil grade.
Carefully remove the plant from its nursery container, gently teasing apart any circling or compacted roots at the bottom and sides of the root ball. If the roots are heavily pot-bound, you may need to use a sharp knife to make a few vertical slits down the side of the root ball to encourage outward growth. Place the plant in the center of the hole, ensuring it is positioned vertically. Begin backfilling the hole with the native soil you removed, breaking up any large clumps. It is generally recommended to use the native soil rather than heavily amended backfill, as this encourages the roots to grow out into the surrounding earth rather than staying confined within the “cushioned” planting hole.
Once the hole is backfilled, gently firm the soil around the base of the plant to eliminate any large air pockets. Create a shallow basin or “moat” of soil around the perimeter of the planting hole to help direct water to the root zone. Water the newly planted shrub thoroughly and deeply, allowing the water to soak in and settle the soil. Finally, apply a two- to three-inch layer of organic mulch, such as shredded bark or compost, around the base of the plant, being careful not to pile the mulch directly against the main stem, as this can trap moisture and encourage rot.
More articles on this topic
Propagation through semi-hardwood cuttings
Propagating the Japanese plum yew from cuttings is the most common and reliable method for creating new plants that are genetically identical to the parent. The ideal time to take these cuttings is from mid-summer to early autumn, when the current season’s growth has started to mature and become firm but has not yet fully hardened into woody stems. This stage, known as semi-hardwood, provides cuttings that have enough stored energy to form roots but are still active enough to do so readily. Look for healthy, vigorous stems from the current year’s growth for the best results.
Using a sharp, sterile pair of pruning shears or a knife, take cuttings that are approximately four to six inches in length. Make the cut just below a node, which is the point on the stem where a leaf or a set of leaves emerges, as this area contains a high concentration of hormones that encourage rooting. Carefully strip the needles from the lower half of the cutting, ensuring that at least two or three sets of needles remain at the top to carry on photosynthesis. A clean cut and careful stripping of the lower needles are important to prevent rot and disease during the rooting process.
To further increase the chances of success, dip the prepared base of each cutting into a rooting hormone powder or gel. While not strictly necessary, rooting hormone contains auxins that significantly stimulate root development and can speed up the process while also helping to protect the cut surface from fungal infection. Gently tap off any excess powder, as a thick coating can actually hinder root formation. This simple step can make a substantial difference in the percentage of cuttings that successfully develop into viable plants.
Insert the treated cuttings into a pot or tray filled with a sterile, well-draining rooting medium, such as a mix of perlite and peat moss or coarse sand. The medium should be pre-moistened and firm enough to hold the cuttings upright. To create a humid environment that prevents the cuttings from drying out, cover the pot with a clear plastic bag or a propagation dome. Place the cuttings in a warm location with bright, indirect light, and ensure the medium remains consistently moist but not waterlogged. Roots typically begin to form within several months, and a gentle tug on a cutting that resists will indicate that rooting has been successful.
Propagating from seed: a long-term project
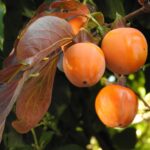
Growing Japanese plum yew from seed is a fascinating but lengthy process that requires a great deal of patience, making it a project for the dedicated horticulturist. The seeds are contained within the fleshy, olive-like fruits that mature on female plants in the autumn. For the seeds to be viable, pollination from a nearby male plant is necessary. Once the fruits ripen and fall, they can be collected, and the fleshy outer coating must be cleaned off completely to reveal the hard seed inside, as the pulp contains germination inhibitors.
The seeds of Cephalotaxus harringtonia have a complex dormancy that needs to be broken before they will germinate, a process that mimics natural seasonal cycles. This requires a period of warm, moist stratification followed by a period of cold, moist stratification. First, the cleaned seeds should be mixed with a slightly damp medium like sand or peat moss, placed in a sealed plastic bag, and kept in a warm place (around 68-75°F or 20-24°C) for about two to three months. This warm period allows the embryo inside the seed to mature. It is crucial to check the bag periodically to ensure the medium remains damp but not wet.
Following the warm stratification period, the seeds must undergo a cold period to break their physiological dormancy. The bag containing the seeds and moist medium should be moved to a cold environment, such as a refrigerator, for another three to four months at a temperature of around 34-41°F (1-5°C). This cold treatment simulates the winter season and is essential for triggering the germination process. Without this sequence of warm followed by cold stratification, the seeds will simply remain dormant and will not sprout.
After the cold period is complete, the seeds are finally ready for sowing. Plant them about half an inch deep in a well-draining seed-starting mix. Place the pot in a location with bright, indirect light and keep the soil consistently moist. Germination can be slow and erratic, sometimes taking several weeks or even months to occur. Once the seedlings have developed a few sets of true leaves and are large enough to handle, they can be carefully transplanted into individual pots to continue growing until they are large enough for the garden, a process that can take a couple of years.
Aftercare for newly planted or propagated yews
The period immediately following planting or the successful rooting of cuttings is a critical time that determines the long-term success of the new Japanese plum yew. The primary focus of aftercare is providing consistent and adequate moisture to the developing root system. For a newly planted shrub, this means a deep, thorough watering once or twice a week for the first few months, especially in the absence of steady rainfall. The goal is to keep the soil evenly moist but not saturated, allowing the roots to establish themselves in their new environment. For newly rooted cuttings, the soil should be kept consistently moist as they transition from a propagation environment to a normal growing one.
Protecting young plants from environmental extremes is another key aspect of aftercare. A newly planted shrub may benefit from a temporary shade cloth if an unexpected heatwave occurs, protecting its foliage from scorching while the roots are still getting established. Similarly, newly propagated plants that have been moved into individual pots are tender and should be gradually acclimated, or “hardened off,” to outdoor conditions over a week or two before being left fully exposed. This gradual introduction to direct sun and wind prevents shock and ensures a smoother transition.
Weed control around the base of the new plant is essential, as weeds will compete for vital water, nutrients, and light, potentially stunting the young shrub’s growth. Maintaining a two- to three-inch layer of organic mulch is the most effective way to suppress weeds while also conserving soil moisture and regulating soil temperature. Be sure to keep the mulch from touching the main stem of the plant. This simple mulching practice greatly reduces maintenance and provides a more stable environment for the developing root system.
Finally, patience is paramount. Do not be tempted to fertilize a newly planted shrub or recently rooted cutting for at least the first year. The plant needs to focus its energy on developing a strong, healthy root system, and the application of fertilizer can encourage weak, spindly top growth at the expense of root development, and can even burn the tender new roots. The best approach is to provide optimal growing conditions, particularly consistent water, and allow the plant to establish itself at its own slow and steady pace.
📷: A. Barra, CC BY-SA 4.0, via Wikimedia Commons