The successful establishment of the japanese lady fern begins with thoughtful site selection and proper planting technique, which are foundational to its long-term health and vitality. This fern is not a plant that thrives on neglect in an unsuitable location; rather, it flourishes when its specific environmental preferences are met from the very beginning. By investing time in preparing the soil and choosing a spot that offers the right balance of shade and moisture, you create an environment where the fern’s delicate rhizomes can readily establish and spread. This initial care is the most critical step in cultivating a lush and vibrant specimen that will grace your garden for years.
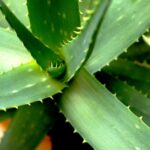
Understanding the growth habit of the japanese lady fern is key to its proper placement and planting. It is a rhizomatous fern, meaning it spreads slowly via underground stems, forming an expanding clump over time. This gentle spreading nature makes it an excellent groundcover in shaded areas or a beautiful filler plant amongst other woodland perennials like hostas and astilbes. When planting, it is important to provide enough lateral space for this clump-forming habit, ensuring it will not be overly crowded by more aggressive neighbors in the future.
The process of planting itself is straightforward but requires a gentle touch to avoid damaging the delicate roots and the crown, where new fronds emerge. The primary goal is to situate the plant at the correct depth and provide a welcoming substrate for new root growth. Rushing this stage or planting in poorly prepared soil can lead to a stressed plant that struggles to establish, resulting in weak growth and diminished foliage color. Careful attention to detail during this phase will be rewarded with a robust and resilient fern.
Beyond initial planting, understanding the methods of propagation is essential for any gardener wishing to expand their collection or rejuvenate an older clump. The most reliable and common method for this fern is rhizome division, a simple process that yields new plants identical to the parent. While propagation from spores is a more complex and lengthy endeavor, it offers a rewarding experience for the more adventurous horticulturist. Both methods provide sustainable ways to increase the presence of this elegant fern in the garden landscape.
Selecting the perfect planting site
Choosing the right location is arguably the most critical decision you will make for the long-term success of your japanese lady fern. The ideal site closely mimics the understory of a temperate forest, its native habitat. This means the primary consideration should be light exposure; the fern requires a location in partial to full shade. Dappled sunlight filtering through the canopy of deciduous trees is perfect, as is a spot that receives a few hours of gentle morning sun, but direct afternoon sun must be avoided at all costs as it will quickly scorch the delicate fronds.
More articles on this topic
The soil at the chosen site must be consistently moist but also offer excellent drainage. The japanese lady fern is not tolerant of drought, nor will it survive in waterlogged, boggy conditions where its rhizomes are prone to rot. Look for a naturally low-lying area in the garden where moisture might collect, or a spot near a downspout, provided the soil is well-amended to prevent it from becoming a swamp. Before finalizing the location, it’s wise to observe it over a few days to understand its light and moisture patterns throughout the day.
Protection from the elements is another important factor in site selection. Strong, gusty winds can easily damage the fern’s brittle fronds and will also rapidly dry out both the foliage and the surrounding soil. Planting it in a sheltered location, such as behind a hedge, next to a wall, or nestled amongst other sturdy perennials, will provide necessary protection. This is particularly important in more exposed garden settings where wind can be a constant challenge for delicate plants.
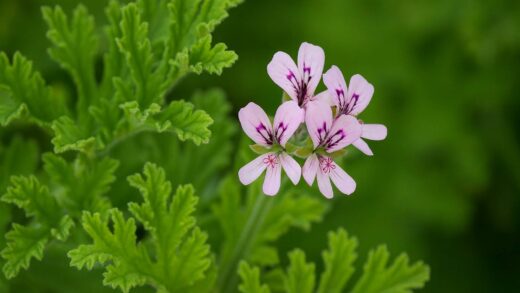
Finally, consider the plant’s companions in the garden bed. The japanese lady fern’s subtle coloration and fine texture are best appreciated when contrasted with plants of different forms and colors. It pairs beautifully with broad-leaved plants like hostas, the glossy foliage of brunnera, or the delicate flowers of woodland phlox and bleeding hearts. Ensure its neighbors have similar light and moisture requirements and will not grow so aggressively as to crowd out the fern, allowing it adequate air circulation and space to mature.
The step-by-step planting process
Once the ideal site has been selected, proper preparation of the planting area is the next crucial step. Begin by clearing the area of any weeds or turf, and then turn the soil over to a depth of at least 12 inches (30 cm). This is the time to incorporate generous amounts of organic matter, such as compost, well-rotted leaf mold, or peat moss, to improve the soil’s structure, fertility, and moisture-holding capacity. Aim for a final soil mixture that is loose, friable, and rich in humus.
More articles on this topic
Dig a planting hole that is approximately twice as wide as the root ball of the fern but no deeper. It is essential that the crown of the plant—the point where the fronds emerge from the rhizome—is not buried too deep. Planting the crown at or just slightly above the level of the surrounding soil will prevent crown rot, a common issue when ferns are planted too deeply. Gently tease out any circling roots at the bottom of the root ball to encourage them to grow outwards into the prepared soil.
Carefully place the fern in the center of the hole, ensuring its crown is at the correct depth. Begin backfilling the hole with the amended soil, gently firming it around the root ball with your hands to eliminate any large air pockets. Avoid compacting the soil too heavily, as this can impede drainage and root growth. Once the hole is filled, the plant should be sitting at the same level it was in its nursery pot.
The final and most critical step in the planting process is to water the fern thoroughly and deeply. This initial watering helps to settle the soil around the roots, removing any remaining air pockets and ensuring good contact between the roots and the soil. Continue to water the newly planted fern regularly for the first few weeks to keep the soil consistently moist while it establishes its root system. Applying a 2-3 inch (5-7 cm) layer of organic mulch around the plant will further help to conserve moisture and regulate soil temperature.
Propagation through rhizome division
Rhizome division is the most common, effective, and straightforward method for propagating the japanese lady fern. This technique is best carried out in the early spring, just as the new growth, or fiddleheads, are beginning to emerge from the soil. Performing the division at this time allows the newly separated plants to take full advantage of the entire growing season to establish a robust root system before winter. Alternatively, division can be done in the autumn after the plant has gone dormant, but spring is generally preferred.
To begin the process, you must first carefully excavate the entire clump of the fern. Use a sturdy spade or garden fork to dig around the perimeter of the plant, being careful to go deep enough to get under the entire root mass. Once the clump is loosened, gently lift it from the ground and place it on a tarp or other clean surface. Shake or gently wash off the excess soil so that you can clearly see the structure of the rhizomes and the crown.
With the rhizome exposed, you can identify the best places to make your cuts. Look for natural points of separation or sections that have a healthy cluster of roots and at least two or three growing points (buds or fiddleheads). Using a sharp, sterilized knife, a hori-hori, or a clean spade, decisively cut the rhizome into smaller sections. Ensure each new division is a viable size; divisions that are too small may struggle to establish and survive on their own.
Immediately after dividing, it is crucial to replant the sections as quickly as possible to prevent the delicate roots from drying out. Plant the new divisions in a prepared site at the same depth they were previously growing, following the same planting guidelines as for a new nursery plant. Water them in thoroughly and keep the soil consistently moist for the next several weeks. It is normal for the newly divided plants to show some signs of transplant shock, but with proper care, they will soon recover and begin to produce new growth.
Exploring propagation from spores
Propagating japanese lady ferns from spores is a fascinating and rewarding process, though it requires significantly more patience and precision than rhizome division. Spores are the fern’s method of sexual reproduction and can be found on the undersides of mature, healthy fronds. They appear as small dots, called sori, which in the case of this fern, are typically arranged in a chevron or herringbone pattern along the leaflets. The sori contain the sporangia, which in turn hold the microscopic spores.
The first step is to collect the spores at the right time, usually in mid to late summer when the sori have ripened but not yet fully released their contents. To check for ripeness, you can gently tap a frond over a piece of white paper; if a fine, dust-like powder falls, the spores are ready. To collect them, carefully cut a frond that has dark, plump sori and place it, spore-side down, on a clean sheet of paper in a dry, draft-free location. Over the next few days, the spores will be released onto the paper.
Sowing the spores requires a sterile environment to prevent contamination from mold and algae. A clean, clear plastic container with a lid makes an excellent miniature greenhouse. Fill the container with a sterilized, fine-textured growing medium, such as a seed-starting mix or sifted peat moss, and moisten it thoroughly with distilled or boiled water that has cooled. Carefully sprinkle the collected spore dust as evenly as possible over the surface of the moist medium; do not cover the spores with soil.
Place the lid on the container and position it in a location with bright, indirect light but no direct sun. Keep the medium consistently moist by misting with sterile water as needed. Germination is a two-stage process and can take several weeks to months. First, a tiny, heart-shaped structure called a prothallus will form. Fertilization occurs on the prothallus, and only then will the first tiny fern fronds, the sporophytes, begin to appear. Once these young ferns are large enough to handle, they can be carefully transplanted into individual small pots to continue growing.
📷: David J. Stang, CC BY-SA 4.0, via Wikimedia Commons