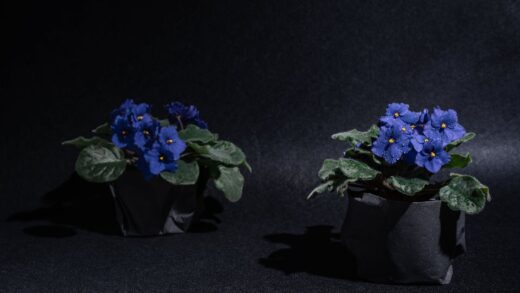
Successfully planting and propagating African violets is a deeply rewarding aspect of cultivating these beautiful houseplants, allowing you to expand your collection or share them with others. The process begins with selecting the right container and potting medium, which are foundational to establishing a healthy plant. As previously discussed, a light, airy, and well-draining soilless mix is non-negotiable for their sensitive root systems. When potting a new plant, whether it’s a young plug or a newly separated sucker, choosing a pot that is proportionally small is critical. This encourages the development of a compact root system and promotes blooming rather than excessive foliage growth.
When you are ready to pot your African violet, gently place the plant in the center of the pot, holding it at the desired height. The crown of the plant, where the leaves emerge from the main stem, should sit just above the soil line. Burying the crown is a common mistake that can quickly lead to crown rot, a fatal condition for the plant. Fill the pot with your chosen potting mix, gently tapping the sides of the pot to help the mix settle around the roots. Avoid compacting the soil with your fingers, as this can reduce the aeration that is so vital for the roots.
After potting, the plant should be watered thoroughly to help the soil settle and to provide initial hydration. Bottom watering is the preferred method here as well, as it ensures the entire root ball is moistened without disturbing the freshly potted plant or wetting the crown. Allow the pot to soak up water until the surface of the soil is damp, then remove it from the water and let any excess drain away completely. For the first few weeks, it can be beneficial to keep the newly potted plant in a slightly more humid environment, such as under a clear plastic dome or inside a plastic bag, to help it acclimate and reduce transplant shock.
Repotting is a necessary maintenance task that should typically be performed once or twice a year. Over time, the potting mix can become compacted, break down, and accumulate fertilizer salts, all of which are detrimental to the plant’s health. Signs that a plant needs repotting include slowed growth, the soil pulling away from the sides of the pot, or roots growing out of the drainage holes. When repotting, you can often reuse the same size pot, simply refreshing the soil and trimming away any dead or circling roots to rejuvenate the plant.
Propagation from leaf cuttings
One of the most popular and reliable methods for propagating African violets is through leaf cuttings. This technique allows you to create numerous new plants from a single parent, and it is remarkably straightforward. To begin, select a healthy, mature leaf from the middle rows of the plant; avoid the oldest, outermost leaves and the youngest, central leaves. Using a clean, sharp blade, cut the leaf stem (petiole) at a 45-degree angle, leaving about 2-4 cm (1-1.5 inches) of the stem attached to the leaf. The angled cut provides a larger surface area for root formation.
After taking the cutting, you can place the stem directly into a propagating medium. A light, soilless mix, similar to the one used for mature plants, works very well. Insert the stem into the medium just deep enough for it to stand upright, ensuring the leaf itself is not touching the soil. Alternatively, many growers have great success rooting leaves in water. Simply place the leaf cutting in a small, narrow-necked bottle or jar filled with water, ensuring only the stem is submerged. Change the water weekly to keep it fresh and prevent bacterial growth.
Patience is key during the rooting process, which can take anywhere from a few weeks to a couple of months. You can create a humid microclimate for your cuttings by covering the pot with a clear plastic bag or placing it in a small propagator. This helps to keep the leaf from drying out before it has a chance to develop roots. Place the cuttings in a location with bright, indirect light and maintain a stable, warm temperature. Once roots have formed and tiny new plantlets begin to emerge at the base of the petiole, you know the propagation has been successful.
Once the new plantlets, often called “pups,” have developed a few leaves of their own and are about 2-3 cm (about an inch) tall, they are ready to be separated from the parent leaf. Carefully unpot the entire clump and gently tease the small plantlets apart, each with its own tiny root system. The original parent leaf can be discarded or even repotted to potentially produce another round of plantlets. Pot each new, tiny plant into its own small container, typically a 5 cm (2-inch) pot, using a fresh, light potting mix and care for it as you would a mature plant.
Division and suckers
Propagation by division is a simple method best suited for multi-crowned or trailing varieties of African violets. Over time, a single plant can develop multiple growing points or crowns, resulting in a crowded and overgrown appearance. Dividing the plant not only provides you with new specimens but also rejuvenates the original plant, improving its shape and flowering potential. To divide a plant, carefully remove it from its pot and gently shake off the excess soil to expose the root structure and the different crowns.
With the plant unpotted, you can clearly see where the individual crowns are joined. Using your fingers or a clean, sharp knife, carefully separate the crowns from each other. The goal is to ensure that each new division has a healthy portion of the root system attached to it. Try to minimize damage to the roots during this process. If any of the divided sections have excessively long or damaged roots, you can trim them back slightly to encourage new, healthy root growth once potted.
Each newly divided section should be potted up individually into its own appropriately sized pot. As with any new planting, use a fresh, well-draining African violet mix and center the crown just above the soil line. Water the new divisions thoroughly using the bottom watering method and allow them to drain completely. It is especially important to provide a high-humidity environment for the first few weeks after division, as this will help the plants recover from the stress of the process and establish their root systems more quickly.
Suckers, the small plantlets that form in the leaf axils of the main plant, offer another easy route to propagation. While these are often removed to maintain a single-crowned, symmetrical plant, they can be allowed to grow large enough to be propagated. Once a sucker has developed a few of its own leaves and is large enough to handle, it can be carefully removed from the parent plant using a sharp, pointed tool. Often, these suckers will already have some rudimentary roots, making them very easy to pot up and grow on as independent plants.
Growing from seed
Growing African violets from seed is a more advanced and time-consuming method of propagation, but it is the primary way that new hybrids are created. It offers the unique opportunity to cultivate a plant with entirely new and unpredictable combinations of flower color, leaf type, and form. The process begins with pollination, which involves transferring pollen from the anther of one flower to the stigma of another. This can be done with a small, soft brush. If pollination is successful, the base of the flower will begin to swell as a seed pod develops over the next several months.
Once the seed pod has matured and dried on the plant, it is ready for harvesting. The pod will contain hundreds of tiny, dust-like seeds. To sow the seeds, prepare a clean, shallow container filled with a sterilized, fine-grade seedling mix. The mix should be pre-moistened to be damp but not wet. Carefully sprinkle the seeds as evenly as possible over the surface of the medium. Do not cover the seeds with soil, as they require light to germinate.
After sowing, the container must be covered with a clear lid or plastic wrap to maintain a very high humidity level, which is essential for germination. Place the container in a warm location with bright, indirect light or under grow lights. Germination can take anywhere from a few weeks to several months, so patience is crucial. During this time, ensure the growing medium remains consistently moist, misting it lightly with a fine spray if it begins to dry out.
Once the seedlings have emerged and developed their first true leaves, you can begin to gradually acclimate them to lower humidity by slightly opening the cover for increasing periods each day. When the seedlings are large enough to handle, they can be painstakingly transplanted into individual small pots or cell packs. This is a delicate operation requiring a steady hand. From this point on, they can be cared for in the same way as young plantlets obtained from leaf cuttings, though it will take significantly longer for them to reach a flowering size.
Post-planting care
The period immediately following planting, repotting, or propagation is a critical time for the young or stressed African violet. The primary focus during this stage is to minimize stress and encourage the establishment of a new, healthy root system. One of the most effective ways to do this is to provide a high-humidity environment. Placing the newly potted plant under a plastic dome, in a clear plastic bag, or in a terrarium for the first two to four weeks can make a significant difference in its recovery and subsequent growth.
During this establishment phase, it is important to be cautious with watering and to withhold fertilizer completely. The plant’s root system is not yet fully functional, and it cannot absorb a large amount of water or nutrients. Keep the soil lightly moist, but be very careful to avoid overwatering, which is a major risk at this stage. Fertilizing a plant with a compromised or developing root system can easily lead to root burn and should be avoided until you see clear signs of new growth, indicating that the plant has successfully established itself.
Light conditions should also be carefully managed after planting. While bright, indirect light is necessary for long-term health, a newly transplanted violet may benefit from slightly lower light levels for the first week or so. This reduces the demands on the plant for photosynthesis and water transpiration while its roots are recovering. After a week, you can gradually move it back to its ideal lighting conditions. Continue to avoid any direct sunlight, which would be especially damaging to a stressed plant.
Be patient and observant in the weeks following any planting or propagation activity. Look for signs of new leaf growth from the center of the crown. This is the best indication that the plant has successfully transitioned and is beginning to thrive in its new environment. Once you see this new growth, you can gradually acclimate the plant back to normal room humidity and begin a regular watering and fertilizing schedule, starting with a very dilute fertilizer solution.