Successfully establishing a lemon tree, whether from a seed, a cutting, or a grafted plant, requires a foundational understanding of its specific needs and a methodical approach. The process begins long before the plant is in the ground, starting with the selection of a suitable planting site that offers ample sunlight and protection from harsh elements. Furthermore, preparing the soil to create a welcoming environment for the roots is a critical step that significantly influences the tree’s future growth and productivity. This initial phase of planting is a crucial investment in the long-term health and vitality of the tree, setting the stage for a vigorous life and bountiful harvests.
The journey of propagation starts with choosing the right method, as each has its own timeline and set of requirements. Growing a lemon tree from a seed is a patient endeavor, often taking many years to produce fruit, and the resulting tree may not have the same characteristics as its parent. Propagation from cuttings offers a faster route to a mature, fruit-bearing tree that is a genetic clone of the parent plant. Grafting, a more advanced technique, involves joining a desirable lemon variety onto a hardy rootstock, combining the best qualities of both plants to create a resilient and productive tree.
Once a young tree is obtained or propagated, the planting process itself must be executed with care. The hole for the tree should be dug wider than it is deep, allowing the roots to spread out horizontally into the prepared soil. It is essential to plant the tree at the correct depth, ensuring that the root collar—the point where the roots meet the trunk—is slightly above the soil line to prevent moisture from accumulating against the trunk, which can lead to collar rot. After placing the tree in the hole, the soil should be backfilled gently but firmly to eliminate air pockets.
Following the physical act of planting, immediate aftercare is vital for the tree to establish itself successfully. A thorough watering is necessary to settle the soil around the roots and provide essential hydration. Applying a layer of organic mulch around the base of the tree, while keeping it away from the trunk, helps to conserve soil moisture, suppress weeds, and regulate soil temperature. This initial care, combined with a well-chosen site and proper planting technique, gives the young lemon tree the best possible start in its new environment.
Propagation from seed
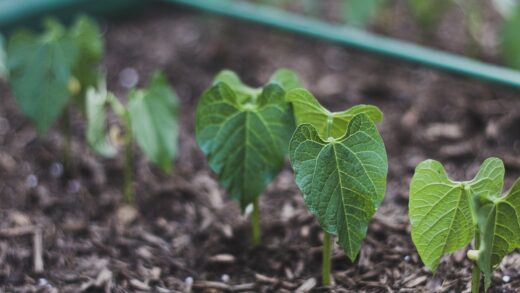
Propagating a lemon tree from a seed is an accessible and rewarding project, though it demands patience. The first step is to select seeds from a ripe, healthy lemon, as these will have the best chance of germination. After extracting the seeds, they should be washed thoroughly to remove any clinging pulp and the sugary coating, which can inhibit germination or encourage fungal growth. For optimal results, it is best to plant the seeds immediately while they are still moist, as their viability can decrease if they are allowed to dry out completely.
More articles on this topic
Once the seeds are prepared, they can be planted in a small pot filled with a sterile, well-draining seed-starting mix. Plant the seed about half an inch deep and lightly cover it with the mix. The soil should then be gently moistened, but not waterlogged, and the pot should be covered with a plastic wrap or a clear dome to create a humid environment that encourages sprouting. Placing the pot in a warm, bright location, but out of direct sunlight, will provide the ideal conditions for germination, which can take several weeks.
After the seed has sprouted and the seedling has developed a few sets of true leaves, the plastic cover can be removed to acclimate the young plant to the ambient humidity. It is crucial to continue providing the seedling with bright, indirect light and to keep the soil consistently moist. As the seedling grows stronger, it can be gradually introduced to more direct sunlight. Careful attention during this early stage is critical for developing a robust root system and a sturdy main stem.
It is important to manage expectations when growing a lemon tree from seed. The resulting tree may not be a true replica of the parent fruit, a phenomenon known as genetic variability. Furthermore, a seed-grown lemon tree can take anywhere from five to fifteen years to mature enough to produce its first flowers and fruit. While it is a lengthy process, growing a lemon tree from a tiny seed into a mature plant offers a unique and deeply satisfying horticultural experience.
Propagation from cuttings
Propagating lemon trees from cuttings is a highly effective method for creating a new plant that is a genetic clone of the parent. This means the new tree will have the exact same characteristics, including fruit quality and growth habit, and it will reach maturity much faster than a seed-grown tree. The process begins with selecting a healthy, vigorous branch from the parent tree during the spring or early summer when the plant is in an active growth phase. The ideal cutting is a semi-hardwood stem from the current season’s growth, about four to six inches long, with several nodes.
More articles on this topic
Once the cutting has been selected, it should be prepared for rooting. Use a sharp, sterile pruning shear or knife to make a clean cut just below a leaf node. Remove the leaves from the lower half of the cutting to reduce moisture loss and expose the nodes where roots will form. To increase the chances of successful rooting, the cut end of the stem can be dipped into a rooting hormone powder or gel. This encourages the development of a strong and healthy root system more quickly.
The prepared cutting should then be planted in a suitable rooting medium. A mix of perlite and peat moss or a specialized propagation mix provides the necessary moisture retention and aeration for root development. Insert the lower half of the cutting into the medium, ensuring that the nodes where leaves were removed are buried. After planting, water the medium thoroughly and cover the pot with a plastic bag or place it in a propagator to maintain high humidity around the cutting, which is essential for preventing it from drying out before it can form roots.
Place the container in a warm location with bright, indirect light. It is important to keep the rooting medium consistently moist but not saturated. Rooting can take anywhere from several weeks to a few months. You can check for root development by gently tugging on the cutting; if there is resistance, it is a sign that roots have formed. Once a substantial root system has developed, the new lemon tree can be gradually acclimated to lower humidity and eventually transplanted into a larger pot to continue its growth.
The grafting technique
Grafting is an advanced propagation technique used by horticulturalists to combine the desirable characteristics of two different plants into one. In the context of lemon trees, this typically involves taking a cutting, known as a scion, from a lemon variety with excellent fruit quality and attaching it to the rootstock of another, more resilient citrus tree. The rootstock is chosen for its vigor, disease resistance, and adaptability to specific soil types or climatic conditions. This method ensures that the resulting tree is both productive and robust.
The success of grafting depends on precise technique and timing. The procedure is usually performed in the spring or late summer when the bark of the rootstock is “slipping,” meaning the cambium layer is actively growing and the bark can be easily separated from the wood. There are several grafting methods, but a common one for citrus is T-budding or shield budding. This involves making a T-shaped incision in the bark of the rootstock and inserting a single bud, the scion, cut from the desired lemon variety into the slit.
Proper alignment of the cambium layers of the scion and the rootstock is absolutely critical for a successful graft union. The cambium is a thin layer of actively dividing cells located just beneath the bark, and it is responsible for healing and forming the connection between the two plant parts. Once the bud is inserted, the graft is securely wrapped with grafting tape or rubber to hold the pieces firmly together, maintain pressure, and prevent the union from drying out. The wrapping protects the wound while allowing the cambium tissues to fuse.
After the graft has been made, the plant requires careful monitoring. The wrapping is typically left in place for several weeks to allow the union to heal completely. If the graft is successful, the bud will remain green and plump and may begin to swell, indicating that a vascular connection has been established. Once the bud starts to grow into a new shoot, the part of the rootstock above the graft union is often cut back to encourage all the plant’s energy to be directed into the growth of the new scion, which will eventually form the main trunk and branches of the new lemon tree.
Planting a young tree
The process of planting a young lemon tree, whether in a container or in the ground, is a pivotal moment that determines its future health. The first step is to prepare the planting location. For container planting, choose a pot that is at least a few inches wider in diameter than the nursery container and ensure it has excellent drainage. For in-ground planting, select a site that receives full sun for at least six to eight hours a day and is sheltered from strong winds. The soil should be well-draining; if you have heavy clay soil, amend it with organic matter like compost to improve its structure and drainage.
When you are ready to plant, carefully remove the young tree from its nursery pot, taking care not to damage the root ball. Gently inspect the roots and loosen any that are tightly coiled or circling the bottom of the pot. This encourages the roots to grow outward into the new soil rather than continuing to grow in a restricted pattern. Dig a hole that is approximately twice as wide as the root ball but no deeper. It is crucial that the tree is not planted too deep, as this can lead to serious problems like collar rot.
Position the tree in the center of the hole, making sure that the top of the root ball is level with or slightly above the surrounding soil surface. Once you are satisfied with the depth and position, begin backfilling the hole with the excavated soil. Gently firm the soil around the root ball as you go to eliminate any large air pockets, which can dry out the roots. Avoid heavily compacting the soil, as this can impede water drainage and root growth.
Immediately after planting, the tree needs to be watered thoroughly and deeply. This helps to settle the soil, remove any remaining air pockets, and provide essential moisture to the roots as they begin to establish themselves in their new environment. Applying a two to three-inch layer of organic mulch, such as wood chips or compost, around the base of the tree will help conserve moisture and regulate soil temperature. Be sure to keep the mulch a few inches away from the trunk itself to prevent moisture buildup against the bark.
📷 Pixabay