Freesia, this fragrant plant originating from South Africa, has captured the hearts of many garden enthusiasts. However, to ensure it graces us with abundant blooms year after year, it’s important to understand a few basic steps of its care, among which pruning and cutting back play a prominent role. Although pruning freesias is not as drastic an intervention as with many other garden plants, proper cutting back at the right time is essential for maintaining the plant’s health and laying the foundation for the next year’s floral splendour. Understanding this process is crucial for anyone who wants to enjoy the beauty and fragrance of these wonderful flowers in the long term. By applying the correct techniques, we not only preserve the plant’s vitality but also increase its resistance to diseases.
In freesia care, the primary goal of pruning is to remove spent flowers and properly manage the foliage at the end of the growing season. This process helps the plant direct its energy towards strengthening the corms instead of wasting it on seed production. Strong, well-nourished corms will result in richer and more vigorous blooms the following season. It is important to note that the term “pruning” for freesias does not imply a complex shaping procedure, but rather a kind of tidying, maintenance intervention.
The timing of pruning tasks is crucial in the freesia’s life cycle. Continuous removal of spent flowers occurs during the blooming period, while the leaves should only be cut back once they have completely yellowed and dried. Premature cutting back can prevent the corms from storing enough nutrients for the next year’s growth and flowering. Therefore, patience is necessary, and one must wait until the plant naturally completes its vegetative cycle.
Using the appropriate tools is also essential for successful pruning. Always use sharp and clean pruning shears or a knife to ensure clean cuts and to avoid unnecessarily damaging the plant’s tissues. Using disinfected tools reduces the risk of transmitting pathogens, thus preventing potential plant diseases. This is especially important if you are caring for multiple plants simultaneously, as diseases can easily spread from one to another via improperly cleaned tools.
Removing Spent Flowers: For Continuous Blooming
Regularly removing spent freesia flowers, also known as deadheading, is one of the most important care operations during the blooming period. This seemingly simple task has multiple positive effects on the plant. Primarily, it is aesthetically beneficial, as the sight of withered flower heads detracts from the plant’s overall appearance. Furthermore, it encourages the formation of new flowers, as the plant does not waste energy on ripening seeds.
More articles on this topic
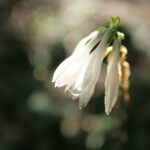
Spent flowers are best removed when the petals begin to brown and lose their firmness. Cut the flower stalk directly below the flower head, or if the entire inflorescence has faded, cut the flower stalk at its base with sharp pruning shears. Ensure the cut is clean and does not damage the stalk. This intervention encourages the freesia to develop additional flower buds, thereby extending the blooming period and maximizing the number of flowers.
It is important to note that removing spent flowers is not the same as cutting back the foliage. The leaves, at this stage, should be left untouched as they continue to photosynthesize and produce nutrients for the corms. Only remove the flowers and flower stalks, and leave the green leaves on the plant until they naturally wither. This ensures that the corms gather enough energy for the next year’s flowering.
For continuous blooming, it is advisable to regularly check the freesias, even daily or every other day, and remove the spent parts. This small attention can greatly contribute to freesias blooming long and abundantly in your garden or even in a pot. The care will be rewarded with the wonderful sight and intoxicating fragrance that these plants provide.
Managing Foliage After Blooming
After freesias have bloomed, the foliage plays a crucial role in laying the groundwork for the following year’s flowering. Although it might be tempting to quickly remove the no-longer-very-decorative leaves, this would be a serious mistake. The leaves continue to produce energy through photosynthesis, which the plant stores in the corms. This energy is vital for the corms’ survival during the dormant period and for the development of new shoots and flowers the next spring.
More articles on this topic
Therefore, after flowering, allow the freesia leaves to die back naturally. This process means the leaves gradually turn yellow, then brown, and dry out. This is a sign that the plant has drawn the nutrients and water from them back into the corm. As long as the leaves are green, they are actively working for the plant, so do not cut them prematurely.
The drying of the leaves can take several weeks after flowering ends. During this period, the plant should still be watered moderately, especially if the weather is dry, but avoid overwatering, which can lead to corm rot. Nutrient replenishment should also not be forgotten; a fertilizer low in nitrogen but rich in potassium and phosphorus can aid the optimal development of the corms during this critical period.
When the foliage has completely dried and is easily detached from the corm, then it is time for its removal. This can be done carefully by hand, or the leaves can be cut at soil level with clean shears. If the corms are left in the ground to overwinter (possible in milder climates), removing the dry foliage helps prevent the development of fungal diseases and the establishment of pests.
Cutting Back Freesias Before the Dormant Period
The complete drying of freesia foliage signals that the plant has entered its dormant period. This is the point at which the leaves can be safely removed without harming the next year’s bloom. Cutting back at this stage primarily serves to remove plant debris and keep the area clean, which reduces the chances of diseases and pests overwintering. Therefore, correctly timed cutting back contributes to the healthy overwintering of freesia corms.
If freesia corms are left in the soil for winter – which is only recommended in frost-free or very mild winter areas – cut the completely dried foliage back to ground level. Afterwards, it is advisable to cover the area with a layer of mulch (such as leaves or straw) to provide protection for the corms against potential cold effects. This mulch layer also helps retain soil moisture and prevents weed growth.
However, in most climates where freesias are not hardy, the corms must be lifted from the ground in autumn, before the first frosts. In this case, the foliage is cut back either before or immediately after lifting the corms. Once the leaves have completely dried, cut them back leaving a stub of about 2-3 centimetres (about an inch) above the corm. This makes handling and storing the corms easier.
The cleanliness of the tools used during cutting back remains of utmost importance. By using sharp, disinfected shears or a knife, you will prevent the transmission of pathogens and damage to the cut surfaces. After careful cutting back, remove plant debris from the area and, if possible, compost it, provided it showed no signs of disease. This ensures garden hygiene and a healthy start for freesias the following year.
“Pruning” During Lifting and Storing Corms
Although lifting and storing corms is not pruning in the classic sense, certain cleaning and preparation steps can be included here, which can be considered a type of “pruning.” After the freesia foliage has completely dried and the corms have been carefully lifted from the ground, they need to be cleaned. This process involves removing excess soil, old root pieces, and any remaining dried leaf stubs from the corms.
First, allow the lifted corms to dry for a few days in a cool, well-ventilated, shady place. This helps the outer layers to cure and reduces the risk of rot during storage. After drying, gently rub off any adhering soil. Remove dried roots and leaf remnants by hand or with a small brush. If a leaf stub is still relatively long, it can now be safely cut back very close to the top of the corm.
During cleaning, thoroughly inspect the corms. Look for damaged, soft, or mouldy specimens. Such corms showing signs of disease should be immediately separated and discarded to avoid infecting the healthy stock. This selection process is also a form of “pruning,” as you are removing undesirable parts. Only store intact, firm, and healthy corms for the next season.
The cleaned and sorted freesia corms should then be stored in a dry, cool (around 10-15 degrees Celsius or 50-59 degrees Fahrenheit), frost-free, and well-ventilated place until spring. A paper bag, mesh bag, or a tray filled with dry peat moss, sawdust, or vermiculite can be suitable for this purpose. Ensuring proper storage conditions is essential for the corms to remain viable in spring and to sprout again, then delight us with abundant blooms.
Common Mistakes in Freesia Pruning and How to Avoid Them
During freesia care, including pruning, mistakes can occur that negatively affect the plant’s health and flowering ability. One of the most common mistakes is removing the foliage too early. Many people, for aesthetic reasons, cut back yellowing leaves before they have completely dried. By doing so, however, they deprive the corm of vital nutrients necessary for the next year’s growth and flowering, so the plant may weaken, and flowering may be absent or sparse.
Another common problem is the use of inappropriate tools or their insufficient cleaning. Using blunt pruning shears damages plant tissues, which can lead to slower wound healing and greater susceptibility to diseases. Non-disinfected tools can easily transmit pathogens from one plant to another. Always ensure you work with sharp and clean tools, and if possible, disinfect them after each plant or at least at the end of the task.
Excessive cutting back, especially of flower stalks, can also cause problems. While removing spent flower heads is beneficial, cutting the entire flower stalk too early or too deeply – before all the buds on it have opened – can reduce the length of the blooming period. Carefully examine the flower stalk and cut it off completely only when all the flowers on it have faded or if only withered parts remain.
Finally, but no less importantly, improper handling during the dormant period can also cause issues. If corms are left in the ground in an area where severe frosts are expected, or if lifted corms are not stored correctly (in a place that is too damp, too warm, or freezing), they can be damaged or die. Always inform yourself about the needs of freesias and provide them with the appropriate conditions at every stage of their vegetative cycle, so that “pruning” interventions will truly serve the plant’s well-being.