Freesia, this fragrant and colourful flower originating from South Africa, has already captured the hearts of many garden enthusiasts. This is no accident, as its graceful appearance, long-lasting bloom, and characteristic sweet fragrance are all equally captivating. While freesia care does require some attention and expertise, with the right knowledge, anyone can successfully grow healthy, abundantly flowering plants. In this article, we will thoroughly explore every important step of freesia cultivation, from selecting the corms to cutting the flowers and overwintering the corms. Our aim is to provide all the necessary information so that our readers can also experience the joy of growing freesias and marvel at the beauty of these wonderful plants.
Freesia belongs to the Iridaceae family and was named after the German botanist and physician Friedrich Heinrich Theodor Freese. In its native habitat in the Cape region of South Africa, it adapted to a climate of winter rainfall and summer drought, which also determines its cultivation requirements. It is important to understand these fundamental biological characteristics to provide the plant with optimal conditions. Thanks to the work of breeders, countless freesia varieties of different colours and shapes exist today, among which everyone can find one that suits their garden or home. The range extends from simpler, single-flowered types to full, ruffled-petaled varieties.
Many people know and love freesia as a cut flower, as its durability and intense fragrance make it a popular element in bouquets and decorative arrangements. However, it is worth knowing that with proper care, we can enjoy its flowers for a long time in our gardens or even grown in pots. Freesia not only offers aesthetic pleasure but can also contribute to garden biodiversity by attracting pollinating insects. In this care guide, we will also address how to extend the flowering period and the lifespan of cut flowers.
The key to successful freesia cultivation lies in attention to detail, including the correct planting depth, water supply regulation, and overwintering conditions. Although for some, keeping the corms intact during the dormant period can be a challenge, this task can also be easily managed by learning the correct techniques. We hope that this comprehensive guide will help dispel any doubts related to freesia cultivation and encourage as many people as possible to embark on growing this wonderful flower. Prepare for a fragrant and colourful journey into the world of freesias!
Botanical Characteristics of Freesia
The genus Freesia comprises approximately 16-20 species, all originating from the southern part of Africa, specifically the Cape Floristic Region. These are perennial herbaceous plants that develop from characteristic underground storage organs called corms. A corm is actually a modified, swollen underground stem base that stores nutrients and allows the plant to survive unfavourable periods. These corms are conical or rounded in shape and are protected by a fibrous, dry tunic (outer covering). Each year, a new corm forms on top of the old one, while the lower one gradually withers.
More articles on this topic
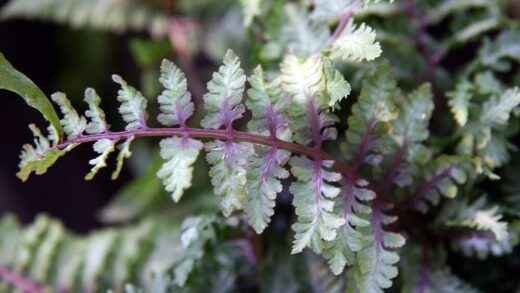
Freesia leaves are narrow, sword-shaped, typically bright green, and arranged fan-like on the short, above-ground stem. The length of the leaves can vary depending on the variety and growing conditions but usually ranges from 10 to 30 cm. The plant’s habit is generally loose and graceful, contributing to its elegant appearance. It is important to note that the health and integrity of the leaves are crucial for photosynthesis, which provides the energy for flowering and the development of the new corm.
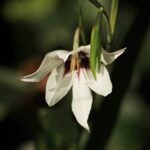
The most distinctive and highly valued part of freesias is their inflorescence. The flowers are borne in a one-sided spike, technically a secund cyme, which is carried on a slender, often branched stem known as a scape. This arrangement, where the flowers open sequentially along one side of the stem, makes the plant particularly striking. A single stem can typically bear 5-10 flowers, or even more, which open progressively from the bottom upwards, thus ensuring a long flowering period.
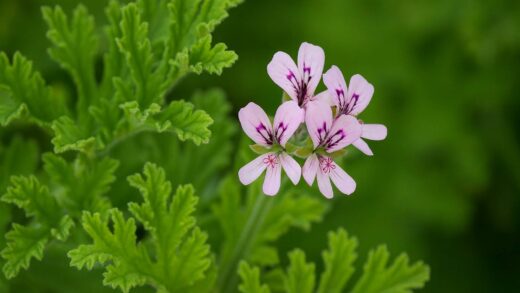
The individual flowers are funnel-shaped and zygomorphic, meaning they have bilateral symmetry (they can be divided into two equal halves by only one plane). Each flower consists of six tepals (undifferentiated petals and sepals) that are fused at the base to form a tube. The colour of the flowers is extremely diverse, ranging from white, yellow, orange, pink, and red to various shades of lavender, purple, and blue, often with contrasting markings in the throat. Many varieties are intensely fragrant, emitting a sweet, often citrus-like scent, which is one of their main attractions.
Variety and Colour Selection
The breeding of freesias has a long history, resulting in an extremely wide range of varieties and colours available to gardeners today. The original wild species, such as Freesia refracta (with white or yellowish-green flowers and a strong fragrance) or Freesia corymbosa, served as the foundation for creating modern hybrids. These hybrids, often referred to as Freesia x hybrida, combine the desirable traits of different parent species, such as larger flower size, a richer colour palette, and longer vase life. Breeders are continually working on developing new varieties that are even more resilient or have a more unique appearance.
More articles on this topic
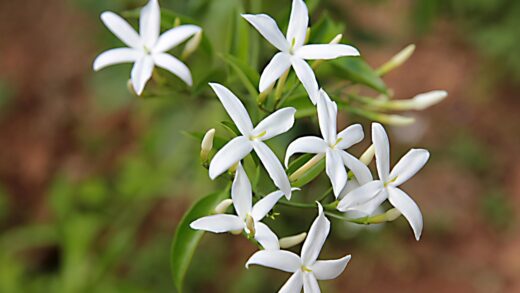
Freesia varieties can be grouped according to several criteria, such as flower colour, flower size, or flower structure. Perhaps the most popular are the classic single-colour varieties, like the snow-white ‘Alba’, the sunny yellow ‘Buttercup’, the fiery red ‘Red Lion’, or the deep purple ‘Blue Heaven’. In addition, there are also bicolour or multicolour varieties where the edges of the petals or the throat area are a different shade, creating an exciting contrast. These more distinctive varieties can lend a unique atmosphere to flower beds or bouquets.
Based on flower structure, we distinguish between single-flowered and double-flowered freesias. Single-flowered ones represent a more natural, graceful appearance, while double-flowered ones, where some of the stamens have transformed into petal-like structures, boast fuller, almost rose-like flower heads. Popular double-flowered varieties include ‘Double White’, ‘Rosalinde’ (pink), or ‘Volante’ (orange). When choosing, it is worth considering the intended use: long-stemmed, large-flowered varieties are ideal as cut flowers, while shorter, more compact-growing ones may be more suitable for pots or borders.
When selecting colours, not only personal taste but also harmony with other plants in the garden can be an important consideration. Warm colours like yellow, orange, and red create a vibrant, cheerful mood, while cooler shades like blue, purple, and white convey a calmer, more elegant atmosphere. By combining freesias of different colours, spectacular and harmonious flower groups can be created. When purchasing, it is advisable to choose healthy corms from reliable sources to ensure successful cultivation and abundant flowering.
Optimal Planting Time and Method
The optimal time for planting freesia corms largely depends on whether they are intended for outdoor or pot cultivation, and on the prevailing climatic conditions. Due to freesias’ sensitivity to frost, the earliest recommended time for outdoor planting in temperate climates is after the last spring frosts have passed, usually from late April to mid-May. If earlier flowering is desired, corms can be pre-sprouted indoors in pots from March, in a frost-free, bright location, and then transplanted outdoors when the weather is favourable. It is important that the soil temperature reaches at least 10-12°C (50-54°F) at the time of planting.
For pot cultivation, the timing can be more flexible, as plants can be more easily protected from adverse weather conditions. For winter or early spring flowering, corms can be planted in autumn, during September-October, and grown in a bright, cool (10-15°C or 50-59°F) location. In this case, flowering can be expected approximately 10-12 weeks after planting. Freesias thrive particularly well in greenhouses or conservatories where temperature and humidity can be better controlled.
The planting process itself requires careful preparation. Freesia corms should be placed in the prepared soil with their pointed end upwards. The planting depth is generally two to three times the height of the corm, which means about 5-7 cm (2-3 inches). If planted too shallowly, the plants may be unstable, while if planted too deeply, they may emerge more slowly and produce weaker flowering. The spacing between individual corms should be at least 5-10 cm (2-4 inches) to provide sufficient room for growth and adequate air circulation.
After planting, water the soil thoroughly but gently, so that the soil around the corms becomes well-moistened to encourage rooting. In the initial period, avoid overwatering, as stagnant water can cause the corms to rot. For outdoor planting, it is advisable to mark the planting location to easily find the plants later and to avoid damaging the emerging shoots during weeding. Proper planting technique lays the foundation for healthy freesia development and abundant flowering.
Preparing and Selecting Suitable Soil
One of the fundamental prerequisites for successful freesia cultivation is providing soil of appropriate quality and structure. These plants prefer well-drained, loose-textured soils rich in nutrients. Overly heavy, clayey soils are not ideal as they tend to retain water, which can lead to corm rot. Conversely, overly sandy soils dry out quickly and cannot adequately retain nutrients, so they also require improvement.
Soil preparation should ideally begin a few weeks before planting. For outdoor planting, the designated area should be dug over or loosened deeply, to at least 20-30 cm (8-12 inches). This improves soil aeration and water permeability. During digging, remove weeds and larger stones. If the soil is too heavy, incorporate well-rotted compost, sand, or perlite to improve its structure. These materials help prevent waterlogging and provide the necessary air for the roots.
To increase the nutrient content of the soil, it is advisable to work in organic matter, such as well-matured farmyard manure or compost, during preparation. Avoid using fresh, uncomposted manure, as it can damage young roots and promote the proliferation of pathogens. Organic matter not only supplies plants with nutrients but also improves the soil’s water-holding capacity and friable structure. Regarding soil pH, freesias prefer a slightly acidic to neutral medium (pH 6.0-7.0).
For pot cultivation, use a good quality, general-purpose potting mix, which can be further improved by adding a little sand or perlite for better drainage. It is important that the pot has drainage holes at the bottom so that excess water can escape freely. A layer of clay pebbles or gravel can also be placed at the bottom of the pot to enhance drainage. Carefully prepared and selected soil provides freesias with optimal growing conditions, contributing to the development of a healthy root system and rich flowering.
Light and Temperature Requirements
Freesias are light-loving plants, meaning they require plenty of sunlight for abundant flowering and healthy development. A minimum of 6 hours of direct sunlight per day is ideal for them. If planted in a shadier location, their stems may become elongated (etiolated), flowering may be sparser, and the flower colour may not be as intense. For freesias grown in pots, choose a sunny windowsill or patio where they will receive sufficient light.
Temperature is also a crucial factor in the freesia life cycle. For corm sprouting and vegetative growth, the optimal daytime temperature is around 18-22°C (64-72°F), while a slightly cooler night temperature of 10-15°C (50-59°F) is ideal. However, for flower induction, meaning the formation of flower buds, a cooler period is necessary, during which the temperature ranges between 8-12°C (46-54°F) for several weeks. This mimics the winter period in their native habitat.
During the flowering period, freesias prefer moderately warm temperatures between 15-20°C (59-68°F). Excessively high temperatures, especially when combined with low humidity, can shorten the flowering time and lead to faster wilting of the flowers. Avoid keeping plants in draughty locations or subjecting them to sudden temperature fluctuations, as these can cause stress to the plant. Balanced temperature conditions contribute to the longevity of the flowers and the intensity of their fragrance.
At the end of the growing season, after the leaves have yellowed and withered, the corms enter a dormant state. During this period, the corms require warm, dry conditions for proper ripening and preparation for the next season. This cyclical pattern of alternating cooler and warmer periods is essential for successfully flowering freesias year after year. Therefore, accurate knowledge and provision of light and temperature requirements are of fundamental importance in growing these wonderful flowers.
Watering and Humidity
Freesias’ water requirements vary depending on the plant’s developmental stage, so watering should always be adjusted to current needs. After planting and until sprouting, water the corms only moderately to prevent rot. Once the first shoots appear and growth begins, gradually increase the amount of water. They require the most intensive water supply during the period before and during flowering, when the soil should be kept consistently slightly moist.
It is important that the top layer of soil is allowed to dry out slightly between waterings to avoid waterlogging, which can lead to root suffocation and fungal diseases. For watering, preferably use room-temperature, soft water, such as rainwater or tap water that has been left to stand. Watering in the early morning hours is most ideal, as this allows the leaves to dry during the day, reducing the risk of fungal infections. When watering, try to direct the water straight onto the soil, avoiding wetting the leaves and flowers.
Freesias prefer a moderately humid environment, especially during the flowering period. Low humidity, particularly in heated rooms, can lead to faster wilting of flowers and drying of buds. Several methods can be used to increase air humidity. For pot-grown plants, the pot can be placed on a tray filled with water and pebbles, ensuring the bottom of the pot does not sit directly in the water. Misting the leaves can also help, but this should be done carefully, with a fine spray, and avoiding misting the flowers.
After flowering has finished and the leaves begin to yellow and wither, gradually reduce watering. At this stage, the plant is drawing nutrients back into the corm and preparing for the dormant period. Allow the soil to dry out completely before lifting the corms. Proper watering and humidity control practices are essential for the healthy development of freesias, abundant flowering, and the preparation of corms for the next season.
Nutrient Supply and Fertilisation
Freesias, especially modern large-flowered hybrids, are nutrient-demanding plants, so a regular and balanced supply of nutrients is essential for abundant flowering and strong, healthy growth. It is important to establish an adequate nutrient level in the soil right from planting. As mentioned earlier, incorporating well-rotted organic manure or compost during soil preparation before planting provides an excellent foundation. This organic matter decomposes slowly, gradually supplying the plant with the necessary nutrients.
During the growing season, starting from the emergence of shoots, regular supplementary fertilisation is required. Initially, during the growth phase, a balanced general-purpose fertiliser with a higher nitrogen content is recommended to promote the development of strong foliage and stems. Later, during bud formation, switch to a bloom-boosting liquid fertiliser with a higher phosphorus and potassium content. Phosphorus is crucial for flower and root formation, while potassium strengthens the plant’s resistance and improves flower quality.
Liquid fertilisation is usually carried out every two to three weeks, according to the manufacturer’s instructions for the product used. It is important not to exceed the recommended dosage, as over-fertilisation can damage the roots and upset the plant’s nutrient balance. Always apply liquid fertiliser to moist soil to avoid root burn. During flowering, moderate nutrient supplementation can be continued to ensure the plant has enough energy for flower development and corm growth.
After flowering, when the leaves begin to yellow, stop applying nutrients, as the plant is then preparing for its dormant period. Adequate and balanced nutrient supply during the growing season not only influences the current season’s flowering but also contributes to the corms storing enough nutrients for successful sprouting and flowering the following year. Pay attention to the plant’s signals, such as yellowing leaves or weak growth, which may indicate a nutrient deficiency, and adjust fertilisation practices if necessary.
Promoting Flowering and Flower Care
Promoting rich and long-lasting freesia flowering requires the harmony of several factors. As previously discussed, appropriate light and temperature conditions, balanced watering, and nutrient supply are fundamental. Particularly crucial is ensuring the cooler period necessary for flower induction, after which the plants form flower buds. Furthermore, regular inspection of plants and early treatment of any emerging diseases or pests also contribute to maximising flowering potential.
When freesias develop flower stalks, ensure that the plants receive adequate support, especially for taller-growing, large-flowered varieties. The thin, slender stems can easily bend or break under the weight of the flowers. Thin bamboo stakes or special plant supports can be used, to which the stems are carefully tied. This not only protects the integrity of the flowers but also gives a more aesthetically pleasing appearance to the plant group.
Cutting flowers for a vase is also an important part of care, and a few practices can extend their lifespan. Freesias should ideally be cut when the bottom one or two flowers on the spike have opened, and the rest are still in bud. Use a sharp knife or scissors and cut in the early morning or late evening when the plants are turgid (full of water). Immediately place the cut stems in lukewarm water and re-cut the stem ends at an angle to increase the water uptake surface.
Change the water in the vase for freesias daily or every other day, and each time, trim a small piece off the stem ends. Using a special cut flower food solution can also significantly prolong the life and freshness of the flowers. Avoid placing vases in direct sunlight or near heat sources, as well as near ripening fruit, as ethylene gas accelerates wilting. Properly cared-for cut freesias can adorn a home with their wonderful fragrance and colours for as long as one to one-and-a-half weeks.
Protection Against Diseases and Pests
Although freesias are relatively resilient plants, certain diseases and pests can occasionally attack them, especially if growing conditions are not optimal. Prevention is always the best defence strategy. This includes purchasing healthy corms from verified sources, practising crop rotation where possible, ensuring well-drained soil, and avoiding overcrowding, which promotes good air circulation among plants.
Among the most common fungal diseases are Fusarium corm rot (Fusarium oxysporum), which causes decay of corms and roots, and grey mould (Botrytis cinerea), which mainly attacks flowers and leaves in damp, cool weather. Fusarium can be controlled by removing infected corms and replacing the soil, or by treating corms with a fungicide before planting. Grey mould can be prevented by keeping plants dry, ensuring good ventilation, and immediately removing infected plant parts. In severe infections, fungicide spraying may also be necessary.
Among pests, aphids, spider mites, and thrips can cause problems. Aphids suck sap from young shoots and leaves, causing distortion and producing honeydew, which attracts ants and promotes sooty mould growth. Spider mites thrive in dry, warm conditions, forming fine webs on the undersides of leaves and causing yellowing and leaf drop through their feeding. Thrips are small, flying insects that damage flowers and leaves, leaving behind silvery patches and distortions.
In the case of mild pest infestations, biological control methods can be attempted, such as introducing ladybirds to control aphids, or washing off infected parts with a jet of water. In more persistent cases, the application of insecticides may become necessary, but always proceed with caution, following the instructions for use. Regular inspection is important to detect and treat problems as early as possible, thereby minimising damage and ensuring the healthy development of your freesias.
Overwintering and Storing Corms
Since freesias originate from South Africa and are frost-sensitive, in temperate climates, their corms must be lifted in autumn and overwintered in a frost-free location. The time for lifting the corms arrives when the plant’s leaves have yellowed and withered, which usually occurs 6-8 weeks after flowering. This signals that the corms have matured and are ready for their dormant period. Carefully dig up the corms from the soil, taking care not to damage them.
Remove soil remnants and dried plant parts from the lifted corms. Allow them to dry for a few days in a well-ventilated, warm, shady place. This drying process helps prevent rot during storage. From the completely dried corms, carefully separate the old, withered parent corm and any small cormels (offsets) that may have formed, which can later be used for propagation. Only store healthy, intact, firm corms.
Cleaned and dried freesia corms can be stored in paper bags, mesh bags, or in a single layer on trays, surrounded by dry peat moss, sawdust, or vermiculite. The storage medium helps maintain the corms’ moisture content and protects them from physical damage. The storage location should be dark, dry, cool, but frost-free. The ideal storage temperature is between 12-15°C (54-59°F). In a warmer place, corms may sprout prematurely, while too cold temperatures can damage them.
During storage, regularly inspect the corms, at least once a month, and remove any that have become mouldy or soft to prevent the spread of infection. Properly overwintered corms can be replanted in spring and will once again delight with beautiful flowers. Careful overwintering is crucial for successfully growing freesias year after year, allowing favourite varieties to be preserved for many years.
Propagation Methods
Freesias can be propagated in several ways, but most commonly they are multiplied by cormels (small offset corms) or by seed. Both methods have their own advantages and disadvantages, as well as specific techniques that are worth knowing if one wishes to expand their freesia collection or try new varieties. The most common and simplest method is propagation by cormels, which results in exact replicas of the parent plant.
Cormels, also known as daughter corms, form on the side of the parent corm, at its base, during the growing season. These can be separated from the parent corm when lifting and cleaning the corms. Only use healthy, well-developed cormels for further propagation. Smaller cormels usually flower only in the second or third year, while larger ones may flower as early as the following season. Cormels should be stored and planted in the same way as mature corms.
Propagating freesias from seed is a longer process that requires more patience, but it offers the opportunity to create new plants with unique characteristics, especially if using seeds from one’s own crosses. Seeds can be sown in spring or autumn in a well-drained, loose sowing medium. Seed germination requires a warm (approx. 20-22°C or 68-72°F) and moist environment. Germination usually takes 3-6 weeks. Young seedlings should be cared for carefully, ensuring they receive adequate light and moisture.
Freesias grown from seed typically reach flowering size only in the second or third year. In the first year, they develop small corms, which should be lifted at the end of the season and replanted the following spring. Although this method is more time-consuming, it is an excellent opportunity for experimentally-minded gardeners. It is important to note that offspring grown from the seeds of hybrid varieties do not necessarily inherit all the characteristics of the parent plants, so the outcome can hold surprises. Whether trying with cormels or by sowing seeds, successful propagation always brings great joy to plant lovers.