The glaucous cotoneaster, scientifically known as Cotoneaster glaucophyllus, is an exceptionally versatile and decorative shrub originating from the mountainous regions of East Asia. It is particularly favoured by gardeners and landscape architects due to its low maintenance requirements, dense, arching branch structure, and year-round ornamental value. It is excellently suited for use as a ground cover, for stabilising slopes, as a low hedge, or even as a standalone specimen plant, lending a spectacular appearance to any garden. Thanks to its robust nature and good drought tolerance, it is also an ideal choice for novice gardeners, as it generously rewards even minimal care.
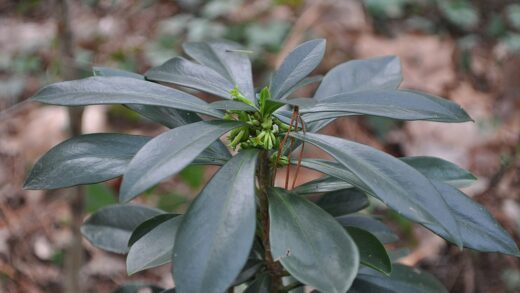
From a botanical perspective, the glaucous cotoneaster belongs to the rose family and is a semi-evergreen or evergreen shrub, retaining its foliage depending on the climatic conditions. Its most prominent feature is the glaucous, bluish-green or greyish-green colour of its leaves, from which it gets its name; “glaucophyllus” means blue-green leaved in Latin. In late spring or early summer, it produces clusters of small white flowers which, though not ostentatious, appear in large numbers and attract pollinating insects. However, the real spectacle is its bright red berries that ripen in autumn and remain on the bush through winter, providing not only aesthetic value but also an important food source for birds during the cold months.
In terms of soil requirements, the glaucous cotoneaster is extremely tolerant, thriving in almost any type of soil, from sandy to clay. The most crucial aspect is ensuring proper drainage, as waterlogged conditions, especially during the winter, can lead to root rot. To prevent this, it is advisable to amend heavy, compacted soils with organic matter such as compost or well-rotted manure at the time of planting. The ideal soil pH ranges from slightly acidic to slightly alkaline (pH 6.0-7.5), but the plant adapts without issue to most garden soils.
Its light and climate requirements are also flexible, which further increases its popularity in gardens with varying conditions. It performs best in full sun, where the most abundant flowering and fruit production can be expected, but it also tolerates partial shade well. However, deep shade should be avoided, as the plant will become leggy, its foliage will thin out, and its ornamental value will significantly decrease. Its frost hardiness is good, generally surviving temperate winters without damage, making it a safe choice for planting in most regions. Once established, it is highly resistant to drought, an increasingly important trait in the era of climate change.
The professional steps of planting
Choosing the optimal planting time is crucial for the successful establishment and future development of the plant. The most ideal period for planting is in autumn, in the weeks before the frosts set in, and in early spring, before budding begins. The advantage of autumn planting is that the soil is still sufficiently warm, allowing the plant time to develop its root system before winter, enabling it to start growing with full energy in the spring. Spring planting is also a good choice, but it requires regular watering during the summer heat. While container-grown plants can theoretically be planted year-round, planting in the heat of summer carries increased risk and requires more intensive care.
More articles on this topic
During planting preparation, the first and most important step is selecting the right location and preparing the soil. Thoroughly clear the designated area of weeds, stones, and other debris, then dig the soil to a depth of at least 30-40 centimetres to loosen its structure. If the soil is overly compacted or clay-like, it is highly recommended to incorporate organic materials such as compost, well-rotted manure, or peat, which will improve the soil’s water management and aeration. This step ensures an optimal environment for root growth and nutrient uptake in the long term.
The planting process itself also requires precision. The planting hole should be at least twice as wide as the plant’s root ball, but no deeper. Carefully remove the plant from its container, and if the roots are tightly coiled, gently tease them apart to encourage new growth in different directions. Place the plant in the centre of the hole so that the top of the root ball is level with the surrounding soil; planting too deep can lead to collar rot. Backfill the hole with the excavated and, if necessary, amended soil, gently firming it around the roots to eliminate air pockets.
The first and most important element of post-planting care is a thorough, abundant watering. This not only satisfies the plant’s water needs but also helps the soil particles settle around the roots, eliminating air pockets. After watering, it is extremely beneficial to spread a 5-7 centimetre thick layer of mulch (such as pine bark, wood chips, or compost) around the base of the plant, keeping it a few centimetres away from the stem. Mulch helps retain soil moisture, inhibits weed growth, and protects the root zone from extreme temperature fluctuations. During the first growing season, ensure regular watering, especially during dry, drought-prone weeks.
Methods of vegetative propagation
Vegetative propagation is the most common and effective method for the glaucous cotoneaster, as it guarantees that the offspring will be identical to the parent plant in all their characteristics. This is particularly important when wishing to preserve the specific traits of a particular cultivar, such as leaf colour or growth habit. The two most commonly used procedures are semi-hardwood cuttings and hardwood cuttings, which differ in their timing and the maturity of the plant parts used, but both promise a high success rate with the correct technique. These methods allow for the production of a large number of vigorous new plants in a relatively short time.
More articles on this topic
The ideal time for taking semi-hardwood cuttings is from mid-summer to early autumn, when the current year’s shoots are sufficiently mature but not yet fully woody. Cut 10-15 centimetre long shoot tips from a healthy, vigorous parent plant using sharp and sterile pruning shears or a knife. Make the cut just below a leaf node, at a slight angle, to increase the rooting surface. Remove the leaves from the lower part of the cutting, leaving only the top 2-3 leaves to reduce transpiration. To increase the chances of rooting, the base of the cuttings can be dipped in rooting hormone powder or gel.
Hardwood cuttings are taken during the plant’s dormant season, from late autumn to late winter. For this, fully woody, pencil-thick stems from the previous growing season are used. Cut 15-25 centimetre long sections, ensuring that both the top and bottom cuts are near a bud. It is important to pay attention to the polarity of the cuttings, i.e., the direction of growth; to distinguish them, make the top cut straight and the bottom one slanted. To encourage rooting, you can make one or two shallow, longitudinal wounds on the bark at the base with a knife (a technique known as wounding).
The cuttings are rooted in a loose, well-draining medium, ideally a mixture of peat and perlite, or sand and compost. Insert the cuttings into the medium to about two-thirds of their length, then gently firm the soil around them. High humidity is essential for rooting, so cover the pot or tray with a transparent plastic bag or place it in a propagator. During the rooting period, keep the medium consistently moist but not waterlogged, and provide a bright location protected from direct sunlight. Once rooted, the cuttings can be transplanted into larger pots or their final location the following spring.
Generative propagation and care of young plants
Generative, or seed, propagation is also a possible route for the glaucous cotoneaster, but this method is considerably more time-consuming and complicated than vegetative procedures. The seeds of the Cotoneaster genus have a double dormancy, meaning that for germination to occur, both the physical barrier of the seed coat and the chemical germination inhibitors within it must be broken down. This requires patience and precise pre-treatment, and it is important to know that plants grown from seed may exhibit some genetic variation, meaning they will not necessarily be exact replicas of the parent plant.
To promote seed germination, a stratification process is needed, which mimics natural winter conditions. The process begins with a warm-moist treatment: mix the cleaned seeds with moist sand or peat and keep them at a temperature of about 20-25 degrees Celsius for two to three months. This is followed by a cold-moist period; place the seed mixture in a refrigerator (at about 4 degrees Celsius) for another three to four months. This alternating temperature treatment helps to break down germination inhibitors, soften the seed coat, and prepare the embryo for sprouting.
After the stratification process is complete, sowing can take place in early spring. Use a sterile, well-draining seedling mix, filling propagation trays or pots with it. Sprinkle the seeds evenly over the surface of the soil, then cover them with a thin layer of soil or sand, about half a centimetre thick. After sowing, gently water the medium and continue to keep it consistently moist, but avoid overwatering. Germination can be slow and erratic even with careful pre-treatment, so be patient; the appearance of the first shoots may take weeks or even months.
Once the small seedlings have developed their first true leaves and reached a manageable size, they should be carefully pricked out into individual small pots. At this stage, the young plants need a bright location protected from scorching sun, as well as regular but moderate watering. Overwatering can lead to the development of a fungal disease called damping-off. In the first year, stimulate their growth with only a very weak, diluted liquid fertiliser. Before planting them out in their permanent location the following year, gradually acclimate them to outdoor conditions, a process known as hardening off.