The Hosta, also known by its botanical name Hosta, is one of the most beloved and versatile perennial plants in gardens, having justly earned its recognition among garden enthusiasts. It not only adorns with its stunning foliage, which ranges from blue-green to chartreuse and variegated patterns, but also with its relative hardiness and shade-tolerant nature. This plant is a perfect choice for those corners of the garden where other ornamental plants would not thrive due to a lack of light. Its care does not require complex horticultural knowledge, but by following a few basic rules, we can ensure that our plants grow healthily and vigorously year after year, decorating shady garden areas in their full splendor.
The enduring popularity of Hostas is primarily due to their incredible variety in form and color. There are very small, dwarf varieties that look great in rock gardens or containers, as well as huge, dramatic specimens that can exceed a meter in diameter. The texture of the leaves can also be diverse, ranging from smooth and glossy surfaces to ribbed, waxy, or even wavy-edged leaves. This diversity allows us to create creative compositions, playing with different colors, shapes, and textures to create a dynamic and visually appealing shade garden.
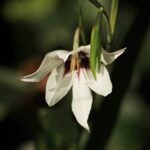
Although the Hosta is primarily grown for its foliage, its summer flowers also contribute to the beauty of the garden. The bell-shaped flowers, which develop on tall stalks, are typically lavender or white, and while not as conspicuous as the leaves, they lend an elegant and delicate appearance to the plant. The flowers of some varieties can also be slightly fragrant, which further enhances the plant’s appeal. After flowering, removing the flower stalks is recommended for both aesthetic and plant health reasons, so that the plant directs its energy towards developing its root system and leaves rather than seed production.
The history of the Hosta dates back to Asia, where they live in their natural habitat in wooded, humid areas. They were introduced to Europe at the end of the 18th century and have since been a favorite tool of garden designers and hobby gardeners for enlivening shady areas. Thanks to the work of breeders, there are now thousands of registered Hosta varieties, and this number is growing every year. This extraordinary genetic diversity ensures that everyone can find the Hosta that best suits their garden and taste, whether it’s a modern, minimalist, or lush, naturalistic garden.
Choosing the right planting location
The ideal location for a Hosta is a garden area with filtered light, partial shade, or full shade. Although they prefer the shade as their name suggests, only the dark green-leaved varieties can fully tolerate deep shade, such as under the dense canopy of trees or on the north side of buildings. The lighter, yellowish, or variegated-leaved varieties require some morning or late afternoon sun for their leaf colors to become truly vibrant and contrasting. However, the scorching midday sun should be avoided for all varieties, as it can burn the leaves, appearing as brown, dry spots and significantly detracting from the plant’s aesthetic value.
More articles on this topic
Soil quality is crucial for the healthy development of Hostas. The best soil for them is well-draining, rich in humus and nutrients, and has a slightly acidic to neutral pH (6.5-7.5). Before planting, it is advisable to improve the soil with organic matter, such as mature compost or high-quality potting soil. This not only provides the necessary nutrients but also improves the soil structure and water-retention capacity, which is particularly important during the hot summer months. Waterlogged, clayey, or overly sandy soils should be avoided, as the former can lead to root rot, and the latter to rapid drying out.
When choosing a planting location, you must also consider the final size of the plant. A tiny, few-centimeter-tall plant can develop into a huge clump, sometimes over a meter and a half in diameter, over the years. Study the label of the chosen variety and leave enough space for growth so that the plants do not crowd each other and their leaves can unfold to their full beauty. Proper spacing also ensures air circulation between the plants, which helps prevent the development of fungal diseases, especially during humid, wet periods.
The microclimate can also be an important factor. Hostas appreciate a location sheltered from the wind, as strong, drying winds can damage the large-surfaced leaves, causing tears and browning of the leaf edges. A wall, a hedge, or a group of larger shrubs can provide ideal protection against the wind. When placing the plants, consider the garden’s features and look for protected nooks where the air humidity is naturally higher, thus mimicking the Hosta’s natural forest habitat.
Tricks of planting and propagation
The best time to plant Hostas is in the spring, after the frosts have passed, or in early autumn. The advantage of spring planting is that the plant has the entire season to establish a strong root system before winter sets in. With autumn planting, the soil is still warm enough for rooting, and by the following spring, you can expect a vigorous, well-developed plant. Container-grown plants can be planted practically any time during the frost-free period, but planting in the summer heat requires increased attention and abundant watering.
More articles on this topic
Before starting to plant, improve the soil with compost or other organic matter as mentioned earlier. The planting hole should be at least twice as wide as the plant’s root ball and slightly deeper. Place the plant in the center of the hole so that the crown (where the roots and shoots meet) is level with the soil surface. Planting too deep can lead to crown rot, while planting too shallow can cause the roots to dry out. Fill the hole back with the improved soil, lightly tamp it down, and then water it thoroughly.
Hostas are most commonly propagated by division, which is a simple and effective method. The ideal time for this is early spring, when the shoots have just emerged from the ground (these are also called “pips”), or in early autumn. Using a garden fork, carefully lift the entire plant out of the ground, taking care not to damage the roots. Shake off the excess soil to make the root system and the structure of the crowns clearly visible. Using a sharp knife or spade, divide the clump into smaller sections, ensuring that each section has sufficient roots and at least one or two strong buds or shoots.
Plant the newly obtained plants immediately in their prepared locations as described previously. Division not only serves propagation but is also excellent for rejuvenating overly dense, old clumps. If you notice that the center of your Hosta clump has started to die out or the leaf size is decreasing, it is a sign that the plant needs renewal. Regular division every 4-5 years ensures that your plants remain vigorous and healthy, and continuously show their best form.
Watering and nutrient supply guide
Hostas require consistently moist, but not waterlogged, soil for their best development. Their water needs are greatly influenced by the planting location, soil type, and current weather conditions. Plants exposed to more sunlight, as well as those in sandier soil, require more frequent watering. The basic rule of watering is to water less frequently but deeply and thoroughly, rather than just moistening the soil surface daily. This encourages the plant to grow its roots deeper, making it more resistant to drier periods.
It is best to water in the early morning, applying the water directly to the soil and avoiding wetting the leaves. Water remaining on the leaves can cause scorching in the sun, and on humid, warm evenings, it can promote the spread of fungal diseases such as powdery mildew or anthracnose. Signs of overwatering can include yellowing, wilting foliage and root rot, while water deficiency is indicated by wilted, dry-edged leaves. Covering the soil with a 5-7 cm thick layer of mulch (e.g., pine bark, compost) helps retain soil moisture, suppresses weeds, and keeps the root zone cool.
Hostas are not particularly nutrient-hungry plants, but they appreciate regular, balanced nutrient supplementation. In the spring, at the beginning of the growing season, it is advisable to apply a dose of slow-release, balanced NPK (nitrogen-phosphorus-potassium) fertilizer, or even better, organic fertilizer such as mature compost, around the base of the plants. Nitrogen promotes foliage growth, phosphorus aids root and flower formation, and potassium supports overall resilience. Avoid excessive nitrogen application, as it can result in overly lush, soft foliage that is more susceptible to diseases and pests.
During the season, if the plant’s growth seems slow or the leaves appear pale, you can occasionally give it a liquid, water-soluble fertilizer mixed with the irrigation water, but do this no later than mid-summer. Late summer or autumn fertilization should be avoided, as it can trigger new shoot growth that would not have time to mature before winter and could thus easily be damaged by frost. The best solution is always the regular enrichment of the soil with organic matter, which provides the necessary nutrients and proper soil life for the plant in the long term.
Pest and disease control
Perhaps the most significant and annoying pests of Hostas are slugs and snails. These nocturnal creatures are particularly fond of the plant’s fleshy leaves and can cause significant aesthetic damage by chewing irregular holes in them, especially on thinner-leaved varieties. The basis of control is prevention: keep the area around the plants clean, and remove fallen leaves and other plant debris that provide hiding places. One method of physical control is to manually collect the slugs and snails in the early morning or evening hours, or to set traps, such as containers filled with beer.
There are numerous environmentally friendly methods to deter slugs. Spreading sharp sand, crushed eggshells, or coffee grounds around the plants creates a physical barrier for them. The use of iron phosphate-based slug pellets is also an effective solution, which is less harmful to pets and beneficial organisms like birds and hedgehogs than traditional, metaldehyde-containing products. Thicker, waxier-leaved varieties, such as ‘Sum and Substance’ or blue-leaved varieties (‘Elegans’, ‘Halcyon’), are generally more resistant to slug damage.
Although less common, other pests such as aphids or spider mites can also appear, especially during dry, warm periods. Rinsing the leaves with a strong jet of water is usually sufficient to control them, or in more severe cases, applying biological pesticides such as potassium soap or neem oil spray. The most dreaded disease is Hosta Virus X (HVX), an incurable viral infection that causes distorted, mottled leaves with a “bleeding” pattern along the veins. HVX is spread by infected plant sap, for example, through contaminated pruning shears or during division, so the diseased plant must be immediately removed and destroyed (not composted!), and the tools must be thoroughly disinfected.
Fungal diseases, such as anthracnose (irregular brown spots with dark borders on the leaves) or leaf spots, can be prevented by maintaining proper planting distances, keeping the leaves dry (watering at the soil level), and ensuring good air circulation. Remove and destroy infected leaves to prevent further spread. In severe infections, the use of copper-based fungicides may be warranted. However, healthy, well-conditioned plants are generally much more resistant to diseases and pests.
Pruning and seasonal care
Pruning Hostas is a relatively simple task and primarily serves aesthetic and plant hygiene purposes. After the summer flowering, it is advisable to cut the flower stalks at the base as soon as the flowers have withered. This prevents the plant from expending energy on unnecessary seed production, which it can then direct towards strengthening its root system and foliage for the next season. This practice helps maintain the plant’s compact, tidy form and keeps the focus on the decorative leaves, which are the main attraction of Hostas.
As autumn arrives, after the first serious frosts, the leaves of the Hosta begin to turn yellow and then die back. At this stage, we have two options. One is to cut the yellowed, dried leaves at ground level and remove them from the garden. This method helps prevent decaying leaves from providing shelter for pests, such as slug eggs, and reduces the chance of fungal diseases overwintering. A clean bed provides a tidy appearance during the winter months and facilitates spring tasks.
The other approach is to leave the leaves on the plant throughout the winter. The dead foliage acts as a natural cover, a mulch, protecting the plant’s crown from winter frosts and temperature fluctuations. This more natural method can be particularly useful in colder climates or for newly planted, not yet fully established plants. However, in the spring, before the new shoots appear, it is essential to remove the old, rotted leaf remains to make way for new growth and prevent the development of diseases.
Spring care includes the careful removal of the winter cover (whether it’s the plant’s own foliage or an extra layer of mulch) as soon as the new shoots, the characteristic “pips,” begin to emerge from the ground. This moment is ideal for loosening the soil around the base of the plant and applying a dose of compost or slow-release fertilizer, which gives a boost to seasonal growth. During the spring cleanup, check the plant for early signs of pests or diseases, so you can intervene in time, ensuring healthy and spectacular development throughout the growing season.
Companion planting with Hostas
Thanks to their versatility, Hostas can be excellently paired with other shade-loving plants, allowing for the creation of compositions with varied textures, shapes, and colors. Their large, rounded or heart-shaped leaves create a wonderful contrast with plants that have finer, lacier foliage. Classic and proven companion plants are ferns, whose airy appearance perfectly complements the more robust form of Hostas. Different fern species, such as the lady fern (Athyrium) or the ostrich fern (Matteuccia), add height and fine texture to the planting.
Another great partner is Astilbe, whose feathery, colorful flower plumes bring vibrant colors to the shade bed during the summer, while its fern-like foliage also contrasts well with the Hosta. Coral bells (Heuchera) varieties, especially those with burgundy, purple, orange, or silvery leaves, can create dramatic color spots next to the green and blue tones of the Hostas. The difference in leaf shape between the two plants—the rounded Hosta leaves and the lobed Heuchera leaves—further enriches the visual experience.
Ground cover plants, such as lesser periwinkle (Vinca minor), spotted dead-nettle (Lamium maculatum), or Japanese spurge (Pachysandra terminalis), are excellent for filling the spaces between Hostas. These plants help suppress weeds, retain soil moisture, and form a uniform green carpet from which the Hostas can emerge as focal points. Bulbous plants, such as Siberian squill (Scilla), glory-of-the-snow (Chionodoxa), or daffodils, provide color in early spring before the Hostas have developed their full foliage.
Hostas are extremely attractive not only in beds but also as container plants, especially the small or medium-sized varieties. You can plant several different varieties together in a larger pot, playing with leaf colors and shapes. When grown in containers, they are easier to protect from slugs, and you can precisely control the soil quality and water supply. A well-composed Hosta arrangement can create an elegant and lush oasis on a shady terrace or balcony.