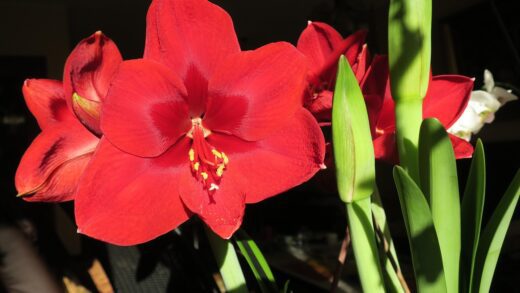
The oleander is an incredibly grateful plant that, with proper care, rewards us with a spectacular display of flowers. It is not considered a particularly demanding plant in terms of nutrients, but during the growing season, especially in the intense flowering phase, it needs a substantial amount of nutrients for continuous and abundant blooming. The secret to successful oleander cultivation lies in a balanced nutrient supply, which not only affects the number and size of the flowers but also the plant’s health and resilience. Timely and correctly proportioned fertilization is crucial. Both excessive and deficient nutrient supply can be harmful, so it’s important to be aware of the plant’s needs.
The macro- and microelement needs of oleander
The oleander, like all plants, relies on three main macronutrients: nitrogen (N), phosphorus (P), and potassium (K) for growth and flowering. Nitrogen is responsible for the growth of green mass and the lush, healthy appearance of the foliage, while phosphorus supports root system development and flower formation. The role of potassium is crucial for increasing the plant’s general resilience, stem strength, and the intensity of flower colors. The right ratio of these elements is essential for harmonious development, so it is worth choosing a fertilizer that contains them in a balanced proportion. During the vegetative growth stage in spring, a dominance of nitrogen helps with shoot development.
Microelements, though needed in smaller quantities, are also indispensable for the healthy development of oleander. Iron, magnesium, boron, copper, manganese, and zinc all play important roles in plant metabolic processes. Iron, for example, is essential for chlorophyll formation; its deficiency can cause yellowing of the leaves, a condition known as chlorosis. Magnesium also participates in chlorophyll synthesis and photosynthesis. The deficiency of microelements is often indicated by leaf discoloration and deformation, so pay attention to the plant’s subtle signs. Many complex fertilizers also contain the necessary microelements, so choosing the right product can prevent deficiency symptoms from developing.
The soil’s pH value also greatly affects the availability of nutrients. The oleander prefers neutral to slightly alkaline soil, ideally with a pH value between 6.5 and 8.0. In acidic soil, the absorption of iron and other microelements can be impaired, leading to nutrient deficiencies. It’s worth checking the soil’s pH at least once a year and intervening if necessary. Liming can help correct the pH of acidic soil, but this should be done with caution.
In its natural habitat in the Mediterranean, the oleander lives in nutrient-rich but well-draining soils. It is worth imitating this environment when growing it in a container. The use of a suitable, nutrient-rich potting mix is essential, but due to the limited living space for the roots, nutrients will eventually become depleted. Therefore, regular nutrient replenishment is indispensable. Fertilizing with a liquid feed is the best method to ensure a continuous supply of nutrients to the root zone.
More articles on this topic
Timing and frequency of fertilization
Fertilization of the oleander should be timed to its active growing season. It’s best to start nutrient replenishment with the plant’s spring awakening, typically in late March or early April, after the last frosts. At this time, the plant begins to develop shoots and leaves, and it needs a generous supply of nitrogen for this. In the initial stage, it’s advisable to use a fertilizer with a balanced NPK ratio to ensure the plant develops harmoniously. Spring fertilization lays the groundwork for abundant flowering throughout the season.
During the summer months, at the peak of the flowering season, the oleander’s nutrient demand is at its highest. During this period, it’s a good idea to fertilize weekly, or at least every two weeks. At this point, it’s recommended to increase the proportion of potassium and phosphorus at the expense of nitrogen. A higher potassium content aids in flower formation, the intensity of their color, and the plant’s resilience. It is important not to let the plant dry out before fertilizing, as concentrated fertilizer poured onto dry roots can cause root burn.
In the autumn, as temperatures drop and the plant prepares for winter, the frequency and amount of fertilization should be gradually reduced. From September onwards, fertilize only once a month, and by the end of October, stop nutrient replenishment completely. Late autumn and winter fertilization is not recommended because it unnecessarily stimulates growth, making the plant more susceptible to frost and winter diseases. By stopping nutrient replenishment, we help the plant prepare for its dormant period.
Always follow the manufacturer’s recommended dosage when fertilizing. The “more is better” principle does not apply to plants; over-fertilization can severely damage the plant and even lead to root death. Excessive nutrient concentration disrupts the plant’s water uptake and causes nutrient imbalance issues. It’s best to use a slightly more diluted solution than recommended and apply it more frequently. This method is both safer and more effective.
More articles on this topic
Methods of fertilization and suitable products
For oleander, the best method is liquid fertilization with a water-dilutable feed. This form allows for quick and efficient absorption of nutrients through the roots. During the flowering season, it’s recommended to use special oleander fertilizers with a high potassium content. These products are specifically tailored to the needs of flowering plants and contain the necessary macro- and microelements for abundant blooming. Always pour the liquid fertilizer onto moist soil after the plant has been watered.
Slow-release fertilizers in granular or stick form can also be used, especially at the beginning of the active growing season. These products dissolve gradually in the soil, providing a long-lasting nutrient supply. The granules should be mixed into the top layer of the soil, and the sticks should be inserted near the roots. While convenient, they do not fully replace fast-acting liquid fertilization, especially during the summer peak season. A combination of both methods is also possible if the oleander is showing very intensive growth.
Organic fertilization can also be an option, but it should be used with caution. Well-composted manure or aged compost can be an excellent source of nutrients, but an excessive amount can upset the soil’s balance and be harmful to the roots. It’s best to mix organic fertilizer into the soil during planting or repotting. Organic fertilizers generally act more slowly and do not provide nutrients as quickly as chemical fertilizers, so they do not replace summer liquid feeding.
The oleander likes calcareous soil, so tap water, which is usually hard and limy, does not pose a problem. In fact, it can even be beneficial in some cases. However, it’s a good idea to avoid using chlorinated water or let the water stand before watering so that the chlorine evaporates. During fertilization, it’s also worth paying attention to the water quality; water that is too cold or too hot can cause stress to the plant. Lukewarm, room-temperature water is the most ideal.
Signs of over-fertilization and nutrient deficiency
One of the most common signs of over-fertilization is root burn. Symptoms include browning and death of the leaves, which often starts at the leaf tips. White, crystalline deposits on the soil surface can also indicate an excessive buildup of salts, which is a clear sign of over-dosing. In such a case, the plant should be thoroughly flushed with clean water to dissolve the excess salts from the soil. In more severe cases, repotting the plant into fresh, nutrient-free soil may be necessary.
Signs of nutrient deficiency often appear on the leaves. Nitrogen deficiency is the most common; in this case, the plant’s leaves turn uniformly yellow, especially the lower, older leaves. This phenomenon is a form of chlorosis caused by the plant withdrawing mobile nutrients for the benefit of younger shoots. In case of phosphorus deficiency, the leaves may become dark green with a purplish tint, and flowering is also weaker. Potassium deficiency is indicated by browning and drying of the leaf edges and weaker, wilting stems.
The signs of microelement deficiencies are also characteristic. Iron deficiency is the most common microelement problem; in this case, new, young leaves turn yellow, but their veins remain green. This phenomenon is called interveinal chlorosis. Magnesium deficiency causes similar symptoms, but here the yellowing starts on the inner part of the leaf. Boron deficiency can lead to the death of shoot tips. Identifying nutrient deficiencies and providing the right correction is key to maintaining the health of the oleander.
If you notice deficiency symptoms on the plant, it’s important not to panic. First, check whether fertilization was done on time and in the right amount. If you suspect a deficiency, choose a balanced, complex liquid fertilizer that also contains the necessary microelements. If the problem is related to the soil’s pH, adjusting the soil’s acidity might be the solution. In the care of oleander, observation and quick reaction are the most important things.